I've heard it said that the only time people in the countryside lock their cars is during zucchini season. Otherwise, they run the risk of returning to find their vehicle stuffed to the brim with enormous summer squashes by some desperate neighbor who was drowning in green giants...
If you've got zucchini coming out of your ears and you're starting to eye your neighbors' cars, relax, I've got you covered!
Summer squash are so tasty and so versatile that there's no end to the recipes. But since there is only so much of MY time available these days, I'm limiting it to
10 16 to start. The first eight are from my blog but I've rounded the selection out by including eight more that have caught my eye of late.
Without further ado, here are some terrific ways to make use of the (over)abundance of zucchini and other summer squash. You may even want to start leaving your car unlocked...
1. Savory Zucchini Fritters I personally think that pretty much anything tastes good in fritter form but zucchini is particularly well-suited to the job. These are a big favorite in my house. Although this recipe is for savory fritters, you could easily adapt it for sweet variation and make a big batch for breakfast sometime.
2. Grilled Summer Squash with Sea Salt & Garlic Grilled zucchini is a stand-by at our house on any given night. It's easy, it's quick and it's always super tasty. Oh yes, and it's good for you, too! What more could a couple of exhausted parents of young kids ask for?
3. Sweet Corn and Zucchini Gratin with Fresh Basil This is one of those ultimate summer meals where several fresh ingredients at the peak of their flavor and freshness combine to make an unforgettable combination.
4. Provençal Vegetable Tian This tian may be my favorite veggie dish of all time. The combination of flavors from the squash, eggplant, tomato, potato, onions and fresh herbs is just killer. I know it probably doesn't sound like anything special but trust me, if you have really good ingredients to work with, the results are surprisingly delicious.
5. Summer Squash & Onion Quesadillas with Mango-Jicama Salsa The sautéed summer squash make these quesadillas extra special (and the mango-jicama salsa doesn't hurt, either). Slicing and sautéeing the squash does not take long and allows you to pack more nutrition and more flavor into this quick weeknight dinner.
6. Pasta with Grilled Zucchini, Eggplant, Tomatoes & Basil Grilling the veggies brings out their natural sweetness (you could roast them with good results, too) and the eggplant lends this dish some nice meatiness. Toss with fresh basil and top with grated Parmesan and you will be in business. You can always vary the veggies you include, too - it's very flexible.
7. Zucchini Bread Squash need not always be savory - it can be equally good sweet. This is a super easy batter bread that also happens to be dairy-free. You could make it with butter but I don't think it would be as good as this oil-based version (and I love butter, so you can trust me on this.) The result is moist, sweet and delicious! Feel free to add chocolate chips, nuts, or dried fruit, too.
8. Ratatouille & Sausage Potpie with Cornmeal Biscuit Topping This is a truly delectable dish. I would probably make this once a week if I had the time... The vegetables meld with the sausage to create a rich, savory, flavorful filling and the cornbread biscuits are crispy on the outside and moist on the inside.
9. Zucchini Tian with Curried Breadcrumbs A slight twist on the more traditional tian (number 4 above) from Melissa Clark for the NY Times. I love the idea of the curried breadcrumbs!
10. Confetti Vegetable Sauce This recipe comes from my friend and former co-worker, Meghan over at NestMeg - I remember wiping a drop of drool off the keyboard the first time I read this one. It's just that good! A creamy, vegetable-packed sauce inspired by the time she spent in Italy.
11. Summer Squash Strata I love a good strata - a.k.a., a rich, savory bread pudding.
The one I usually make uses spinach but this summer squash and asparagus option from Joanna Miller for The Kitchn sounds divine.
12. Zucchini & Potato Frittata Frittatas are wonderful, hearty, melty, flavorful and easy to make. This lovely recipe from Andrea Chesman's excellent cookbook,
Serving Up the Harvest
, pairs zucchini with waxy potatoes, Canadian bacon and cheese. You could omit either the bacon or the cheese if necessary, of course. And, while you're at it, check out Andrea's book,
Recipes from the Root Cellar: 270 Fresh Ways to Enjoy Winter Vegetables
- one of my all-time favorites and super helpful for those of us that live in places with a long, cold winter, too.
13. Summer Squash Ribbon Salad Although we primarily encounter summer squash in cooked form, it can be super tasty sliced into very thin ribbons and tossed with a simple dressing and fresh herbs -- goat cheese is optional but verrry tasty. The ribbons have a nice crunchy texture and a mild but fresh flavor. A
mandoline
is a must-have for this preparation although you could use a knife (with slower and clunkier results) if you don't have a
mandoline on hand. This recipe is from The Kitchn.
14. Sautéed Summer Squash with Onions & Brown Sugar This dish strikes a nice balance between savory and sweet. The end result of all the sautéeing is a delicious pile of gooey, sweet and savory goodness. Recipe via The Kitchn.
15. Baked Zucchini Fries These healthy "fries" from Two Peas and Their Pod look might tasty. Chop up some zucchini spears, coat them in herbs, Parmesan and homemade breadcrumbs then bake them up and dip in homemade marinara sauce.
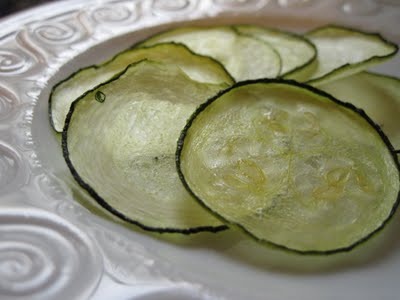
16. Zucchini Chips These crunchy chips from Julianne (a.k.a., the Kitchen Ninja) won first prize in my
Can You Can It? contest a few years ago. I absolutely love this idea and, now that we have a food dehydrator, we can produce a lot more of these to munch on.
You might also like:
Want even more recipes, photos, giveaways, and food-related inspiration? "Like" the Garden of Eating on Facebook, or follow me on
Twitter or
Pinterest.