Mya's Cupboard Brownies - Simple & Decadent

Sunday, January 22, 2012

I count myself lucky in that I've always made good friends at work. Even at the jobs I hated (namely, the first two I had after college when I lived in Boston), I was blessed to find one or two people I really clicked with.

Ingredients for cupboard brownies by Eve Fox, Garden of Eating blog, copyright 2012

And the company where I've worked for the last 10 years has been no exception. It was way back in the early days when I was still fairly new and working at the DC office that I met my friend, Mya. Despite that fact that neither of us have lived in DC for many years and she's changed fields for an actual field (she's a farmer now - sorry about the pun, I just couldn't help it...) we are still friends.

Creaming the butter and sugar by Eve Fox, Garden of Eating blog, copyright 2012

Mya is one of those wonderful people who is smart, funny, charming, loyal, unfailing polite, and wants to do what's right. (If you guessed that she's from the Midwest, you're right!) She's also a good cook and would often invite me and my then-boyfriend-now-husband over to her group house for dinner with her housemates and their other friends.

Cupboard brownie batter in the pan by Eve Fox, Garden of Eating blog, copyright 2012

It was at the end of one of these lively meals that I was introduced to these brownies. They made quite an impression on me... Naturally, I asked Mya for her recipe. She seemed almost surprised - in her mind, they were nothing special - just her "cupboard" brownies. But they were everything I was looking for in a brownie - moist, crumb-y, chocolatey and mild enough that I could contemplate eating half a pan of them... (that is a quality I am always looking for in a chocolate cake, too, in case you were wondering.)

Cupboard brownies and vanilla icecream by Eve Fox, Garden of Eating blog, copyright 2012

She obligingly wrote out her recipe for me on an index card. It is, in fact, wondrously simple. And very quick and easy to make.

Cupboard brownies and vanilla icecream by Eve Fox, Garden of Eating blog, copyright 2012

Give them a shot sometime. If you prefer something a little more intense, just add some chocolate chunks or chips and/or nuts to the batter.

Bowl to wash by Eve Fox, Garden of Eating blog, copyright 2012

Here's to old friends. And to brownies!

Cupboard Brownies
Makes a 9"x13" pan

Ingredients

* 1 cup butter, softened
* 2 cups sugar
* 1 1/2 cups flour
* 4 eggs
* 1/2 cup cocoa powder
* 2 tsps pure vanilla extract
* 1/2 tsp salt

Just a note - I recommend using organic everything if at all possible, especially for the butter and eggs (and pasture-raised eggs are way better for all involved if you have access to them.)

Directions

1. Preheat oven to 300 degrees F and grease the baking pan.

2. Cream the butter and sugar together. Add the flour, cocoa, eggs, salt and vanilla and mix well to combine.

3. Pour the batter out into the prepared baking pan and bake for 40-50 minutes, until a toothpick or fork comes out clean. Serve warm with vanilla ice cream (I'm a real traditionalist on brownies and vanilla ice cream - they just seem made for one another - but you should, of course, use whatever flavor floats your boat.)

You might also like:
Want even more recipes, photos, giveaways, and food-related inspiration? "Like" the Garden of Eating on Facebook or follow me on Twitter.

Cranberry Bean Gratin

Saturday, January 14, 2012

Cranberry beans post-soaking by Eve Fox, Garden of Eating blog, copyright 2012

I won a ton of dried beans by entering My Legume Love Affair this summer and decided it was finally time to start using them. So I set these cranberry beans (also known as Borlotti beans) out to soak the night before last.

I was not sure what I would do with them but knew I'd find something good. After searching online and in some of my favorite cookbooks, I found this recipe in Alice Waters' lovely cookbook, The Art of Simple Food.

Chopped tomatoes by Eve Fox, Garden of Eating blog, copyright 2011

Before we decided to move back to Woodstock, NY, we lived in the ghetto (cue Elvis music.) To be more specific, we lived in North Berkeley's Gourmet Ghetto neighborhood, just a few blocks away from Alice's famous restaurant, Chez Panisse. Although we did not go often (dining there regularly would require that we move up an entire socio-economic bracket), we ate there several times during our four years in Berkeley.

Sauteeing onions, garlic, carrots and celery by Eve Fox, Garden of Eating blog, copyright 2012

It's impossible not to appreciate the lovely food and atmosphere of both the cafe (upstairs) and the restaurant (downstairs). Fresh, flavorful, and carefully crafted to showcase the ingredients' natural beauty and delicious attributes. We also lived a short walk from another of Waters' pet projects, The Edible Schoolyard, where we always enjoyed strolling (some pix of this neighborhood gem can be found here.)

Cranberry gratin before adding breadcrumbs by Eve Fox, Garden of Eating blog, copyright 2012

This simple gratin is homey, flavorful, hearty, and really good for you. Unlike eating at Chez Panisse, it's also quite affordable - dried beans are amazingly cheap! Serve it with a loaf of crusty bread (and lots of butter), and a big green salad and call it a meal. Enjoy.

Cranberry bean gratin by Eve Fox, Garden of Eating blog, copyright 2012

-- print recipe --
Cranberry Bean Gratin
Serves 4

Ingredients

* 1 1/4 cups dried cranberry beans
* Coarse salt
* 1/2 onion, finely chopped
* 1 small carrot, peeled, finely chopped
* 1 small stalk celery, finely chopped
* 1/4 cup olive oil
* 4 cloves garlic, thinly sliced
* 6 fresh sage leaves, chopped
* 1/2 cup chopped tomatoes, fresh or canned
* 1/2 cup Toasted Breadcrumbs

Directions

1. Place beans in a large bowl and cover with 4 cups water; let soak overnight.

2. Drain beans and transfer to a medium saucepan; cover with water by 2 inches. Bring water to a boil, reduce heat and skim foam from surface. Continue simmering beans until tender, 30 to 45 minutes, adding more water as necessary. Season beans with salt and set aside to cool in their liquid.

3. Preheat oven to 350 degrees. In a medium, heavy-bottomed skillet heat 1/4 cup of olive oil over medium heat. Add onion, carrot, and celery; cook until tender, about 10 minutes. Add garlic and sage, and season with salt; let cook 5 minutes. Stir in tomatoes; cook 5 minutes more and remove from heat.

4. Drain beans, reserving liquid. Transfer beans to skillet with vegetables; stir to combine. Pour bean mixture into a medium gratin or baking dish; season with salt. Add enough bean cooking liquid to almost cover. Drizzle with olive oil and top with toasted breadcrumbs.

5. Transfer gratin dish to oven and bake for 40 minutes, checking occasionally to make sure the gratin has not dried out. If necessary spoon a little of the bean cooking liquid into the side of the gratin, to avoid wetting the breadcrumbs.

Want even more recipes, photos, giveaways, and food-related inspiration? "Like" the Garden of Eating on Facebook or follow me on Twitter.
Chocolate Hazelnut Spread - a.k.a. Homemade Nutella

Sunday, January 8, 2012

This container of hazelnuts had been sitting on our counter since Thanksgiving - a leftover from the cooking frenzy. I did not know exactly what to do with them so I let them sit for a few weeks well over a month while I pondered my options.

Hazelnuts by Eve Fox, Garden of Eating blog, copyright 2012

My friend, Ben recommended toasting them and putting them in salads. It sounded tasty so I went ahead and toasted them all. The smell coming from our toaster oven was beyond heavenly... I ate a few of the toasted nuts and was hooked on their amazing flavor.

Toasting the hazelnuts by Eve Fox, Garden of Eating blog, copyright 2012

But when I saw this recipe for homemade Nutella pop up on David Leite's (of Leite's Culinaria) Facebook feed two days ago, I knew I'd found the right way to use my toasted hazelnuts.

Homemade chocolate hazelnut spread by Eve Fox, Garden of Eating blog, copyright 2012

I was kind of daunted by the idea of making chocolate hazelnut spread from scratch until I took a look at David's simple recipe - it's really not so tough after all! It's a pretty basic mixture of ground hazelnuts and melted chocolate with a few other ingredients blended in.

Square of semi-sweet baker's chocolate by Eve Fox, Garden of Eating blog, copyright 2012

I'd already toasted the nuts. The next step was to remove the skins - a little tedious (though those of you who are more evolved than I am might find it "meditative") but not hard at all.

Toasted hazelnuts by Eve Fox, Garden of Eating blog, copyright 2012

Then into the cuisinart they went where I ground them into a paste.

Making a paste of the toasted hazelnuts in the Cuisinart by Eve Fox, Garden of Eating blog, copyright 2012

Then added canola oil, a little confectioner's sugar, some cocoa powder, a dash of salt and a little vanilla extract and blended again until smooth.Then I added the melted chocolate and blended it again.

After adding melted chocolate by Eve Fox, Garden of Eating blog, copyright 2012

The resulting spread is divine, very rich, with a stronger roasted hazelnut flavor than Nutella. It solidified overnight but you can always warm it in a bowl of warm water or zap it in the microwave for a few seconds if you're having trouble spreading it. Below is a pic I took of it before it spent a few seconds in the microwave - still spreadable but a little more work than the stuff I heated up was.

Chocolate hazelnut spread by Eve Fox, Garden of Eating blog, copyright 2012

I am storing mine in an old Bon Maman jam jar since it's got a screw-on lid and I also love the look of 'em. Use it just like you'd normally use Nutella and enjoy the fact that it is even tastier and does not have any of the additives and preservatives in the store-bought version.

Homemade chocolate hazelnut spread on toast by Eve Fox, Garden of Eating blog, copyright 2012

Chocolate Hazelnut Spread (recipe via Christie Matheson at Leite's Culinaria)
Makes one 18 oz jar

Ingredients

* 1 cup hazelnuts
* 12 ounces milk chocolate, chopped
* 2 tablespoons mild vegetable oil, such as canola
* 3 tablespoons confectioners’ sugar
* 1 tablespoon unsweetened cocoa powder
* 1/2 teaspoon vanilla extract
* 3/4 teaspoon salt

Directions

1. Preheat the oven to 350°F. (I recommend using your toaster oven as it's a waste of energy to heat your entire oven for this small amount of nuts.)

2. Spread the hazelnuts in a single layer on a baking sheet and toast them for about 12 minutes, checking once or twice and turning as needed, until they’ve browned a little and the skins are blistered. Wrap them in a kitchen towel and rub vigorously or put them in a yogurt container and shake hard for a few seconds to remove as much loose skin as possible. There will still be some skin clinging to the nuts when you're finished - it's okay.  Let cool completely.

3. Melt the chocolate in a saucepan over gently simmering water or in the microwave. Stir until smooth. Set aside to cool.

4. In a food processor, grind the hazelnuts until they form a paste. Add the oil, sugar, cocoa powder, vanilla, and salt and continue processing until the mixture is as smooth as possible (unless you prefer to have a chunkier spread). Add the melted chocolate and blend well. Store the spread in a glass jar with an airtight lid on the counter for up to two weeks.

You might also like:

Want even more recipes, photos, giveaways, and food-related inspiration? "Like" the Garden of Eating on Facebook or follow me on Twitter.

Lemony Roasted Broccoli With Pasta, Pignolas & Sweet Italian Sausage

Thursday, January 5, 2012

My love affair with roasted Brussels sprouts rages on. I just love the way roasting brings out their sweetness, and enhances their nutty flavor. I've been so enjoying them that I decided to see if I could recreate the joyful experience with broccoli, their cruciferous cousin.

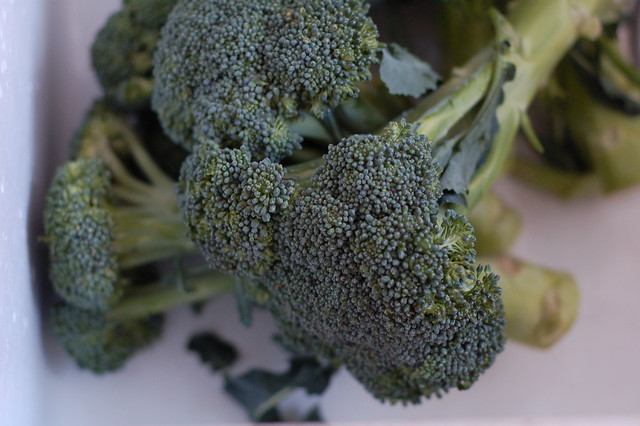
Organic broccoli by Eve Fox, the Garden of Eating blog, copyright 2014

I looked online to see what temp to roast broccoli at and found this simple, yummy sounding recipe from Ina Garten, a.k.a., the Barefoot Contessa, for lemony roasted broccoli that I modified slightly.

The prep is very simple -- you wash and cut up the broccoli into florets and chunks -- I always include the stem as it's just as tasty and nutritious as the florets -- no need to waste it! Toss with olive oil, minced garlic, lemon zest, sea salt and freshly ground pepper and spread in a single layer on a heavy baking sheet.

Broccoli by Eve Fox, Garden of Eating blog, copyright 2012

Roast at 400 degrees for about 20 minutes, flipping once to ensure even roasting. Et voila, you've got the most divine, sweetly caramelized, richly nutty, fragrantly garlicky, lemony treat you can imagine. It may not look like much but it will melt in your mouth.

Roasted broccoli with garlic and lemon zest by Eve Fox, Garden of Eating blog, copyright 2012

I paired it with pasta, toasted pine nuts, a bit more lemon zest and juice, sweet Italian sausage, and sauteed red onion. You could also omit the sausage to make this vegetarian - it will be delicious without it. Then topped it all with a small avalanche of freshly grated Parmesan cheese.

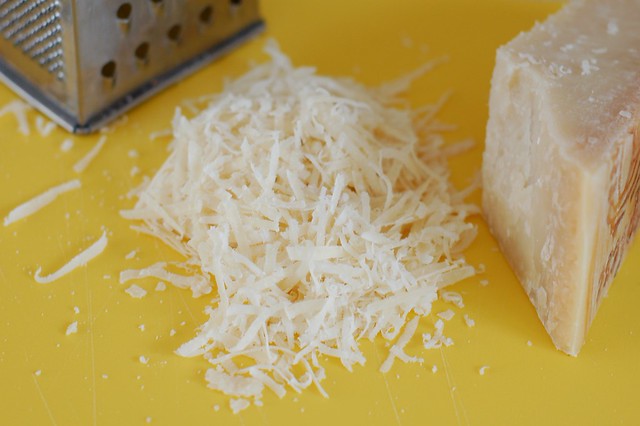
Grating Parmesan cheese by Eve Fox, the Garden of Eating, copyright 2015

Mmmm mmmm gooooooood. Even our two-year-old son liked it and that is saying something these days.

Roasted Broccoli With Sweet Italian Sausage, Pinenuts, Parmesan & Pasta by Eve Fox, Garden of Eating blog, copyright 2012

-- print recipe --
Lemony Roasted Broccoli With Pasta, Pine Nuts & Sweet Italian Sausage
From  Ina Garten's The Barefoot Contessa: Back to Basics
Serves 4

Ingredients

* 1 box of organic pasta (whatever shape you like)
* 1 large head of broccoli, cleaned, trimmed and cut into florets and chunks of a similar size
* 3/4 pound organic sweet Italian sausage (optional)
* 1 large red onion, sliced
* 1/2 cup toasted pine nuts, you can substitute slivered almonds if need be
* Zest of two lemons (get organic if you can since you'll be using the skin) and the juice of one of them
* 3-4 cloves garlic, minced or pressed
* Olive oil for roasting and sauteeing
* Sea salt
* Freshly ground black pepper
* 1/3 cup freshly grated Parmesan cheese

Directions

1. Preheat the oven to 400 degrees F. Place the broccoli florets on a heavy baking sheet large enough to hold them in a single layer. Toss the garlic with half the lemon zest, all of the garlic, sea salt, pepper, and 3-4 tablespoons of olive oil. Roast for 20 to 25 minutes, flipping once to ensure even roasting, until the pieces are crisp-tender and browned at the tips.

2. Bring the water for the pasta to a boil and cook according to the directions on the box until al dente. Drain and toss with a little olive oil then set aside.

3. While you're cooking the pasta and roasting the broccoli, sautee the red onion and the sausage in a saucepan, cooking until the onion is translucent and sweet and crumbling the sausage into small pieces.

4. Remove the broccoli from the oven and toss with other half of the lemon zest and the juice from one lemon. Toss with the pasta, onions, sausage and pine nuts and top with the Parmesan cheese. Serve hot.

You might also like:
For more delicious recipes, gardening ideas, foraging tips, and food-related inspiration "like" the Garden of Eating on Facebook, or follow me on Twitter and Pinterest.

Sunday, January 22, 2012

Mya's Cupboard Brownies - Simple & Decadent

I count myself lucky in that I've always made good friends at work. Even at the jobs I hated (namely, the first two I had after college when I lived in Boston), I was blessed to find one or two people I really clicked with.

Ingredients for cupboard brownies by Eve Fox, Garden of Eating blog, copyright 2012

And the company where I've worked for the last 10 years has been no exception. It was way back in the early days when I was still fairly new and working at the DC office that I met my friend, Mya. Despite that fact that neither of us have lived in DC for many years and she's changed fields for an actual field (she's a farmer now - sorry about the pun, I just couldn't help it...) we are still friends.

Creaming the butter and sugar by Eve Fox, Garden of Eating blog, copyright 2012

Mya is one of those wonderful people who is smart, funny, charming, loyal, unfailing polite, and wants to do what's right. (If you guessed that she's from the Midwest, you're right!) She's also a good cook and would often invite me and my then-boyfriend-now-husband over to her group house for dinner with her housemates and their other friends.

Cupboard brownie batter in the pan by Eve Fox, Garden of Eating blog, copyright 2012

It was at the end of one of these lively meals that I was introduced to these brownies. They made quite an impression on me... Naturally, I asked Mya for her recipe. She seemed almost surprised - in her mind, they were nothing special - just her "cupboard" brownies. But they were everything I was looking for in a brownie - moist, crumb-y, chocolatey and mild enough that I could contemplate eating half a pan of them... (that is a quality I am always looking for in a chocolate cake, too, in case you were wondering.)

Cupboard brownies and vanilla icecream by Eve Fox, Garden of Eating blog, copyright 2012

She obligingly wrote out her recipe for me on an index card. It is, in fact, wondrously simple. And very quick and easy to make.

Cupboard brownies and vanilla icecream by Eve Fox, Garden of Eating blog, copyright 2012

Give them a shot sometime. If you prefer something a little more intense, just add some chocolate chunks or chips and/or nuts to the batter.

Bowl to wash by Eve Fox, Garden of Eating blog, copyright 2012

Here's to old friends. And to brownies!

Cupboard Brownies
Makes a 9"x13" pan

Ingredients

* 1 cup butter, softened
* 2 cups sugar
* 1 1/2 cups flour
* 4 eggs
* 1/2 cup cocoa powder
* 2 tsps pure vanilla extract
* 1/2 tsp salt

Just a note - I recommend using organic everything if at all possible, especially for the butter and eggs (and pasture-raised eggs are way better for all involved if you have access to them.)

Directions

1. Preheat oven to 300 degrees F and grease the baking pan.

2. Cream the butter and sugar together. Add the flour, cocoa, eggs, salt and vanilla and mix well to combine.

3. Pour the batter out into the prepared baking pan and bake for 40-50 minutes, until a toothpick or fork comes out clean. Serve warm with vanilla ice cream (I'm a real traditionalist on brownies and vanilla ice cream - they just seem made for one another - but you should, of course, use whatever flavor floats your boat.)

You might also like:
Want even more recipes, photos, giveaways, and food-related inspiration? "Like" the Garden of Eating on Facebook or follow me on Twitter.

Saturday, January 14, 2012

Cranberry Bean Gratin

Cranberry beans post-soaking by Eve Fox, Garden of Eating blog, copyright 2012

I won a ton of dried beans by entering My Legume Love Affair this summer and decided it was finally time to start using them. So I set these cranberry beans (also known as Borlotti beans) out to soak the night before last.

I was not sure what I would do with them but knew I'd find something good. After searching online and in some of my favorite cookbooks, I found this recipe in Alice Waters' lovely cookbook, The Art of Simple Food.

Chopped tomatoes by Eve Fox, Garden of Eating blog, copyright 2011

Before we decided to move back to Woodstock, NY, we lived in the ghetto (cue Elvis music.) To be more specific, we lived in North Berkeley's Gourmet Ghetto neighborhood, just a few blocks away from Alice's famous restaurant, Chez Panisse. Although we did not go often (dining there regularly would require that we move up an entire socio-economic bracket), we ate there several times during our four years in Berkeley.

Sauteeing onions, garlic, carrots and celery by Eve Fox, Garden of Eating blog, copyright 2012

It's impossible not to appreciate the lovely food and atmosphere of both the cafe (upstairs) and the restaurant (downstairs). Fresh, flavorful, and carefully crafted to showcase the ingredients' natural beauty and delicious attributes. We also lived a short walk from another of Waters' pet projects, The Edible Schoolyard, where we always enjoyed strolling (some pix of this neighborhood gem can be found here.)

Cranberry gratin before adding breadcrumbs by Eve Fox, Garden of Eating blog, copyright 2012

This simple gratin is homey, flavorful, hearty, and really good for you. Unlike eating at Chez Panisse, it's also quite affordable - dried beans are amazingly cheap! Serve it with a loaf of crusty bread (and lots of butter), and a big green salad and call it a meal. Enjoy.

Cranberry bean gratin by Eve Fox, Garden of Eating blog, copyright 2012

-- print recipe --
Cranberry Bean Gratin
Serves 4

Ingredients

* 1 1/4 cups dried cranberry beans
* Coarse salt
* 1/2 onion, finely chopped
* 1 small carrot, peeled, finely chopped
* 1 small stalk celery, finely chopped
* 1/4 cup olive oil
* 4 cloves garlic, thinly sliced
* 6 fresh sage leaves, chopped
* 1/2 cup chopped tomatoes, fresh or canned
* 1/2 cup Toasted Breadcrumbs

Directions

1. Place beans in a large bowl and cover with 4 cups water; let soak overnight.

2. Drain beans and transfer to a medium saucepan; cover with water by 2 inches. Bring water to a boil, reduce heat and skim foam from surface. Continue simmering beans until tender, 30 to 45 minutes, adding more water as necessary. Season beans with salt and set aside to cool in their liquid.

3. Preheat oven to 350 degrees. In a medium, heavy-bottomed skillet heat 1/4 cup of olive oil over medium heat. Add onion, carrot, and celery; cook until tender, about 10 minutes. Add garlic and sage, and season with salt; let cook 5 minutes. Stir in tomatoes; cook 5 minutes more and remove from heat.

4. Drain beans, reserving liquid. Transfer beans to skillet with vegetables; stir to combine. Pour bean mixture into a medium gratin or baking dish; season with salt. Add enough bean cooking liquid to almost cover. Drizzle with olive oil and top with toasted breadcrumbs.

5. Transfer gratin dish to oven and bake for 40 minutes, checking occasionally to make sure the gratin has not dried out. If necessary spoon a little of the bean cooking liquid into the side of the gratin, to avoid wetting the breadcrumbs.

Want even more recipes, photos, giveaways, and food-related inspiration? "Like" the Garden of Eating on Facebook or follow me on Twitter.

Sunday, January 8, 2012

Chocolate Hazelnut Spread - a.k.a. Homemade Nutella

This container of hazelnuts had been sitting on our counter since Thanksgiving - a leftover from the cooking frenzy. I did not know exactly what to do with them so I let them sit for a few weeks well over a month while I pondered my options.

Hazelnuts by Eve Fox, Garden of Eating blog, copyright 2012

My friend, Ben recommended toasting them and putting them in salads. It sounded tasty so I went ahead and toasted them all. The smell coming from our toaster oven was beyond heavenly... I ate a few of the toasted nuts and was hooked on their amazing flavor.

Toasting the hazelnuts by Eve Fox, Garden of Eating blog, copyright 2012

But when I saw this recipe for homemade Nutella pop up on David Leite's (of Leite's Culinaria) Facebook feed two days ago, I knew I'd found the right way to use my toasted hazelnuts.

Homemade chocolate hazelnut spread by Eve Fox, Garden of Eating blog, copyright 2012

I was kind of daunted by the idea of making chocolate hazelnut spread from scratch until I took a look at David's simple recipe - it's really not so tough after all! It's a pretty basic mixture of ground hazelnuts and melted chocolate with a few other ingredients blended in.

Square of semi-sweet baker's chocolate by Eve Fox, Garden of Eating blog, copyright 2012

I'd already toasted the nuts. The next step was to remove the skins - a little tedious (though those of you who are more evolved than I am might find it "meditative") but not hard at all.

Toasted hazelnuts by Eve Fox, Garden of Eating blog, copyright 2012

Then into the cuisinart they went where I ground them into a paste.

Making a paste of the toasted hazelnuts in the Cuisinart by Eve Fox, Garden of Eating blog, copyright 2012

Then added canola oil, a little confectioner's sugar, some cocoa powder, a dash of salt and a little vanilla extract and blended again until smooth.Then I added the melted chocolate and blended it again.

After adding melted chocolate by Eve Fox, Garden of Eating blog, copyright 2012

The resulting spread is divine, very rich, with a stronger roasted hazelnut flavor than Nutella. It solidified overnight but you can always warm it in a bowl of warm water or zap it in the microwave for a few seconds if you're having trouble spreading it. Below is a pic I took of it before it spent a few seconds in the microwave - still spreadable but a little more work than the stuff I heated up was.

Chocolate hazelnut spread by Eve Fox, Garden of Eating blog, copyright 2012

I am storing mine in an old Bon Maman jam jar since it's got a screw-on lid and I also love the look of 'em. Use it just like you'd normally use Nutella and enjoy the fact that it is even tastier and does not have any of the additives and preservatives in the store-bought version.

Homemade chocolate hazelnut spread on toast by Eve Fox, Garden of Eating blog, copyright 2012

Chocolate Hazelnut Spread (recipe via Christie Matheson at Leite's Culinaria)
Makes one 18 oz jar

Ingredients

* 1 cup hazelnuts
* 12 ounces milk chocolate, chopped
* 2 tablespoons mild vegetable oil, such as canola
* 3 tablespoons confectioners’ sugar
* 1 tablespoon unsweetened cocoa powder
* 1/2 teaspoon vanilla extract
* 3/4 teaspoon salt

Directions

1. Preheat the oven to 350°F. (I recommend using your toaster oven as it's a waste of energy to heat your entire oven for this small amount of nuts.)

2. Spread the hazelnuts in a single layer on a baking sheet and toast them for about 12 minutes, checking once or twice and turning as needed, until they’ve browned a little and the skins are blistered. Wrap them in a kitchen towel and rub vigorously or put them in a yogurt container and shake hard for a few seconds to remove as much loose skin as possible. There will still be some skin clinging to the nuts when you're finished - it's okay.  Let cool completely.

3. Melt the chocolate in a saucepan over gently simmering water or in the microwave. Stir until smooth. Set aside to cool.

4. In a food processor, grind the hazelnuts until they form a paste. Add the oil, sugar, cocoa powder, vanilla, and salt and continue processing until the mixture is as smooth as possible (unless you prefer to have a chunkier spread). Add the melted chocolate and blend well. Store the spread in a glass jar with an airtight lid on the counter for up to two weeks.

You might also like:

Want even more recipes, photos, giveaways, and food-related inspiration? "Like" the Garden of Eating on Facebook or follow me on Twitter.

Thursday, January 5, 2012

Lemony Roasted Broccoli With Pasta, Pignolas & Sweet Italian Sausage

My love affair with roasted Brussels sprouts rages on. I just love the way roasting brings out their sweetness, and enhances their nutty flavor. I've been so enjoying them that I decided to see if I could recreate the joyful experience with broccoli, their cruciferous cousin.

Organic broccoli by Eve Fox, the Garden of Eating blog, copyright 2014

I looked online to see what temp to roast broccoli at and found this simple, yummy sounding recipe from Ina Garten, a.k.a., the Barefoot Contessa, for lemony roasted broccoli that I modified slightly.

The prep is very simple -- you wash and cut up the broccoli into florets and chunks -- I always include the stem as it's just as tasty and nutritious as the florets -- no need to waste it! Toss with olive oil, minced garlic, lemon zest, sea salt and freshly ground pepper and spread in a single layer on a heavy baking sheet.

Broccoli by Eve Fox, Garden of Eating blog, copyright 2012

Roast at 400 degrees for about 20 minutes, flipping once to ensure even roasting. Et voila, you've got the most divine, sweetly caramelized, richly nutty, fragrantly garlicky, lemony treat you can imagine. It may not look like much but it will melt in your mouth.

Roasted broccoli with garlic and lemon zest by Eve Fox, Garden of Eating blog, copyright 2012

I paired it with pasta, toasted pine nuts, a bit more lemon zest and juice, sweet Italian sausage, and sauteed red onion. You could also omit the sausage to make this vegetarian - it will be delicious without it. Then topped it all with a small avalanche of freshly grated Parmesan cheese.

Grating Parmesan cheese by Eve Fox, the Garden of Eating, copyright 2015

Mmmm mmmm gooooooood. Even our two-year-old son liked it and that is saying something these days.

Roasted Broccoli With Sweet Italian Sausage, Pinenuts, Parmesan & Pasta by Eve Fox, Garden of Eating blog, copyright 2012

-- print recipe --
Lemony Roasted Broccoli With Pasta, Pine Nuts & Sweet Italian Sausage
From  Ina Garten's The Barefoot Contessa: Back to Basics
Serves 4

Ingredients

* 1 box of organic pasta (whatever shape you like)
* 1 large head of broccoli, cleaned, trimmed and cut into florets and chunks of a similar size
* 3/4 pound organic sweet Italian sausage (optional)
* 1 large red onion, sliced
* 1/2 cup toasted pine nuts, you can substitute slivered almonds if need be
* Zest of two lemons (get organic if you can since you'll be using the skin) and the juice of one of them
* 3-4 cloves garlic, minced or pressed
* Olive oil for roasting and sauteeing
* Sea salt
* Freshly ground black pepper
* 1/3 cup freshly grated Parmesan cheese

Directions

1. Preheat the oven to 400 degrees F. Place the broccoli florets on a heavy baking sheet large enough to hold them in a single layer. Toss the garlic with half the lemon zest, all of the garlic, sea salt, pepper, and 3-4 tablespoons of olive oil. Roast for 20 to 25 minutes, flipping once to ensure even roasting, until the pieces are crisp-tender and browned at the tips.

2. Bring the water for the pasta to a boil and cook according to the directions on the box until al dente. Drain and toss with a little olive oil then set aside.

3. While you're cooking the pasta and roasting the broccoli, sautee the red onion and the sausage in a saucepan, cooking until the onion is translucent and sweet and crumbling the sausage into small pieces.

4. Remove the broccoli from the oven and toss with other half of the lemon zest and the juice from one lemon. Toss with the pasta, onions, sausage and pine nuts and top with the Parmesan cheese. Serve hot.

You might also like:
For more delicious recipes, gardening ideas, foraging tips, and food-related inspiration "like" the Garden of Eating on Facebook, or follow me on Twitter and Pinterest.