7 Simple Ways to Help Honey Bees

Thursday, May 16, 2013

I'm allergic to bees so I spent my whole childhood being terrified of encountering them. But now I am terrified of NOT encountering them! Because...


As you've probably heard, our honey bees are dying. U.S. bee keepers lost a shocking 31% of their hives this winter, marking the seventh year of devastating bee deaths in a row. Although the exact cause(s) of Colony Collapse Disorder is hard to pinpoint with certainty, what is perfectly clear is that we're speeding towards the disastrous point at which we will not have enough honey bees left to pollinate our crops.

You don't need to rush out to buy protective mesh clothing and a smoke can, there are lots of easy ways you can help honey bees to survive and, hopefully, to thrive. Here are seven simple ways to get started.

1. Add your name to the petition urging the EPA and USDA to ban neonicotinoids, a widely used class of agricultural pesticides that is highly toxic to bees and believed to play a crucial role in colony collapse disorder. The EU has just enacted a ban on neonicotinoids and we must follow Europe's lead as there is literally no time to waste.

2. Let dandelions and clover grow in your yard. Dandelions and clover are two of the bees' favorite foods - they provide tons of nourishment and pollen for our pollinators to make honey and to feed their young (look at this bee frolicking in a dandelion below - like a pig in shit!) And these flowers could not be any easier to grow - all you have to do is not do anything.


3. Stop using commercial pesticides, herbicides and fertilizers - these chemicals are harmful to the bees. And they're also harmful to you, your family, and our soil and water supply, too. Definitely not worth it!
4. Eat more honey and buy it from a local bee keeper. This is a pretty sweet way to help the bees (sorry, I can never resist a good pun.) Unlike big honey companies, local bee keepers tend to be much more concerned about the health of their bees than they are about their profits. And their products do not have to travel far to reach your kitchen, either. You can almost always find local honey at your farmers' market and it may also be available at your local health food or grocery store. It may cost a little more than the commercial options, but it's well worth it.


5. Plant bee-friendly flowers. This not only helps the honey bees, it will also make your yard more beautiful and can also provide you with a bunch of great culinary herbs.

In addition to the dandelions and clover I mentioned above, bees love many other flowers, including: bee balm, borage, asters, lavender, thyme, mint, rosemary, honey suckle, poppies, sunflowers, marigolds, salvia, butterfly bush, clematis, echinacea (see the bee partaking of some coneflower goodness below) blackberries, raspberries, strawberries, fennel, yellow hyssop, milkweed, goldenrod, and many more.

You can also just buy one of those pre-mixed packets of wildflowers with good results. And, if you're ever in doubt, choose native plants as they will be best suited to the climate you live in and can help support the bees throughout the season.


6. Buy organic. Organic food and fibers like cotton and hemp are produced without the use of commercial pesticides, fertilizers and herbicides, making them inherently more bee-friendly than conventionally grown products.

7. Share this post with your friends, family, neighbors and co-workers to help build more "buzz" for honey bees.

You might also like these posts from the Greening Your Kitchen series:
Want even more recipes, photos, giveaways, and food-related inspiration? "Like" the Garden of Eating on Facebook, or follow me on Twitter or Pinterest.

Easy, Moist (Vegan) Chocolate Cupcakes

Monday, May 13, 2013

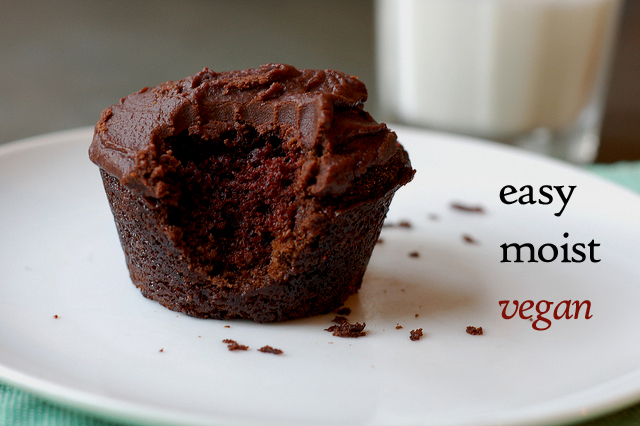
I am not a vegan and the fact that these cupcakes are is purely coincidence. But it's definitely a happy coincidence for those of you who are vegans 'cause these suckers are GOOD!

Super easy, super moist, super flavorful vegan chocolate cupcakes by Eve Fox, the Garden of Eating blog, copyright 2014

I was looking for an easy, moist, not too intensely chocolatey cupcake recipe to make for my son's fourth birthday last week. I read a lot of different recipes before I hit on this one from Simply Recipes. It sounded perfect - simple, moist, and not too rich for my little guy's young taste buds.

This recipe reminds me of the first cake I ever baked as a kid (of course it was chocolate.) I must have been about nine or ten and I remember it because the cake recipe in my kids' cookbook called for vinegar which struck me as odd even then. But it totally works!

Combining the dry and wet ingredients for chocolate cupcakes by Eve Fox, Garden of Eating blog, copyright 2013

It's no accident that this type of recipe was in a kids baking cookbook - the recipe is so simple and easy that a child can make it. No eggs to crack and beat, no butter to soften or melt - all you need to do is measure and mix!

Coffee in my mini French press by Eve Fox, Garden of Eating blog, copyright 2013

I think the coffee in the recipe is essential to the flavor so don't skip it although you can use decaf if you're worried about the caffeine (I really would not worry about it unless you know from past experience that you're extremely sensitive to caffeine in baked goods.)

Chocolate cupcake batter in the muffin tin by Eve Fox, Garden of Eating blog, copyright 2013

I've included links to some frosting recipes (including a vegan option) below but I have not tested any of these. I would include my own frosting recipe but I don't use an actual recipe - I usually just melt chocolate chips, butter, a little heavy cream, confectioners sugar and vanilla extract  in a double boiler and whisk until it's smooth, adding what always feels like a shocking amount of powdered sugar throughout the process.

Cupcakes in pan cooling on counter by Eve Fox, the Garden of Eating blog, copyright 2013

One note on the yield, Elise's recipe says it makes 12 cupcakes but I've made it twice now (it's that good!) and I feel that 12 is a little optimistic unless you want pretty small cupcakes. Ten is more realistic if you're shooting for a normal-sized cupcake.

But I've nattered on quite long enough. Without further ado, I give you the world's simplest, moistest chocolate cupcake recipe. And vegan to boot!

Chocolate cupcakes with red candles by Eve Fox, Garden of Eating blog, copyright 2013

-- print recipe --
Easy, Moist (Vegan) Chocolate Cupcakes via Simply Recipes
Makes 10 cupcakes - if you want to make a cake, double the recipe and cook in two 8-inch round cake pans for 35-40 minutes

Ingredients

* 1 1/2 cups all purpose flour
* 1/4 cup unsweetened cocoa powder
* 1 cup organic cane sugar (I use vanilla sugar - it adds an extra yum factor)
* 1 tsp baking soda
* 1/2 tsp sea salt
* 1 cup of medium strength brewed coffee
* 1 Tbsp white vinegar
* 2 tsps vanilla extract
* 6 Tbsps (1/4 cup plus 2 Tbsp) olive oil

* Unbleached cupcake liners (I prefer to use unbleached paper liners as I suspect some of the bleach must get transferred to the wet batter as it heats up.)

Directions

1. Preheat the oven to 350°F. Line a muffin tin with cupcake liners (you can also grease the tin instead but the liners are definitely easier and will prevent anything from sticking.)

2. Whisk the flour, cocoa powder, sugar, baking soda, and salt together in a large bowl until there are no visible clumps. If you've got particularly clumpy cocoa or sugar, you can always sift the dry ingredients into the bowl, too.

3. In a small to medium-sized bowl, mix together the coffee (or water plus coffee granules), vinegar, vanilla extract, and olive oil.

4. Add the wet ingredients to the dry ingredients and stir just to combine (mixture will be rather lumpy.)

5. Ladle the batter into the cupcake liners, filling them about two-thirds of the way full. Put in the oven and bake for 18 to 20 minutes, until a bamboo skewer inserted in the center comes out clean.

6. Remove from oven and cool in the pan for 5 minutes, then remove from the pan and let cool completely on a rack. Once cool, frost with the frosting of your choice and serve.

A few frosting options (first two are vegan) if you don't have one you like already (but please note that I haven't tried these recipes):
You might also like:
Want even more recipes, photos, giveaways, and food-related inspiration? "Like" the Garden of Eating on Facebook, or follow me on Twitter or Pinterest.

Can Saver Kitchen Hack

Wednesday, May 8, 2013

Just wanted to share this handy little kitchen hack I've been using for the past year or so - the kitty food can saver!

Although it's obviously intended to keep cans of pet food fresh in your fridge it works equally well to keep canned chipotles or tuna fish fresh.

Clever Kitty Can Saver Top by Eve Fox, Garden of Eating blog, copyright 2013

It had always bothered me that most of the can of chipotles would end up going to waste since I'd open a can of them, use just a tiny bit as I am quite wimpy about spicy food, and then lamely try to keep it fresh by covering it with some tin foil and a rubber band. It just did not work.

But now, my kitty can saver allows me to extend its stay in the fridge for many, many weeks. One nice thing about this can saver is that it's adjustable - the lid has several different circumference rings that will fit different sized cans. I got it at my local hardware store for under $2 but you can also find them online.

Clever Kitty Can Saver Top by Eve Fox, Garden of Eating blog, copyright 2013

Check out some of these other "Gifts from the Kitchen Gods":

Want even more recipes, photos, giveaways, and food-related inspiration? "Like" the Garden of Eating on Facebook, or follow me on Twitter or Pinterest.

Grilled Ramps - Simple, Spectacular & Seasonal Fare

Friday, May 3, 2013

We're coming to the tail end of wild ramp season here in the Hudson Valley so we made one more push to harvest a few more yesterday and we couldn't have picked a nicer day for it. Rahm took this photo of me with some of the ramps and the tool of the trade - I was like a pig in shit, if I do say so myself.

Eve Fox with ramps & trowel by Rahm Rechtschaffen, the Garden of Eating blog, copyright 2013

Just a reminder to please harvest sustainably if you are fortunate enough to find a big enough patch to sustain some picking. You can only take a fraction of the plants without impacting their ability to thrive next year. If you're not sure how much is too much, my friend and fellow Woodstock Farm Festival-er, Rick is a big proponent of snipping just the greens instead of digging up the entire plant.

Freshly picked ramps awaiting cleaning by Eve Fox, the Garden of Eating blog, copyright 2013

And don't forget that you can and should start your own patch by planting seeds and transplanting bulbs! We started this process last year by ordering ramp bulbs and seeds from Facemire's farm.

Fresh-picked ramps on the grill by Eve Fox, the Garden of Eating blog, copyright 2013

The bulbs we planted last year are up again this year and seem to be doing well though it will be a number of years before they've spread enough to harvest any of them. We'll just keep at it, though, and eventually should have a stellar patch of these singularly tasty spring onions.

Fresh-picked ramps on the grill by Eve Fox, the Garden of Eating blog, copyright 2013

If you want to start your own patch (do it!) keep in mind that ramps like sandy, loamy soil near streams or on hillsides in deciduous forest - I've heard that maple and oak trees are their favorites - where they can enjoy the early spring sunshine before the trees leaf out and benefit from the natural mulch of leaf litter in the fall. They do NOT like the acidic soil and limited sunlight of conifer (pine/evergreen) forest.

Now that my little lecture has been delivered, back to the grilled ramps.We made these last night to accompany some grilled salmon with mustard and thyme and we are HOOKED! Even our four-year-old son who does not typically like onion-y, garlicky foods attacked them with great enthusiasm.

Grilled ramps by Eve Fox, the Garden of Eating blog, copyright 2013

Very simple, too. Just toss with olive oil, salt and pepper and grill. Enjoy!

Grilled Ramps
Serves 2-4 as a side

Ingredients

* 1 bunch (roughly 20) amps, cleaned with root ends cut off
* 1-2 tsps olive oil
* Sea salt
* Freshly ground black pepper

Directions

1. Clean and preheat your grill.

2. While you're waiting for the grill to heat up, toss the ramps with the olive oil, sea salt and pepper in a large bowl until well-coated.

3. Lower flame to medium and lay the ramps out in a single layer. Cook until grill marks form then turn to the other side - this should only take 1-2 minutes on each side.

4. Remove to a platter and serve.

You might also like:
Want even more recipes, photos, giveaways, and food-related inspiration? "Like" the Garden of Eating on Facebook, or follow me on Twitter or Pinterest.

Thursday, May 16, 2013

7 Simple Ways to Help Honey Bees

I'm allergic to bees so I spent my whole childhood being terrified of encountering them. But now I am terrified of NOT encountering them! Because...


As you've probably heard, our honey bees are dying. U.S. bee keepers lost a shocking 31% of their hives this winter, marking the seventh year of devastating bee deaths in a row. Although the exact cause(s) of Colony Collapse Disorder is hard to pinpoint with certainty, what is perfectly clear is that we're speeding towards the disastrous point at which we will not have enough honey bees left to pollinate our crops.

You don't need to rush out to buy protective mesh clothing and a smoke can, there are lots of easy ways you can help honey bees to survive and, hopefully, to thrive. Here are seven simple ways to get started.

1. Add your name to the petition urging the EPA and USDA to ban neonicotinoids, a widely used class of agricultural pesticides that is highly toxic to bees and believed to play a crucial role in colony collapse disorder. The EU has just enacted a ban on neonicotinoids and we must follow Europe's lead as there is literally no time to waste.

2. Let dandelions and clover grow in your yard. Dandelions and clover are two of the bees' favorite foods - they provide tons of nourishment and pollen for our pollinators to make honey and to feed their young (look at this bee frolicking in a dandelion below - like a pig in shit!) And these flowers could not be any easier to grow - all you have to do is not do anything.


3. Stop using commercial pesticides, herbicides and fertilizers - these chemicals are harmful to the bees. And they're also harmful to you, your family, and our soil and water supply, too. Definitely not worth it!
4. Eat more honey and buy it from a local bee keeper. This is a pretty sweet way to help the bees (sorry, I can never resist a good pun.) Unlike big honey companies, local bee keepers tend to be much more concerned about the health of their bees than they are about their profits. And their products do not have to travel far to reach your kitchen, either. You can almost always find local honey at your farmers' market and it may also be available at your local health food or grocery store. It may cost a little more than the commercial options, but it's well worth it.


5. Plant bee-friendly flowers. This not only helps the honey bees, it will also make your yard more beautiful and can also provide you with a bunch of great culinary herbs.

In addition to the dandelions and clover I mentioned above, bees love many other flowers, including: bee balm, borage, asters, lavender, thyme, mint, rosemary, honey suckle, poppies, sunflowers, marigolds, salvia, butterfly bush, clematis, echinacea (see the bee partaking of some coneflower goodness below) blackberries, raspberries, strawberries, fennel, yellow hyssop, milkweed, goldenrod, and many more.

You can also just buy one of those pre-mixed packets of wildflowers with good results. And, if you're ever in doubt, choose native plants as they will be best suited to the climate you live in and can help support the bees throughout the season.


6. Buy organic. Organic food and fibers like cotton and hemp are produced without the use of commercial pesticides, fertilizers and herbicides, making them inherently more bee-friendly than conventionally grown products.

7. Share this post with your friends, family, neighbors and co-workers to help build more "buzz" for honey bees.

You might also like these posts from the Greening Your Kitchen series:
Want even more recipes, photos, giveaways, and food-related inspiration? "Like" the Garden of Eating on Facebook, or follow me on Twitter or Pinterest.

Monday, May 13, 2013

Easy, Moist (Vegan) Chocolate Cupcakes

I am not a vegan and the fact that these cupcakes are is purely coincidence. But it's definitely a happy coincidence for those of you who are vegans 'cause these suckers are GOOD!

Super easy, super moist, super flavorful vegan chocolate cupcakes by Eve Fox, the Garden of Eating blog, copyright 2014

I was looking for an easy, moist, not too intensely chocolatey cupcake recipe to make for my son's fourth birthday last week. I read a lot of different recipes before I hit on this one from Simply Recipes. It sounded perfect - simple, moist, and not too rich for my little guy's young taste buds.

This recipe reminds me of the first cake I ever baked as a kid (of course it was chocolate.) I must have been about nine or ten and I remember it because the cake recipe in my kids' cookbook called for vinegar which struck me as odd even then. But it totally works!

Combining the dry and wet ingredients for chocolate cupcakes by Eve Fox, Garden of Eating blog, copyright 2013

It's no accident that this type of recipe was in a kids baking cookbook - the recipe is so simple and easy that a child can make it. No eggs to crack and beat, no butter to soften or melt - all you need to do is measure and mix!

Coffee in my mini French press by Eve Fox, Garden of Eating blog, copyright 2013

I think the coffee in the recipe is essential to the flavor so don't skip it although you can use decaf if you're worried about the caffeine (I really would not worry about it unless you know from past experience that you're extremely sensitive to caffeine in baked goods.)

Chocolate cupcake batter in the muffin tin by Eve Fox, Garden of Eating blog, copyright 2013

I've included links to some frosting recipes (including a vegan option) below but I have not tested any of these. I would include my own frosting recipe but I don't use an actual recipe - I usually just melt chocolate chips, butter, a little heavy cream, confectioners sugar and vanilla extract  in a double boiler and whisk until it's smooth, adding what always feels like a shocking amount of powdered sugar throughout the process.

Cupcakes in pan cooling on counter by Eve Fox, the Garden of Eating blog, copyright 2013

One note on the yield, Elise's recipe says it makes 12 cupcakes but I've made it twice now (it's that good!) and I feel that 12 is a little optimistic unless you want pretty small cupcakes. Ten is more realistic if you're shooting for a normal-sized cupcake.

But I've nattered on quite long enough. Without further ado, I give you the world's simplest, moistest chocolate cupcake recipe. And vegan to boot!

Chocolate cupcakes with red candles by Eve Fox, Garden of Eating blog, copyright 2013

-- print recipe --
Easy, Moist (Vegan) Chocolate Cupcakes via Simply Recipes
Makes 10 cupcakes - if you want to make a cake, double the recipe and cook in two 8-inch round cake pans for 35-40 minutes

Ingredients

* 1 1/2 cups all purpose flour
* 1/4 cup unsweetened cocoa powder
* 1 cup organic cane sugar (I use vanilla sugar - it adds an extra yum factor)
* 1 tsp baking soda
* 1/2 tsp sea salt
* 1 cup of medium strength brewed coffee
* 1 Tbsp white vinegar
* 2 tsps vanilla extract
* 6 Tbsps (1/4 cup plus 2 Tbsp) olive oil

* Unbleached cupcake liners (I prefer to use unbleached paper liners as I suspect some of the bleach must get transferred to the wet batter as it heats up.)

Directions

1. Preheat the oven to 350°F. Line a muffin tin with cupcake liners (you can also grease the tin instead but the liners are definitely easier and will prevent anything from sticking.)

2. Whisk the flour, cocoa powder, sugar, baking soda, and salt together in a large bowl until there are no visible clumps. If you've got particularly clumpy cocoa or sugar, you can always sift the dry ingredients into the bowl, too.

3. In a small to medium-sized bowl, mix together the coffee (or water plus coffee granules), vinegar, vanilla extract, and olive oil.

4. Add the wet ingredients to the dry ingredients and stir just to combine (mixture will be rather lumpy.)

5. Ladle the batter into the cupcake liners, filling them about two-thirds of the way full. Put in the oven and bake for 18 to 20 minutes, until a bamboo skewer inserted in the center comes out clean.

6. Remove from oven and cool in the pan for 5 minutes, then remove from the pan and let cool completely on a rack. Once cool, frost with the frosting of your choice and serve.

A few frosting options (first two are vegan) if you don't have one you like already (but please note that I haven't tried these recipes):
You might also like:
Want even more recipes, photos, giveaways, and food-related inspiration? "Like" the Garden of Eating on Facebook, or follow me on Twitter or Pinterest.

Wednesday, May 8, 2013

Can Saver Kitchen Hack

Just wanted to share this handy little kitchen hack I've been using for the past year or so - the kitty food can saver!

Although it's obviously intended to keep cans of pet food fresh in your fridge it works equally well to keep canned chipotles or tuna fish fresh.

Clever Kitty Can Saver Top by Eve Fox, Garden of Eating blog, copyright 2013

It had always bothered me that most of the can of chipotles would end up going to waste since I'd open a can of them, use just a tiny bit as I am quite wimpy about spicy food, and then lamely try to keep it fresh by covering it with some tin foil and a rubber band. It just did not work.

But now, my kitty can saver allows me to extend its stay in the fridge for many, many weeks. One nice thing about this can saver is that it's adjustable - the lid has several different circumference rings that will fit different sized cans. I got it at my local hardware store for under $2 but you can also find them online.

Clever Kitty Can Saver Top by Eve Fox, Garden of Eating blog, copyright 2013

Check out some of these other "Gifts from the Kitchen Gods":

Want even more recipes, photos, giveaways, and food-related inspiration? "Like" the Garden of Eating on Facebook, or follow me on Twitter or Pinterest.

Friday, May 3, 2013

Grilled Ramps - Simple, Spectacular & Seasonal Fare

We're coming to the tail end of wild ramp season here in the Hudson Valley so we made one more push to harvest a few more yesterday and we couldn't have picked a nicer day for it. Rahm took this photo of me with some of the ramps and the tool of the trade - I was like a pig in shit, if I do say so myself.

Eve Fox with ramps & trowel by Rahm Rechtschaffen, the Garden of Eating blog, copyright 2013

Just a reminder to please harvest sustainably if you are fortunate enough to find a big enough patch to sustain some picking. You can only take a fraction of the plants without impacting their ability to thrive next year. If you're not sure how much is too much, my friend and fellow Woodstock Farm Festival-er, Rick is a big proponent of snipping just the greens instead of digging up the entire plant.

Freshly picked ramps awaiting cleaning by Eve Fox, the Garden of Eating blog, copyright 2013

And don't forget that you can and should start your own patch by planting seeds and transplanting bulbs! We started this process last year by ordering ramp bulbs and seeds from Facemire's farm.

Fresh-picked ramps on the grill by Eve Fox, the Garden of Eating blog, copyright 2013

The bulbs we planted last year are up again this year and seem to be doing well though it will be a number of years before they've spread enough to harvest any of them. We'll just keep at it, though, and eventually should have a stellar patch of these singularly tasty spring onions.

Fresh-picked ramps on the grill by Eve Fox, the Garden of Eating blog, copyright 2013

If you want to start your own patch (do it!) keep in mind that ramps like sandy, loamy soil near streams or on hillsides in deciduous forest - I've heard that maple and oak trees are their favorites - where they can enjoy the early spring sunshine before the trees leaf out and benefit from the natural mulch of leaf litter in the fall. They do NOT like the acidic soil and limited sunlight of conifer (pine/evergreen) forest.

Now that my little lecture has been delivered, back to the grilled ramps.We made these last night to accompany some grilled salmon with mustard and thyme and we are HOOKED! Even our four-year-old son who does not typically like onion-y, garlicky foods attacked them with great enthusiasm.

Grilled ramps by Eve Fox, the Garden of Eating blog, copyright 2013

Very simple, too. Just toss with olive oil, salt and pepper and grill. Enjoy!

Grilled Ramps
Serves 2-4 as a side

Ingredients

* 1 bunch (roughly 20) amps, cleaned with root ends cut off
* 1-2 tsps olive oil
* Sea salt
* Freshly ground black pepper

Directions

1. Clean and preheat your grill.

2. While you're waiting for the grill to heat up, toss the ramps with the olive oil, sea salt and pepper in a large bowl until well-coated.

3. Lower flame to medium and lay the ramps out in a single layer. Cook until grill marks form then turn to the other side - this should only take 1-2 minutes on each side.

4. Remove to a platter and serve.

You might also like:
Want even more recipes, photos, giveaways, and food-related inspiration? "Like" the Garden of Eating on Facebook, or follow me on Twitter or Pinterest.