I thought a round-up of some recipes might be helpful as you're planning your Thanksgiving dinners. I will likely be adding a few more good recipes after I post this so just check the Thanksgiving section on my holiday foods page to get the up-to-date list.
Hope everything turns out delicious!
Baked Macaroni and Cheese
Serves 4-6 as a main dish
Although mac 'n cheese is not typically a dish I'd prepare for Thanksgiving, this is for those of you who celebrate T-day Southern-style.
Ingredients
* 2 cups (8 oz) macaroni (elbow mac is the classic but you can use whatever you like)
* 2 1/4 cups grated sharp cheddar or Colby cheese
* 2 tbsps butter (plus an additional tbsp for the breadcrumbs)
* 2 tbsps all-purpose flour
* 2 cups milk
* 1/2 large onion, minced
* 1 bay leaf
* 1/4 tsp sweet paprika
* Sea salt and freshly ground black pepper to taste
* 1/2 cup fresh breadcrumbs
Directions
1. Preheat oven to 350 and grease a 1 1/2 quart deep baking dish.
2. Bring 6 cups water to a boil and then add the macaroni. While the macaroni is cooking, grate the cheese. Cook the pasta until al dente then drain and move to a bowl or put back in pot.
3. Melt the 2 tbsps butter in a large saucepan over medium-low heat then whisk in the flour and cooking, whisking, for three minutes.
4. Gradually whisk in the milk then stir in the onion and add the bay leaf and paprika. Simmer gently for 15 minutes, stirring often. Remove from heat and stir in 2/3 of the cheese then season with the salt and pepper to taste.
5. Add the macaroni and stir to combine. Pour half the mixture into the baking dish and sprinkle it with half of the remaining cheese. Add the rest of the macaroni mixture and top with the rest of the cheese.
6. Melt 1 tbsp butter in a small skilet and add the breadcrumbs. Toss to coat and cook for 30-60 seconds. Sprinkle the buttered breadcrumbs over the top of the macaroni in the baking dish and bake until the breadcrumbs are lightly browned, about 30-35 minutes. Let stand 5 minutes before serving.
Cider Glazed Delicata Squash with Sage
Serves 4-6These sweet, buttery chunks of squash basically melt in your mouth... Everyone will love this dish, including little ones.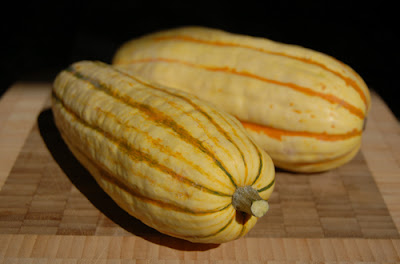
Ingredients
* 2 medium delicata squash (about 2 pounds) or other firm winter squash
* 3 tablespoons unsalted butter
* 1/4 cup very coarsely chopped fresh sage
* 1 tablespoon coarsely chopped fresh rosemary
* 1 1/2 cups fresh unfiltered apple cider or juice
* 1 cup water
* 2 teaspoons sherry vinegar
* 1 teaspoon sea salt
* Freshly ground black pepper Directions
1. Squash. If using delicata squash, peel it with a vegetable peeler, cut it lengthwise in half, and scrape out the seeds with a spoon. Cut each piece lengthwise in half again, then crosswise into 1/2-inch -thick slices. Other types of squash should be peeled with a chef's knife, seeded, cut into 1-inch wedges, then sliced 1/2-inch thick.
2. Herb Butter. Melt the butter in a large (12-inch) skillet over low heat. Add the sage and rosemary and cook, stirring, until the butter just begins to turn golden brown, 3 to 5 minutes. Do not brown the herbs. Cooking the herbs in butter mellows their flavor and improves their texture.
3. Cooking the squash. Add the squash to the skillet, then the apple cider, water, vinegar, and salt. Cook, stirring occasionally, over medium heat at an even boil until the cider has boiled down to a glaze and the squash is tender, 20 to 30 minutes. Taste and season with pepper, and additional salt if needed.
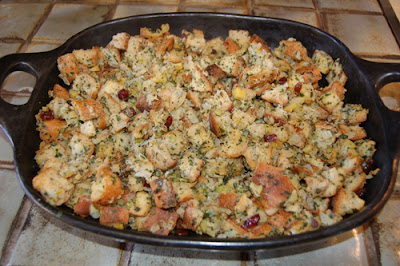
Herbed Chestnut Stuffing With Cranberries
Serves 8-10
Peeling fresh chestnuts is a huge pain in the ass! At first I thought it was odd that all the chestnut stuffing recipes called for canned chestnuts (eww, right?) but after wrestling with the hairy little bastards for over an hour, I now understand why. So there is absolutely no judgement from me about using the canned ones... 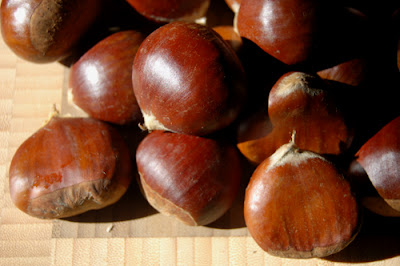 Any white bread will do. Some people like the lighter sandwich type bread and others go for slightly crustier loaves. I used two sweet (as opposed to sour) baguettes. And don't skimp on the herbs! I threw a ton of fresh parsley, sage and thyme in and it lent a lovely herby flavor. The thyme is particularly wonderful-smelling.
I used a combination of chicken stock and egg to achieve the desired moistness level. I also did a vegetarian version for my brother-in-law who does not eat dairy and my sister-in-law who does not eat meat! The only changes were that I sauteed the celery and onions in olive oil, wet the stuffing with vegetable stock, instead of chicken, and did not dot the top with butter before baking. The veggie version is very good and a little healthier for you, too.
 Ingredients
* 1 lb white bread cut into one inch cubes
* 1 cup coarsely chopped roasted or boiled chestnuts
* Half a stick of butter (4 Tbsps)
* 1 - 1 1/2 cups of chicken stock
* 2 small to medium sized onions, chopped
* 4 ribs of celery, finely chopped
* 2 eggs, well beaten
* 1/2 cup dried cranberries or other fruit - currants, etc.
* 1/2 cup chopped flat leaf parsley
* 2 tsps chopped fresh thyme
* 2 tsps chopped fresh sage
* Sea salt
* Freshly ground black pepper
Directions
1. Preheat the oven to 350 degrees. Cut a large X on the flat side of each chestnut (be sure to go all the way through the protective shell) then place the nuts on a thick baking sheet and pour a cup or two of water on the tray. Bake the chestnuts, flipping them over once, for 15-20 minutes. Leave them in the oven and shell and peel a handful at a time (they will be hot and a bit hard to handle). Chop the chestnut meats coarsely.
2. If you don't have time to let the bread cubes get stale by sitting out, place them in a single layer on a thick cookie sheet or two and bake at 300 degrees for 10-15 minutes, until golden.
3. Melt the butter in a frying pan or saucepan and add the onions and celery. Cook on medium heat until softened - 4-5 minutes. Turn off the heat and fold in the herbs, mixing well to combine.
4. Add salt and pepper to taste. Fold in the chestnuts and dried cranberries. Pour this mixture into the cubed dry bread and stir to combine.
5. Add the stock to the stuffing mixture and stir well until it is moist all over but not soggy. Add the egg if you want to give the cooked stuffing a bit more substance.
6. Pour the stuffing into a buttered casserole pan or baking dish and dot the top with butter. Bake until the top gets crusty - 30-45 minutes.
* If you bake the stuffing in the bird, you must be sure that it reaches 165 degrees (the temperature at which bacteria are killed) before you serve it. This may require additional cooking outside of the bird, hence the removable cheesecloth bag.
Pumpkin Pie
Makes one 9-inch pie, 8 servings

A few things to note:
* You'll need to pre-bake the crust, otherwise it will get soggy from the soupy squash/custard mixture.
* In addition to pre-baking, you'll need to brush the entire crust with a mixture of egg yolk and salt to "seal" it from the wetness and help prevent sogginess.
* The crust should be warm/hot when you fill it with the pumpkin mixture.
* Use two eggs for a firmer, more pumpkin flavored pie or three eggs for a softer, more custard-like pie.
* For some odd reason, prepared pumpkin comes in 15 oz cans. The Joy Of Cooking recipe called for 2 cups (16 oz) but one can should be plenty - I ended up having extra filling that I could not fit in the crust.
Ingredients
* Prepared pie crust (see recipe)
* 2 to 3 large eggs
* 2 cups (1 can) canned pumpkin puree - I used an organic one from Trader Joe's. (You can also prepare your own freshly cooked pumpkin to make the filling but I am just not that hard core.)
* 1 1/2 cups light cream or mix 3/4 cup heavy cream and 3/4 cup milk
* 1/2 cup sugar
* 1/3 cup firmly packed light or dark brown sugar
* 1 tsp ground cinammon
* 1 tsp ground ginger (I didn't have this so I left it out but it sounds good)
* 1/2 tsp freshly grated or ground nutmeg
* 1/4 tsp ground cloves or allspice
* 1/2 tsp salt
Directions
1. Position rack in the center of the oven. Preheat oven to 400.
2. Make pie crust and bake at 400 for 20 minutes or until golden brown.
3. Remove the crust, brush thoroughly with a mix of egg yolk and a pinch of salt and bake for another 2 minutes to set the egg wash.
4. Turn oven down to 375. Whisk the eggs together in a large bowl. Add the rest of the ingredients and whisk together thoroughly until combined.
5. If the crust has cooled, warm it in the oven until it is hot to the touch.
6. Pour the pumpkin mixture into the crust and bake until the center of the filling seems set but quivery - like jello - when you nudge the pan. Should take roughly 45 minutes but this varies by oven (as I said, mine took a bit longer).
7. Remove the pie and let cool completely on a wire rack, then refrigerate for up to 1 day. Serve cold or at room temperature with whipped cream.
Roasted Brussel Sprouts
This is a remarkably easy and delightfully tasty recipe. I have not included any amounts as it's simple enough to adapt to however much or little you want to prepare - just use enough oil to coat the sprouts on all sides.

Ingredients
* Brussel sprouts, bottom ends trimmed and any brown or yellow leaves removed, and washed
* Olive oil
* Salt & pepper to taste
Directions
1. Preheat the oven to 400.
2. Toss the sprouts with the olive oil, salt, and pepper, and spread them in a single layer on a baking sheet or in a baking dish.
3. Roast for 45-50 minutes, turning them every 15-20 minutes.
4. Eat!
Roasted Carrots With Maple Syrup
This is a simple and delicious way to prepare carrots. The seasoning is flexible, add herbs or spices as you see fit. Likewise, the amounts are adjustable - just cook as few or as many as you think people will eat - no need to be exact.

Ingredients * Carrots, cut into pieces or slices
* Coconut oil, butter, or olive oil
* Coarse sea salt
* Freshly ground black pepper
* A spoonful of maple syrup or honey
* Splash of water
* Sprinkle of ground ginger (optional)
Directions
1. Preheat oven to 450. Clean the carrots and cut off the ends. Cut them into manageable sized pieces, depending on the size of the carrots.
2. Grease a baking dish with either coconut oil, butter or olive oil (I think I actually like the coconut oil best - it lends a subtle sweetness to the end product and is supposedly also really good for you!). Toss the carrots in the dish and add a bit more fat (dot with the butter or coconut oil or throw in a splash of olive oil). Add salt and pepper to taste and drizzle with a bit of maple syrup or honey (you can omit the sweetener if you prefer).
3. Cover with tin foil and bake for 15-20 minutes. Remove the foil and bake another 10 minutes or until nice and tender.
Roasted Root Vegetables With Maple Sage Glaze
Serves 4
Savory and sweet, this mix of roasted root veggies is a hearty and filling "wintry mix."

Ingredients
* 1 rutagaba, peeled and diced
* 1 turnip, peeled and diced
* 1 sweet potato, peeled and diced
* 1 parsnip, peeled and diced
* 2 carrots, peeled and diced
* 1 tbsp olive oil
* Sea salt and several cranks of freshly ground black pepper
* 3 tbsps pure maple syrup
* 1 tbsp butter
* 1 tbsp chopped fresh sage
Directions
1. Preheat oven to 400 degrees F.
2. In a medium bowl, toss diced vegetables with olive oil, salt, and pepper.
3. Spread vegetables in a single layer on an aluminum lined baking sheet (for easy clean up). Roast for 20 minutes.
4. Stir and continue roasting for another 20 minutes.
5. Meanwhile in a small pan over medium heat, melt the butter. Add the maple syrup and sage to the melted butter and stir until combined. Pour over the vegetables, and stir until well coated.
6. Roast for another 15-20 minutes or until maple syrup becomes bubbly and vegetables are tender when pierced with a fork.
7. Garnish with more chopped fresh sage before serving.
Shoestring-Style Brussel Sprouts With Garlic & Mustard
Serves 4
This recipe is pretty flexible -- you can adjust it by adding dried or fresh herbs (thyme, savory, etc.) to the dressing if you like, going heavier or lighter on either garlic or mustard, skipping the cheese or using a different kind, etc.

Ingredients
* 2 lbs brussel sprouts, washed and trimmed of any yellow leaves and browned bottoms
* 4 tbsps olive oil
* 4 tbsps whole grain or Dijon mustard
* 4 garlic cloves, minced or pressed
* Sea salt
* Freshly ground black pepper
* Pecorino cheese, grated (I actually forgot to add the cheese and the sprouts were delicious without it, so those of you with "lactards" in your families need not worry about omitting this ingredient to make this dish edible for all.)
Directions
1. Preheat oven to 425 degrees.
2. Chop the brussel sprouts into 1/4-inch slices with a knife or cuisinart disc attachment. Try to chop “with the grain” (from the top of the sprout to the bottom) so that the slices stay together, rather than slicing across the top or across the base.
3. Prepare the dressing: Mix equal parts mustard and olive oil with the garlic, add salt and pepper to taste, and stir well. Give it a taste to see if it needs adjusting or if it seems well-balanced as is.
4. Toss the dressing with the sprouts in a big bowl to coat thoroughly. Try to toss them gently so the sprouts don’t break apart too much.
5. Spread the dressed sprouts in a thin layer in a large roasting pan. If you'd like to use the cheese, grate a bit of pecorino on top, using the largest holes in the grater. Press the grated cheese strips down with an oiled spoon or your fingers – the more they’re in contact with the sprouts, the less they’ll become too brown or burn.
6. Roast for 15-20 mins or until the sprouty shreds get soft and carmelized and the cheese is starting to brown.
Simple Mashed Potatoes
Makes 4-6 servings
Ingredients
* 2 1/2 pounds potatoes (about 6 large potatoes), preferably a combination of russet (baking) potatoes and large Yukon Golds, or all Yukon Golds
* 4 tablespoons butter, more for dotting
* 1/3 cup whole milk
* Sea salt
Directions
1. In a large pot, bring a gallon of water and 2 tablespoons salt to a boil over high heat. Peel and quarter potatoes and keep in cold water until ready to cook (this can be done up to 4 hours in advance). Add potatoes to boiling water and boil about 15 to 20 minutes, until soft; a knife should go in with almost no resistance. (It is better to overcook than to undercook.)
2. In a saucepan or a microwave oven, heat butter and milk together until butter melts and mixture steams. Drain potatoes well and return to pot. Using an extruding masher or a ricer, mash hot potatoes until smooth. Lightly mix in about half of hot butter mixture, just until blended. Taste for salt and add more butter mixture until seasoned to your liking.
3. Stop here for fluffy potatoes. For creamy potatoes, keep stirring potato mixture, using a sturdy spoon to press it against sides and bottom of pot. Mix until dense and thick. For whipped potatoes, use a stand mixer to mash hot potatoes just until smooth, about 30 seconds. Add all the butter mixture and salt to taste, pulsing machine in short bursts at medium speed. When light and creamy, stop mixing immediately (potatoes can quickly become sticky).
4. To keep hot until ready to serve, transfer to serving bowl, dot top with butter, cover tightly and keep in a warm place, like the back of the stove. Potatoes will stay hot for at least 30 minutes. To keep longer, place covered bowl in a pan holding about an inch of gently simmering water. Before serving, mix well.
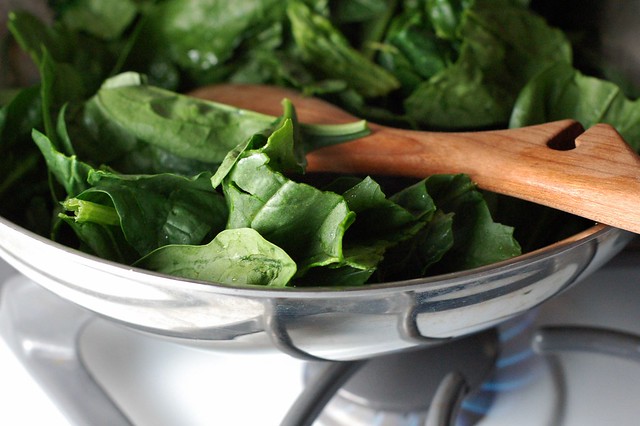
Wilted Kale Salad With Balsamic Vinegar & Orange Zest
Serves 4This salad makes a great Thanksgiving side dish. The kale provides a solid base to which the onions and vinegar lend sweetness and the zest gives a nice little zip.

Ingredients
* 1 large bunch of kale (I like the russian kind or some other purplish variety for this, rather than the dinosaur kale)
* 2 cloves of garlic, minced or thinly sliced
* 1 small onion, thinly sliced
* 2 Tbsps olive oil
* 1/4 cup organic currants
* 1 tsp orange zest
* 2 tsps balsamic vinegar or balsamic vinegar glaze
* Sea salt
* Freshly ground black pepper
Directions
1. Wash the kale well and then chop into large pieces.
2. Heat olive oil in a large skillet over medium heat. Add garlic and onions and sautee until translucent. Add the kale and cook until completely wilted.
3. Remove from heat and let cool. Add the vinegar, currants, zest, and salt and pepper to taste. Toss well to combine and serve.


