In a rush? Skip to the end to learn which brands are best and which you should avoid.
Organic food has become big business, and mega-food processors have moved aggressively into the sector to cash in on the boom.
There are now significantly more organic brands and products to choose from when you go to the store than there were even a few years ago. Unfortunately, the corporations behind the majority of those products have powerful lobbyists who are working overtime to weaken the relatively new USDA organic standards in order to maximize their profits. As a result of their efforts, the "organic" label may not mean what you think it means anymore...
Since there are so many players now and the vast majority of them do not have your best interests (or the best interests of farmers, animals, or the planet) at heart, there are now a truly dizzying array of factors to consider and choices to make every time you shop. These choices are becoming increasingly complex as more and more factors beg our consideration. Since there are far too many organic food products to discuss here, I'm going to focus on one of the more basic foodstuffs - milk.
Here are a few important factors to consider in choosing your gallon of milk:
Location. Where was the milk produced and processed? As you've probably guessed, the more local, the better. Not only will you be helping to support dairy farmers in your community by buying a locally-produced gallon of milk, you'll also be saving gallons of fossil fuel that would be needed to transport the milk over state lines and sparing the environment all those pounds of climate-altering carbon that would have been emitted during transport.
Pasture-raised or grain-fed? Corn-fed cows sound very wholesome, right? Wrong! Cows' stomachs cannot actually tolerate too much corn (it will eventually kill them.) Although it's okay to feed cows some grain and you'd be hard-pressed to find a dairy that is fully pasture-fed since cows need a grain supplement during the winter/dry season, a diet of primarily corn and other grains is bad for the cows and bad for the milk you'll be drinking, nevermind that the grain was probably grown and milled in another state and had to be shipped across state lines.
Humanely-treated or not? In an effort to increase their production and profit margins, big organic chains like Horizon have basically recreated factory farming with a few minor twists designed to satisfy the ever-weaking USDA organic standards. The fact that a product is labeled organic in no way guarantees that the animals were humanely treated, allowed to go outside, graze freely, etc. Organic agribusiness keeps its cows closely penned indoors munching their organic corn and providing the bare minimum of access to pasture the USDA organic regulations require. Smaller dairies tend to provide much better, more humane conditions for their animals.
Waste. All that constant munching mean that cows produce a lot of cow patties and a lot of methane gas along with them. Unfortunately, methane is one of the big contributors to our quickly-warming climate. Waste from cows also pollutes rivers, streams, and entire watersheds. So the way a dairy handles (or does not handle) the waste it produces is also an important consideration.
If you have the time, I suggest that you research the companies on offer in your local market to see where they fall on all these considerations (and while you're at it, you might as well check into their labor practices, too...)
However, if you're a normal human and don't have time to delve into these questions right now, here are a few quick suggestions to inform your dairy shopping.
1. Do not buy Aurora Organic - this huge corporation is the organic equivalent of factory farming operations. It's important to note that Aurora supplies milk for many other private labels including Costco's "Kirkland Signature," Safeway's "O" organics brand, Publix's "High Meadows", Giant's "Natures Promise," and Wild Oats organic milk - so you should avoid buying any of these brands if possible.
2. Skip Stonyfield Farm, too. Although this company started out great and they have tried to stick to their founding principles as they've grown, they sold a controlling stake in their company to Danone Group (a French mega-processor) a few years back. Since then, they've been making their choices based on maximizing profit while ignoring the well-being of the farmers that supply them as well as the environmental impact of sourcing ingredients from places as far flung as China, Turkey, and New Zealand (can you say humongous carbon footprint, boys and girls?)
3. Buy Organic Valley, instead. This worker-run cooperative company offers nation-wide distribution by sourcing and distributing all its dairy products locally, cutting down on fuel and carbon emissions while supporting local farmers. They talk the talk AND walk the walk.
4. Horizon Organic is better than it used to be. I had previously put these as a "definitely do NOT buy" brand but Horizon contacted me in June 2011 to clarify that they've made substantial changes to improve conditions at they and their family of farms - reducing herd sizes, raising their own calves, etc., These changes were made beginning in 2006 in response to consumer complaints about feedlot-like conditions at its farms. While I am skeptical about the company's commitment to organic principles, if you can't choose one of these other brands, Horizon is certainly a better option than Aurora (in any of its many guises.)
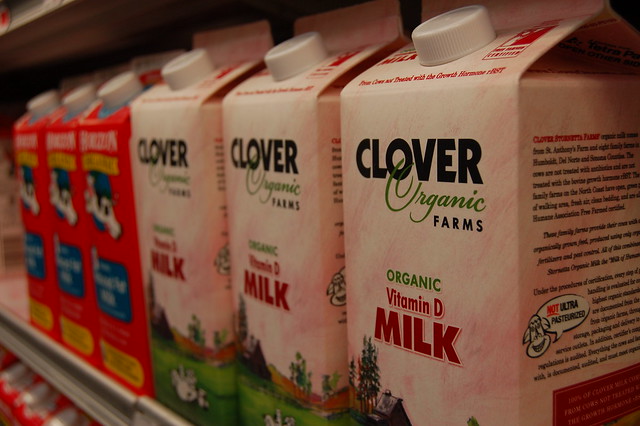
5. If you live in CA, AZ, or NV, you can also buy Clover Stornetta milk and dairy products with a clean conscience. This is a family-owned and run business with good principles and a growing number of organic suppliers that was also the first U.S. dairy to become American Humane Certified.
6. If you live in northern California, the very best milk you can buy is Straus Family Creamery! They make delicious organic milk from cows that are allowed to graze freely that is packaged in fully reusable glass bottles. Better yet, the dairy composts all its solid waste and powers 95% of its operations with the methane captured through that process.
7. If you live in upstate New York (where I grew up), buy Ronnybrook Farms milk and products. They're a small dairy (not organic, but pesticide, hormone and antibiotic-free) that also packages in glass and uses humane, sustainable practices.
8. If you live in Brooklyn, check out the farms in this great post at Nona Brooklyn.
If there is a dairy like Straus and Ronnybrook near your town or city, please buy from them! Their prices may be a bit higher than the bigger companies (especially if you are buying milk in a glass bottle which will include a hefty, but fully refundable, bottle deposit) but it will be worth it. The milk will be better all-around -- better tasting, better for you and your family, better for the cows that produced it, better for the farmers that processed it, better for your local economy and community, and better for the environment. (phew, I am exhausted now...)
I know there are lots more brands out there than the ones I've mentioned here. If you have info on any of them (I'd be curious to know more about who supplies Trader Joe's and Whole Foods with their generic brand milk, for example) please just post a comment. Thanks!
More Ways To Green Your Kitchen
Making Fresh Ricotta Cheese (It's So EASY!)
Monday, April 28, 2008
Little Miss Muffet sat on a tuffet eating her curds and whey. As a kid, I remember being both intrigued and confused by this classic nursery rhyme's reference to curds and whey. I'm somewhat ashamed to admit that my ignorance lasted until Saturday afternoon when my friend Naushon and I embarked on a wonderful cheese-making journey in her sunny kitchen overlooking the Gourmet Ghetto here in North Berkeley.
Our foray into the world of soft cheeses was inspired by my new favorite book, Animal, Vegetable, Miracle by Barbara Kingsolver. The book is a wonderful chronicle of her and her family's experiences during a year of eating locally at their home in Virginia, including an inspirational chapter on cheesemaking that makes it sound both easy and fulfilling.
Luckily, Naushon volunteers at the Edible Schoolyard here in north Berkeley and had actually made fresh ricotta once before with the kids. The Edible Schoolyard recipe below is both as simple and as delicious as Barbara Kingsolver led me to believe.
If you like soft cheeses, I suggest that you give this a shot. It's very straightforward and quick and the results are really yummy. I also suggest that you buy high-quality organic milk from a local dairy if you can. I used milk and cream from the Straus Family Creamery in Marshall, CA because it is DELICIOUS, locally-produced, organic, and also because Straus is such an incredibly cool company (do you know of another dairy that composts all its waste, uses recyclable glass bottles, and powers its operations with methane from its cows?)
I've included a little step-by-step pictorial of the process following the recipe to help you get started.
Fresh Ricotta The Edible Schoolyard Way
Ingredients
* 1 quart whole milk (organic)
* 1/2 cup heavy cream (organic)
* 4 Tbsps lemon juice
* Salt to taste
Directions
1. Bring milk and cream to a simmer very slowly in a thick-bottomed saucepan. Once simmering, turn off the heat.
2. Add the lemon juice a little bit at a time and stir. Add enough lemon juice to curdle the milk/cream mixture (you may need a bit more or less than the 4 tablespoons). The whey, the watery liquid that has separated from the solids (a.k.a. the curds), should be translucent.
3. Let stand for 5 minutes then gently ladle or pour into a fine sieve or colander lined with cheesecloth. Allow to drain for at least 1 hour or until the cheese reaches the desired thickness.
4. Transfer the curds to a bowl and season with salt to taste.
A Step-By-Step Pictorial Guide To Making Fresh Ricotta Cheese
The ingredients are extremely simple.
Squeeze a lemon for the 4 tbsps of juice.
Pour the milk and cream into the pot.
Gently bring the milk and cream to a simmer.
Add the lemon juice to curdle the milk and cream mixture and stir.
The mixture should curdle, separating into curds (solids) and whey (liquid).
Here's a close up look at some of those curds.
Pour the curdled mixture into a cheesecloth-lined colander to strain the whey from the curds.
Drain the whey. You may need to empty the liquid before you let the curds sit if the bowl you're using is not very deep.
The curds will need to rest for about an hour in their cozy cheesecloth-lined strainer.
When the cheese has reached the desired consistency, pour the drained cheese into a bowl and add salt to taste.
Try a spoonful of your delicious homemade ricotta -- fresh, creamy, lightly salty, and just a tiny bit sweet!
You might also like:
Heads Up, Berzerkelyites - Corso is Coming
Sunday, April 27, 2008
I've been wondering what would replace Misto, a Mediterranean bistro on Shattuck Avenue that I pass every day on my way to and from work. Misto never seemed to have any customers when I walked past so it did not come as a total surprise when it closed for good a few months ago. Since then, the windows have been covered in white paper and no signs of activity were visible. But on my way to work earlier this week, I spotted a change - someone had taped a photocopy of a short article from the Chronicle against the glass.
I stopped to read it and was pleased to learn that there is actually a new restaurant in the works behind those papered-up windows. The restaurant-to-be is the brainchild of Wendy Brucker and Roscoe Skipper, the husband and wife duo behind Rivoli, a famous North Berkeley restaurant. (Although Rivoli is on my list of restaurants to review, I have not found the right occasion to go yet - it's a little too pricey for a casual dinner outing.)
According to the Chronicle, the new eatery will be called Corso and is scheduled to open May 1st. Corso will have a more casual feel than its sister eatery and will serve Italian food with a focus on Florentine dishes.
Simmered Sweet Kabocha (Japanese Pumpkin)
Saturday, April 26, 2008
Ever since, I went to the wonderful Thai temple brunch at Wat Mongkolratanaram a few weeks ago, I've been lusting after a delicious curried pumpkin that I sampled there. I was especially curious to find out what kind of pumpkin it was as it had a unique flavor and consistency and a delicate green skin.
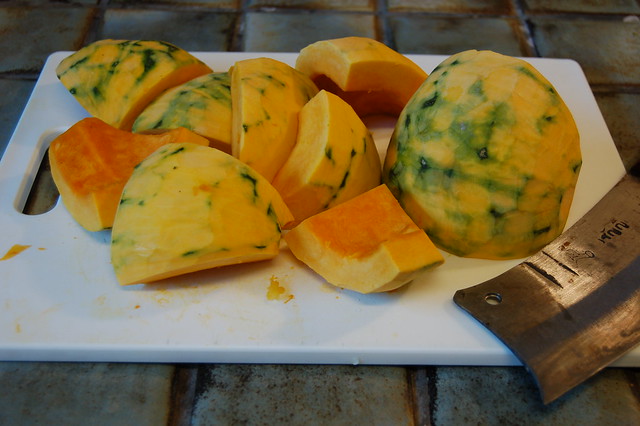
I found several references to kabocha, a type of winter squash commonly known as "Japanese pumpkin" that is prized for its sweet, mild flesh and its pleasing consistency which is both dense and fluffy, similar to a chestnut or sweet potato. As you can see from my photo below, kabocha are charmingly squat in shape and sport a dark green skin with light green stripes and spots.
I also learned that there are tons of kabochas grown here in California although the vast majority of them are exported to Japan where they are a popular ingredient in vegetable tempura and other dishes. But once I knew what to look for, it was no problem to find one (organic, no less.)
Although I could not find the highly addictive curried pumpkin recipe, I did find a simple recipe for simmered sweet kabocha - a popular snack food in Japan where it is eaten both warm and cold. I gave it a shot last night and loved it! The squash has a lovely, rich flavor, pleasing texture, and cheerful color.
This is good as a snack food but it also goes well with a more complete meal. For dinner last night, I made the sweet simmered kabocha with basmati rice and a stir-fry of red cabbage, spinach, grassfed organic beef, scallions, garlic and ginger, and sprinkling of cilantro. Very tasty!
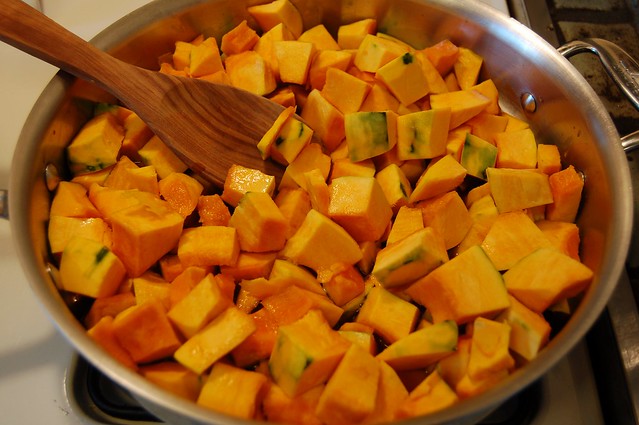
The only downside to these kabochas is that they are really HARD! Both the skin and the flesh are quite tough and it took quite a while and a good deal of effort (not to mention a huge cleaver) to get it peeled and cut into one-inch cubes. But the end result was definitely worth it. Try it and let me know what you think.
Update: If you use a smaller kabocha and the skin does not seem very tough, you don't necessarily need to remove the skin - it's quite edible.
-- print recipe --
Simmered Sweet Kabocha
Serves 4-6
Ingredients
* 1 kabocha squash (2-3 lbs, should make roughly 6 cups of cubed squash)
* 1/2 - 1 cup water
* 3 Tbsp brown sugar
* 2 Tbsp soy sauce
* Pinch of salt
Directions
1. Cut the squash into four pieces and peel (it's normal for this to be quite challenging). If the skin looks good, you can leave some of it intact.
2. Scoop out the seeds and remove any stringy pulp that is left inside the pumpkin. Cut the squash into 1-inch cubes (I had to use a huge, heavy cleaver and bring it down with all my might to do this.)
3. Combine the water, soy, sugar and salt in a wide, shallow saucepan and add the cubed squash. Bring to a boil, then cover and reduce heat to a low simmer.
4. Cook for about 15 minutes or until done (you should be able to easily stick a fork or chopstick into the flesh without it falling apart). The kabocha should have a chestnut-like texture. If there is too much liquid left in the bottom of the pan, remove the squash and reduce it until it's thickened, then pour it over the cubes of cooked Kabocha.
You might also like:
- Quick Coconut Vegetable Curry With Kabocha Squash & Swiss Chard
- Sage & Nut-Stuffed Delicata Squash
- Farro Salad with Roasted Winter Squash, Goat Cheese & Spinach
A Taste Of Yellow 2008 - Curried Egg Salad
Tuesday, April 22, 2008
I'm submitting the following delicious curried egg salad recipe for Winos & Foodies' LIVESTRONG A Taste Of Yellow 2008. Although I did read the instructions, I'm afraid I did not have a Livestrong yellow wristband handy so please just don't enter me in the running for the photo prize. Barbara, I hope you get that "all clear" from your oncologist very soon!
My recipe is below. Feel free to get creative with this - these are just suggestions to get you thinking.
Curried Egg Salad
Serves 4
Ingredients
* 6 eggs, hardboiled
* 1 shallot or small onion, finely minced
* 2 stalks of celery minced
* 1/2 cup chopped cilantro
* 1/2 cup whole organic yogurt (if you like the taste of mayo, you can substitute a tablespoon or two for some of the yogurt)
* 1 tsp mango chutney or apricot preserves
* 1 tsp mustard (a french or yellow mustard would work equally well)
* 2 tsps curry powder
* Sea salt and freshly ground pepper to taste
* Handful of dried currants or chopped purple grapes (optional)
* Handful of toasted chopped walnuts (optional)
Directions
1. Hardboil the eggs and then cool in cold water. While the eggs are cooking, chop the onion, celery and cilantro.
2. Mix the chopped veggies and herbs with the mustard, yogurt (and/or mayo), preserves, and curry powder.
3. Peel the eggs and chop to desired size. Place the eggs in a medium sized bowl and throw in the currants/grapes and/or walnuts if you're using them. Pour the dressing over the eggs and toss to coat. Add salt and pepper to taste.
4. Serve on toasted whole grain sandwich bread with lettuce or arugala.
Introducing the New, Improved RECIPE FILE 2.0!!!
Monday, April 21, 2008
Back in October, I wrote a post about my beloved recipe folder that has truly changed the way I cook. Now it is my great pleasure to introduce you to the newly expanded, fantabulous recipe file box (a.k.a. "Recipe File 2.0" for those of you who are like me and spend too much time at your computers...)
Not only is it much easier to browse through the recipes and to file new ones, the larger file box has also enabled me to add many more categories! I have more than doubled the number of categories I'd been using in Recipe File 1.0 and there is still room to add even more! And to top it all off, I actually alphabetized the folders, making it ever so easy to find what I am looking for. (Are you getting a sense of how anal I am yet?)
The current line up is as follows: appetizers, beans, beef, breads, chicken, dressings, drinks, eggs, glazes and marinades, grains (corn, oats, quinoa, barley, farrow, etc.), how-to's, lamb, pasta, pizza, pork, potatoes, rice, salads, sandwiches, sauces, seafood, soups and stews, tarts and empanadas, Thai, turkey, and vegetables.
If you have a bunch of recipes lying around that you've clipped or inherited, I highly recommend doing something similar (though you don't have to go to the organizational extremes I naturally gravitate towards.) Creating a system will make it so much easier to use your recipes and vary what you cook. It's really worth it!
Newsflash - Nalgene To Stop Using Toxic Chemical
Sunday, April 20, 2008
Just wanted to share an update on a concern that I mentioned in my recent post, Say "Buh-Bye" to Bottled Water. At the time of writing, there was still some debate over whether or not BPA, one of the ingredients used to make Nalgene bottles and many other plastics, was truly a toxic chemical.
"My decision to ditch our Nalgenes came after I read the news stories about polycarbonate plastic bottles leaching bisphenol-A (BPA), a chemical that mimics the hormone estrogen and may be linked to increased cancer risks, infertility, autism, and developmental problems. There is still debate over how serious the risk is but I figure there's no need to keep drinking from a plastic bottle while the scientists hash it out with the plastics industry lobbyists, right?"
But it seems that the debate is finally over.
A recent New York Times article announced that Nalgene will stop using BPA in its products. The Times reports that Nalgene's decision, "came after reports that the Canadian government would declare the chemical bisphenol-a, or BPA, toxic. Some animal studies have linked the chemical to changes in the hormonal system. Those reports also prompted many of Canada’s largest retailers, including Wal-Mart Canada, to remove food-related products made with plastics containing the compound chemical, like baby bottles, toddler sipping cups and food containers, from their stores this week."
Hurray for Canada - way to protect public health! (Some might say Wal-Mart may be equally responsible for Nalgene's decision but I refuse to cheer for Wal-Mart.)
If you've been holding on to your old Nalgene bottle, please recycle it now.
Although this is encouraging news, Nalgene is going to replace BPA with another chemical and I have a hard time believing that plastic can ever be as safe as metal. So rather than wait for Nalgene's new plastic bottles to hit the shelves, why don't you go get yourself a stainless steel water bottle (and getnone for your toddler while you're at it, too)?
Click here to read my full post about breaking the bottled water habit.
Greening Your Kitchen: BYOB (Bring Your Own Bags)
Saturday, April 19, 2008
I finally started bringing my own bags to the grocery store and farmers market about six months ago, after many years of feeling guilty about not bringing my own bags. Not only was I tired of feeling guilty about contributing to the destruction of our lovely planet, my kitchen was also getting way too FULL... You see, in a rather pathetic attempt to sidestep my guilt, I never threw out any of the hundreds of used bags I took home from the store with each purchase. As a result, my kitchen was literally overflowing with these visible reminders of my guilty conscience. To use the parlance of our times, this was clearly not a "sustainable" situation on any level...
I realized it was time to bite the bullet and start bringing my own bags. I decided to approach the problem like a management consultant (i.e., charge $350/hour to point out the obvious) and quickly realized that my main problem was plain old forgetfulness. Although I'd occasionally remember to grab my canvas tote bags before leaving the house, I'd forget them nine times out of ten (though I was GREAT at remembering them the moment I stepped into the store...) And I was even worse about remembering to bring the smaller produce plastic bags I'd saved with me to the market.
My other problem was that I was loathe to reuse the clear plastic produce bags because they were, well, dirty. The detritus of previous shopping excursions - fragments of old onion skins, clumps of dirt from a bundle of fresh spinach, sticky red strawberry juice, etc., left many of them kind of gross on the inside. So I'd stuff them under the sink in order to avoid the guilt that would inevitably accompany throwing them away. But then I would never actually use them...
Once I had identified these two main obstacles, I channeled my inner management consultant to devise a simple (yet brilliant) two-part plan to overcome them. Here's what I came up with.
Cleaning & Drying the Produce Bags
Although it's probably obvious to all of you rocket scientists, it actually took me a little while to figure out that you have to turn the used bag INSIDE-OUT in order to clean it properly (duh!) I had been trying to wash them without turning them inside out first -- it did not go so well. Flipping them inside out allows you to wash any dirt or gunk off with relative ease. Mostly you can just use your hand but if there's something particularly challenging on there, you can also wipe the bag with a sponge.
Once the bag is clean, it's time to dry it. Since you've already flipped it inside-out, all that's left to do is identify an appropriate protrusion to hang it over. All you need is something kind of tall and thin-shaped that will allow air to circulate in and around the bag. I am planning to buy one of those nifty wooden bag driers very soon but, for now, I use my spray bottle, mortar and pestle, and bottle of hand moisturizer to hang the bags on. It's not the most glamorous solution but it does work.
Making It Impossible To Forget (All) The Bags
My first step on this front was to move my reusable canvas tote bags from the dark hall closet they'd been inhabiting for the past few years to a sunnier, more prominent spot next to the front door where they would be hard to miss.
But just moving the tote bags to the doorway was not enough, I also needed help remembering to bring all those plastic produce bags with me when I went shopping. My husband and I store all our used plastic bags under our kitchen sink in a really great bag holder made by Simple Human. The only downside is that I rarely remembered to grab the bags from under the sink before leaving the house, after all, out of sight, out of mind, right? Luckily, I realized that filling the canvas tote bags by the door with the used plastic bags would eliminate the need to remember to grab them altogether. This brilliant innovation did the trick!
A quick note on bags: I have a veritable army of canvas tote bags at my disposal--one from a nonprofit I worked for, one from a nonprofit a friend worked for (nonprofits LOVE tote bags!), one from L.L. Bean, one from the Berkeley farmers market, and three from Trader Joes. I am partial to canvas bags because they are made of a natural, non-toxic, renewable material (cotton), you can stretch them to bursting, you can wash and dry them if they get stained, you can repair them if they tear, and they're very sturdy. I also appreciate their long straps because I do most of my shopping on foot and need to carry the bags over my shoulders to prevent my poor little hands from falling off on the way home.
However, any kind of large, sturdy bag will work and you've certainly got your pick of reusable bag options nowadays. Reusing bags has become hugely trendy and tons of eco-preneurs are cashing in on the craze. Below are a few examples of some of the bags on offer -- I'm really torn - clever and funny or image-oriented and "eco-elitist"? You decide!
If you don't already have good grocery/tote bags, you can either shell out some cash to get one of these clever, trendy numbers or you can spend $2-$3 to buy a more generic but equally useful bag from Trader Joes, Whole Foods, Andronicos, and many other chain grocery stores.
I won't pretend that changing my ways was quick or easy - it did take me a little while to break the plastic bag habit but, once I did, it became surprisingly easy and actually enjoyable. My feelings of guilt have been replaced with a much more enjoyable sense of self-reliance and environmental responsibility.
Although bringing your own bags may seem like a small action, it will add up to a big difference over time. According to the Worldwatch Institute, it takes 430,000 gallons of oil to produce 100 million non-biodegradable plastic bags. And each year, people use 4 to 5 trillion of these bags worldwide. If we cut down on the demand for these bags by reusing, we can save thousands of gallons of oil and prevent the bags from filling our landfills and waterways for centuries to come.
Ultimately, our governments and corporations should be leading the charge by either heavily taxing or banning the use of plastic bags and providing much stronger incentives to bring your own tote bags (that $0.10 bag credit just does not cut it!) Although San Francisco did become the first city in the U.S. to ban the use of plastic bags in major grocery stores and pharmacies last March, most governments and corporations are still dragging their feet.
Hopefully they'll catch up and passing laws like this one soon. And when they do, you'll already be bringing your own bags!
Good luck with starting to BYOB - I know you can do it! Feel free to contact me if you have any questions.
More Ways To Green Your Kitchen
- Nix the Antibacterials
- Slay the Energy Vampires
- Plant an Herb Garden
- Buy In Bulk
- Grow Your Own Garlic
- Say 'Buh-Bye' to Bottled Water
- How To Choose the "Right" Milk
- Skip the BPA, Switch to Glass Storage Containers
- Forget Free-Range, Buy Pasture-Raised Eggs From a Local Farm
- Buy BPA-Free Tomatoes & Beans
Take a Bite Out Of Climate Change
Wednesday, April 16, 2008
I wanted to let you all know about a new website that launched today called Take a Bite Out Of Climate Change at: http://www.takeabite.cc
I'll be doing some of the blogging for this site which was created by Anna Lappe at the Small Planet Institute.
The site aims to:
I'll be doing some of the blogging for this site which was created by Anna Lappe at the Small Planet Institute.
The site aims to:
- explain the connection between the food at the end of their forks and the global climate crisis
- connect people with actions they can take to “take a bite” out of climate change
- empower people to make climate friendly culinary choices every day
Check it out at: http://www.takeabite.cc
Holy Guacomole - This Green Stuff Is GOOOOD!
Tuesday, April 15, 2008
Yesterday, at precisely 1:17 PM PT, a guacomole storm hit my kitchen with deliciously devastating power. It was one of those "perfect storm" situations you hear about -- I was hungry, I had two ripe, organic avocados, a pile of sweet organic romanita tomatoes, a mound of fresh cilantro, an organic red onion, and a lime...
What happened next will undoubtedly go down in culinary history as one of the tastiest guacomole storms ever to hit north of the Oakland/Berkekley border. I gobbled it up with a pile of organic white corn chips.
The very simple recipe is below. I've mostly left out amounts since it is really up to you how much of any one ingredient to include - if you don't like onions or tomatoes you can leave them out, if you love garlic you can add some, if you like your guac spicy you should chop up a jalapeno, etc., etc.
Holy Guacomole!
Ingredients
* Ripe avocado, mashed
* Lime juice
* Red onion, finely chopped
* Tomatoes, chopped
* Fresh cilantro, washed and coarsely chopped
* Sea salt
Directions
Combine all the ingredients and taste. You may want to add more lime juice or salt or adjust the amount of tomato, onion, etc. You can also add some ground coriander or chili powder for additional flavor but I find that it's not necessary if you have good raw ingredients.
A Religious Experience: Thai Brunch at Wat Mongkolratanaram
Wednesday, April 9, 2008
My love of Thai food dates back exactly ten years to my junior year of college. My best friend and I had decided to take spring semester off to travel around the world. Although neither of us knew anything about Thailand (it was not yet the hot tourist destination it has since become), we chose Bangkok as our first stop on a whim.
We arrived horribly jetlagged after the 18+ hour flight and were practically flattened (minus our hair, which was pretty much the exact opposite of flattened) by the wall of intense heat and humidity that hit us when we stepped out of the airport. But after a good nights' sleep, we began to explore this strange and wonderful new land.
Despite the fact that Thailand is so humid that you have to take at least three showers a day just to feel semi-human, I spent next three weeks falling deeply in love with Thailand's gentle and friendly people, beautiful Buddhist temples, orange-clad monks, crowded (yet clean) streets, and noisy tuk-tuks. But all that was nothing compared to how hard I fell for the FOOD.
Thailand is truly a gastronomic wonderland. The food is fresh, cheap, and absolutely delicious. Although I wouldn't touch street food in India with a ten foot pole, I feel perfectly safe eating from Bangkok's army of street vendors. Mangos, rambutan, lychee, pineapple, bananas, champu, jackfruit, durian (if you're into that sort of thing...), noodles, sticky rice, green curry, red curry, yellow curry, rice dishes, beef, chicken, pork, shrimp, fish, you name it, they've got it.
So it was like walking into a wonderful dream when we stepped into the courtyard of Wat Mongkolratanaram this weekend for the Thai brunch the temple hosts each Sunday from 9-2. This brunch is like a little slice of Thailand in South Berkeley, complete with an equal number of neatly dressed Asian people and dreadlocked hippies.
Since a picture is worth a thousand words, I'm going to let the photos I took do most of the talking.
Shot of the ceiling of the temple entranceway.
Two dragons guard the temple entrance.
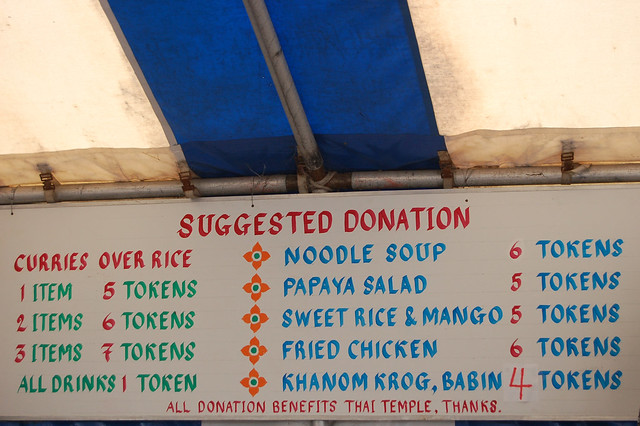
List of the brunch prices - each token costs $1. All proceeds support the the temple.
Pile o' tokens - these Buddhists are raking in the cash for their delicious brunch foods!
My little cup of tokens. This turned out to be way more than I needed but it's no big deal since you can trade them back in for cash before you leave.
Scooping softened rice noodles out of a vat of boiling water and into a waiting bowl for noodle soup, a traditional South East Asian breakfast food. You start by specifying the type of noodles you want in your bowl of soup --vermicelli, medium, or wide rice noodles.
Two women making khanom krog, a sweet coconut pudding with green onions. Truly delicious!
A bowl of delicious noodle soup with beef, scallions, cilantro, and bean sprouts waiting to be devoured. After the vendor hands you your bowl, you head to a side table to add as much (or as little) fish sauce, sugar, vinegar, soy sauce, and chili peppers to it as you like.
Fresh vegetable and herb spring rolls in riceflour wrappers.
Diners wait with forks in hand to dig into the spread which includes fried chicken and sticky rice, several kinds of curry (my favorite was the pumpkin curry - so good!), banana fritters and khanom krog (in the blue paper on the left.)
Papaya salad!!!
View of the brunch scene in the temple's back courtyard.
A pile of soup bowls awaiting pick-up.
A mother and son sharing a bowl of noodle soup by a Buddha statue in the temple garden.
The temple garden grows vegetables and herbs used in traditional Thai cooking, including lemongrass and holy basil.
A sign at the entrance to the temple garden offers both literal and figurative meanings.
Just a note about timing -- I'd recommend arriving either early or late since the crowds get pretty burly between 10:30 and 1:00 (the only downside to arriving later is that they may have run out of some dishes.)
Thai Brunch At Wat Mongkolratanaram
9:00 AM - 2:00 PM on Sundays
Thai Brunch At Wat Mongkolratanaram
9:00 AM - 2:00 PM on Sundays
1911 Russell Street (between Martin Luther King Jr. Way & Otis St)
Berkeley, CA 94703
(510) 849-3419
Berkeley, CA 94703
(510) 849-3419
Wednesday, April 30, 2008
How To Choose The "Right" Milk
In a rush? Skip to the end to learn which brands are best and which you should avoid.
Organic food has become big business, and mega-food processors have moved aggressively into the sector to cash in on the boom.
There are now significantly more organic brands and products to choose from when you go to the store than there were even a few years ago. Unfortunately, the corporations behind the majority of those products have powerful lobbyists who are working overtime to weaken the relatively new USDA organic standards in order to maximize their profits. As a result of their efforts, the "organic" label may not mean what you think it means anymore...
Since there are so many players now and the vast majority of them do not have your best interests (or the best interests of farmers, animals, or the planet) at heart, there are now a truly dizzying array of factors to consider and choices to make every time you shop. These choices are becoming increasingly complex as more and more factors beg our consideration. Since there are far too many organic food products to discuss here, I'm going to focus on one of the more basic foodstuffs - milk.
Here are a few important factors to consider in choosing your gallon of milk:
Location. Where was the milk produced and processed? As you've probably guessed, the more local, the better. Not only will you be helping to support dairy farmers in your community by buying a locally-produced gallon of milk, you'll also be saving gallons of fossil fuel that would be needed to transport the milk over state lines and sparing the environment all those pounds of climate-altering carbon that would have been emitted during transport.
Pasture-raised or grain-fed? Corn-fed cows sound very wholesome, right? Wrong! Cows' stomachs cannot actually tolerate too much corn (it will eventually kill them.) Although it's okay to feed cows some grain and you'd be hard-pressed to find a dairy that is fully pasture-fed since cows need a grain supplement during the winter/dry season, a diet of primarily corn and other grains is bad for the cows and bad for the milk you'll be drinking, nevermind that the grain was probably grown and milled in another state and had to be shipped across state lines.
Humanely-treated or not? In an effort to increase their production and profit margins, big organic chains like Horizon have basically recreated factory farming with a few minor twists designed to satisfy the ever-weaking USDA organic standards. The fact that a product is labeled organic in no way guarantees that the animals were humanely treated, allowed to go outside, graze freely, etc. Organic agribusiness keeps its cows closely penned indoors munching their organic corn and providing the bare minimum of access to pasture the USDA organic regulations require. Smaller dairies tend to provide much better, more humane conditions for their animals.
Waste. All that constant munching mean that cows produce a lot of cow patties and a lot of methane gas along with them. Unfortunately, methane is one of the big contributors to our quickly-warming climate. Waste from cows also pollutes rivers, streams, and entire watersheds. So the way a dairy handles (or does not handle) the waste it produces is also an important consideration.
If you have the time, I suggest that you research the companies on offer in your local market to see where they fall on all these considerations (and while you're at it, you might as well check into their labor practices, too...)
However, if you're a normal human and don't have time to delve into these questions right now, here are a few quick suggestions to inform your dairy shopping.
1. Do not buy Aurora Organic - this huge corporation is the organic equivalent of factory farming operations. It's important to note that Aurora supplies milk for many other private labels including Costco's "Kirkland Signature," Safeway's "O" organics brand, Publix's "High Meadows", Giant's "Natures Promise," and Wild Oats organic milk - so you should avoid buying any of these brands if possible.
2. Skip Stonyfield Farm, too. Although this company started out great and they have tried to stick to their founding principles as they've grown, they sold a controlling stake in their company to Danone Group (a French mega-processor) a few years back. Since then, they've been making their choices based on maximizing profit while ignoring the well-being of the farmers that supply them as well as the environmental impact of sourcing ingredients from places as far flung as China, Turkey, and New Zealand (can you say humongous carbon footprint, boys and girls?)
3. Buy Organic Valley, instead. This worker-run cooperative company offers nation-wide distribution by sourcing and distributing all its dairy products locally, cutting down on fuel and carbon emissions while supporting local farmers. They talk the talk AND walk the walk.
4. Horizon Organic is better than it used to be. I had previously put these as a "definitely do NOT buy" brand but Horizon contacted me in June 2011 to clarify that they've made substantial changes to improve conditions at they and their family of farms - reducing herd sizes, raising their own calves, etc., These changes were made beginning in 2006 in response to consumer complaints about feedlot-like conditions at its farms. While I am skeptical about the company's commitment to organic principles, if you can't choose one of these other brands, Horizon is certainly a better option than Aurora (in any of its many guises.)
5. If you live in CA, AZ, or NV, you can also buy Clover Stornetta milk and dairy products with a clean conscience. This is a family-owned and run business with good principles and a growing number of organic suppliers that was also the first U.S. dairy to become American Humane Certified.
6. If you live in northern California, the very best milk you can buy is Straus Family Creamery! They make delicious organic milk from cows that are allowed to graze freely that is packaged in fully reusable glass bottles. Better yet, the dairy composts all its solid waste and powers 95% of its operations with the methane captured through that process.
7. If you live in upstate New York (where I grew up), buy Ronnybrook Farms milk and products. They're a small dairy (not organic, but pesticide, hormone and antibiotic-free) that also packages in glass and uses humane, sustainable practices.
8. If you live in Brooklyn, check out the farms in this great post at Nona Brooklyn.
If there is a dairy like Straus and Ronnybrook near your town or city, please buy from them! Their prices may be a bit higher than the bigger companies (especially if you are buying milk in a glass bottle which will include a hefty, but fully refundable, bottle deposit) but it will be worth it. The milk will be better all-around -- better tasting, better for you and your family, better for the cows that produced it, better for the farmers that processed it, better for your local economy and community, and better for the environment. (phew, I am exhausted now...)
I know there are lots more brands out there than the ones I've mentioned here. If you have info on any of them (I'd be curious to know more about who supplies Trader Joe's and Whole Foods with their generic brand milk, for example) please just post a comment. Thanks!
More Ways To Green Your Kitchen
Monday, April 28, 2008
Making Fresh Ricotta Cheese (It's So EASY!)
Little Miss Muffet sat on a tuffet eating her curds and whey. As a kid, I remember being both intrigued and confused by this classic nursery rhyme's reference to curds and whey. I'm somewhat ashamed to admit that my ignorance lasted until Saturday afternoon when my friend Naushon and I embarked on a wonderful cheese-making journey in her sunny kitchen overlooking the Gourmet Ghetto here in North Berkeley.
Our foray into the world of soft cheeses was inspired by my new favorite book, Animal, Vegetable, Miracle by Barbara Kingsolver. The book is a wonderful chronicle of her and her family's experiences during a year of eating locally at their home in Virginia, including an inspirational chapter on cheesemaking that makes it sound both easy and fulfilling.
Luckily, Naushon volunteers at the Edible Schoolyard here in north Berkeley and had actually made fresh ricotta once before with the kids. The Edible Schoolyard recipe below is both as simple and as delicious as Barbara Kingsolver led me to believe.
If you like soft cheeses, I suggest that you give this a shot. It's very straightforward and quick and the results are really yummy. I also suggest that you buy high-quality organic milk from a local dairy if you can. I used milk and cream from the Straus Family Creamery in Marshall, CA because it is DELICIOUS, locally-produced, organic, and also because Straus is such an incredibly cool company (do you know of another dairy that composts all its waste, uses recyclable glass bottles, and powers its operations with methane from its cows?)
I've included a little step-by-step pictorial of the process following the recipe to help you get started.
Fresh Ricotta The Edible Schoolyard Way
Ingredients
* 1 quart whole milk (organic)
* 1/2 cup heavy cream (organic)
* 4 Tbsps lemon juice
* Salt to taste
Directions
1. Bring milk and cream to a simmer very slowly in a thick-bottomed saucepan. Once simmering, turn off the heat.
2. Add the lemon juice a little bit at a time and stir. Add enough lemon juice to curdle the milk/cream mixture (you may need a bit more or less than the 4 tablespoons). The whey, the watery liquid that has separated from the solids (a.k.a. the curds), should be translucent.
3. Let stand for 5 minutes then gently ladle or pour into a fine sieve or colander lined with cheesecloth. Allow to drain for at least 1 hour or until the cheese reaches the desired thickness.
4. Transfer the curds to a bowl and season with salt to taste.
A Step-By-Step Pictorial Guide To Making Fresh Ricotta Cheese
The ingredients are extremely simple.
Squeeze a lemon for the 4 tbsps of juice.
Pour the milk and cream into the pot.
Gently bring the milk and cream to a simmer.
Add the lemon juice to curdle the milk and cream mixture and stir.
The mixture should curdle, separating into curds (solids) and whey (liquid).
Here's a close up look at some of those curds.
Pour the curdled mixture into a cheesecloth-lined colander to strain the whey from the curds.
Drain the whey. You may need to empty the liquid before you let the curds sit if the bowl you're using is not very deep.
The curds will need to rest for about an hour in their cozy cheesecloth-lined strainer.
When the cheese has reached the desired consistency, pour the drained cheese into a bowl and add salt to taste.
Try a spoonful of your delicious homemade ricotta -- fresh, creamy, lightly salty, and just a tiny bit sweet!
Our foray into the world of soft cheeses was inspired by my new favorite book, Animal, Vegetable, Miracle by Barbara Kingsolver. The book is a wonderful chronicle of her and her family's experiences during a year of eating locally at their home in Virginia, including an inspirational chapter on cheesemaking that makes it sound both easy and fulfilling.
Luckily, Naushon volunteers at the Edible Schoolyard here in north Berkeley and had actually made fresh ricotta once before with the kids. The Edible Schoolyard recipe below is both as simple and as delicious as Barbara Kingsolver led me to believe.
If you like soft cheeses, I suggest that you give this a shot. It's very straightforward and quick and the results are really yummy. I also suggest that you buy high-quality organic milk from a local dairy if you can. I used milk and cream from the Straus Family Creamery in Marshall, CA because it is DELICIOUS, locally-produced, organic, and also because Straus is such an incredibly cool company (do you know of another dairy that composts all its waste, uses recyclable glass bottles, and powers its operations with methane from its cows?)
I've included a little step-by-step pictorial of the process following the recipe to help you get started.
Fresh Ricotta The Edible Schoolyard Way
Ingredients
* 1 quart whole milk (organic)
* 1/2 cup heavy cream (organic)
* 4 Tbsps lemon juice
* Salt to taste
Directions
1. Bring milk and cream to a simmer very slowly in a thick-bottomed saucepan. Once simmering, turn off the heat.
2. Add the lemon juice a little bit at a time and stir. Add enough lemon juice to curdle the milk/cream mixture (you may need a bit more or less than the 4 tablespoons). The whey, the watery liquid that has separated from the solids (a.k.a. the curds), should be translucent.
3. Let stand for 5 minutes then gently ladle or pour into a fine sieve or colander lined with cheesecloth. Allow to drain for at least 1 hour or until the cheese reaches the desired thickness.
4. Transfer the curds to a bowl and season with salt to taste.
A Step-By-Step Pictorial Guide To Making Fresh Ricotta Cheese
The ingredients are extremely simple.
Squeeze a lemon for the 4 tbsps of juice.
Pour the milk and cream into the pot.
Gently bring the milk and cream to a simmer.
Add the lemon juice to curdle the milk and cream mixture and stir.
The mixture should curdle, separating into curds (solids) and whey (liquid).
Here's a close up look at some of those curds.
Pour the curdled mixture into a cheesecloth-lined colander to strain the whey from the curds.
Drain the whey. You may need to empty the liquid before you let the curds sit if the bowl you're using is not very deep.
The curds will need to rest for about an hour in their cozy cheesecloth-lined strainer.
When the cheese has reached the desired consistency, pour the drained cheese into a bowl and add salt to taste.
Try a spoonful of your delicious homemade ricotta -- fresh, creamy, lightly salty, and just a tiny bit sweet!
You might also like:
Sunday, April 27, 2008
Heads Up, Berzerkelyites - Corso is Coming
I've been wondering what would replace Misto, a Mediterranean bistro on Shattuck Avenue that I pass every day on my way to and from work. Misto never seemed to have any customers when I walked past so it did not come as a total surprise when it closed for good a few months ago. Since then, the windows have been covered in white paper and no signs of activity were visible. But on my way to work earlier this week, I spotted a change - someone had taped a photocopy of a short article from the Chronicle against the glass.
I stopped to read it and was pleased to learn that there is actually a new restaurant in the works behind those papered-up windows. The restaurant-to-be is the brainchild of Wendy Brucker and Roscoe Skipper, the husband and wife duo behind Rivoli, a famous North Berkeley restaurant. (Although Rivoli is on my list of restaurants to review, I have not found the right occasion to go yet - it's a little too pricey for a casual dinner outing.)
According to the Chronicle, the new eatery will be called Corso and is scheduled to open May 1st. Corso will have a more casual feel than its sister eatery and will serve Italian food with a focus on Florentine dishes.
I stopped to read it and was pleased to learn that there is actually a new restaurant in the works behind those papered-up windows. The restaurant-to-be is the brainchild of Wendy Brucker and Roscoe Skipper, the husband and wife duo behind Rivoli, a famous North Berkeley restaurant. (Although Rivoli is on my list of restaurants to review, I have not found the right occasion to go yet - it's a little too pricey for a casual dinner outing.)
According to the Chronicle, the new eatery will be called Corso and is scheduled to open May 1st. Corso will have a more casual feel than its sister eatery and will serve Italian food with a focus on Florentine dishes.
Saturday, April 26, 2008
Simmered Sweet Kabocha (Japanese Pumpkin)
Ever since, I went to the wonderful Thai temple brunch at Wat Mongkolratanaram a few weeks ago, I've been lusting after a delicious curried pumpkin that I sampled there. I was especially curious to find out what kind of pumpkin it was as it had a unique flavor and consistency and a delicate green skin.
I found several references to kabocha, a type of winter squash commonly known as "Japanese pumpkin" that is prized for its sweet, mild flesh and its pleasing consistency which is both dense and fluffy, similar to a chestnut or sweet potato. As you can see from my photo below, kabocha are charmingly squat in shape and sport a dark green skin with light green stripes and spots.
I also learned that there are tons of kabochas grown here in California although the vast majority of them are exported to Japan where they are a popular ingredient in vegetable tempura and other dishes. But once I knew what to look for, it was no problem to find one (organic, no less.)
Although I could not find the highly addictive curried pumpkin recipe, I did find a simple recipe for simmered sweet kabocha - a popular snack food in Japan where it is eaten both warm and cold. I gave it a shot last night and loved it! The squash has a lovely, rich flavor, pleasing texture, and cheerful color.
This is good as a snack food but it also goes well with a more complete meal. For dinner last night, I made the sweet simmered kabocha with basmati rice and a stir-fry of red cabbage, spinach, grassfed organic beef, scallions, garlic and ginger, and sprinkling of cilantro. Very tasty!
The only downside to these kabochas is that they are really HARD! Both the skin and the flesh are quite tough and it took quite a while and a good deal of effort (not to mention a huge cleaver) to get it peeled and cut into one-inch cubes. But the end result was definitely worth it. Try it and let me know what you think.
Update: If you use a smaller kabocha and the skin does not seem very tough, you don't necessarily need to remove the skin - it's quite edible.
-- print recipe --
Simmered Sweet Kabocha
Serves 4-6
Ingredients
* 1 kabocha squash (2-3 lbs, should make roughly 6 cups of cubed squash)
* 1/2 - 1 cup water
* 3 Tbsp brown sugar
* 2 Tbsp soy sauce
* Pinch of salt
Directions
1. Cut the squash into four pieces and peel (it's normal for this to be quite challenging). If the skin looks good, you can leave some of it intact.
2. Scoop out the seeds and remove any stringy pulp that is left inside the pumpkin. Cut the squash into 1-inch cubes (I had to use a huge, heavy cleaver and bring it down with all my might to do this.)
3. Combine the water, soy, sugar and salt in a wide, shallow saucepan and add the cubed squash. Bring to a boil, then cover and reduce heat to a low simmer.
4. Cook for about 15 minutes or until done (you should be able to easily stick a fork or chopstick into the flesh without it falling apart). The kabocha should have a chestnut-like texture. If there is too much liquid left in the bottom of the pan, remove the squash and reduce it until it's thickened, then pour it over the cubes of cooked Kabocha.
Simmered Sweet Kabocha
Serves 4-6
Ingredients
* 1 kabocha squash (2-3 lbs, should make roughly 6 cups of cubed squash)
* 1/2 - 1 cup water
* 3 Tbsp brown sugar
* 2 Tbsp soy sauce
* Pinch of salt
Directions
1. Cut the squash into four pieces and peel (it's normal for this to be quite challenging). If the skin looks good, you can leave some of it intact.
2. Scoop out the seeds and remove any stringy pulp that is left inside the pumpkin. Cut the squash into 1-inch cubes (I had to use a huge, heavy cleaver and bring it down with all my might to do this.)
3. Combine the water, soy, sugar and salt in a wide, shallow saucepan and add the cubed squash. Bring to a boil, then cover and reduce heat to a low simmer.
4. Cook for about 15 minutes or until done (you should be able to easily stick a fork or chopstick into the flesh without it falling apart). The kabocha should have a chestnut-like texture. If there is too much liquid left in the bottom of the pan, remove the squash and reduce it until it's thickened, then pour it over the cubes of cooked Kabocha.
You might also like:
- Quick Coconut Vegetable Curry With Kabocha Squash & Swiss Chard
- Sage & Nut-Stuffed Delicata Squash
- Farro Salad with Roasted Winter Squash, Goat Cheese & Spinach
Tuesday, April 22, 2008
A Taste Of Yellow 2008 - Curried Egg Salad
I'm submitting the following delicious curried egg salad recipe for Winos & Foodies' LIVESTRONG A Taste Of Yellow 2008. Although I did read the instructions, I'm afraid I did not have a Livestrong yellow wristband handy so please just don't enter me in the running for the photo prize. Barbara, I hope you get that "all clear" from your oncologist very soon!
My recipe is below. Feel free to get creative with this - these are just suggestions to get you thinking.
Curried Egg Salad
Serves 4
Ingredients
* 6 eggs, hardboiled
* 1 shallot or small onion, finely minced
* 2 stalks of celery minced
* 1/2 cup chopped cilantro
* 1/2 cup whole organic yogurt (if you like the taste of mayo, you can substitute a tablespoon or two for some of the yogurt)
* 1 tsp mango chutney or apricot preserves
* 1 tsp mustard (a french or yellow mustard would work equally well)
* 2 tsps curry powder
* Sea salt and freshly ground pepper to taste
* Handful of dried currants or chopped purple grapes (optional)
* Handful of toasted chopped walnuts (optional)
Directions
1. Hardboil the eggs and then cool in cold water. While the eggs are cooking, chop the onion, celery and cilantro.
2. Mix the chopped veggies and herbs with the mustard, yogurt (and/or mayo), preserves, and curry powder.
3. Peel the eggs and chop to desired size. Place the eggs in a medium sized bowl and throw in the currants/grapes and/or walnuts if you're using them. Pour the dressing over the eggs and toss to coat. Add salt and pepper to taste.
4. Serve on toasted whole grain sandwich bread with lettuce or arugala.
My recipe is below. Feel free to get creative with this - these are just suggestions to get you thinking.
Curried Egg Salad
Serves 4
Ingredients
* 6 eggs, hardboiled
* 1 shallot or small onion, finely minced
* 2 stalks of celery minced
* 1/2 cup chopped cilantro
* 1/2 cup whole organic yogurt (if you like the taste of mayo, you can substitute a tablespoon or two for some of the yogurt)
* 1 tsp mango chutney or apricot preserves
* 1 tsp mustard (a french or yellow mustard would work equally well)
* 2 tsps curry powder
* Sea salt and freshly ground pepper to taste
* Handful of dried currants or chopped purple grapes (optional)
* Handful of toasted chopped walnuts (optional)
Directions
1. Hardboil the eggs and then cool in cold water. While the eggs are cooking, chop the onion, celery and cilantro.
2. Mix the chopped veggies and herbs with the mustard, yogurt (and/or mayo), preserves, and curry powder.
3. Peel the eggs and chop to desired size. Place the eggs in a medium sized bowl and throw in the currants/grapes and/or walnuts if you're using them. Pour the dressing over the eggs and toss to coat. Add salt and pepper to taste.
4. Serve on toasted whole grain sandwich bread with lettuce or arugala.
Monday, April 21, 2008
Introducing the New, Improved RECIPE FILE 2.0!!!
Back in October, I wrote a post about my beloved recipe folder that has truly changed the way I cook. Now it is my great pleasure to introduce you to the newly expanded, fantabulous recipe file box (a.k.a. "Recipe File 2.0" for those of you who are like me and spend too much time at your computers...)
Not only is it much easier to browse through the recipes and to file new ones, the larger file box has also enabled me to add many more categories! I have more than doubled the number of categories I'd been using in Recipe File 1.0 and there is still room to add even more! And to top it all off, I actually alphabetized the folders, making it ever so easy to find what I am looking for. (Are you getting a sense of how anal I am yet?)
The current line up is as follows: appetizers, beans, beef, breads, chicken, dressings, drinks, eggs, glazes and marinades, grains (corn, oats, quinoa, barley, farrow, etc.), how-to's, lamb, pasta, pizza, pork, potatoes, rice, salads, sandwiches, sauces, seafood, soups and stews, tarts and empanadas, Thai, turkey, and vegetables.
If you have a bunch of recipes lying around that you've clipped or inherited, I highly recommend doing something similar (though you don't have to go to the organizational extremes I naturally gravitate towards.) Creating a system will make it so much easier to use your recipes and vary what you cook. It's really worth it!
Not only is it much easier to browse through the recipes and to file new ones, the larger file box has also enabled me to add many more categories! I have more than doubled the number of categories I'd been using in Recipe File 1.0 and there is still room to add even more! And to top it all off, I actually alphabetized the folders, making it ever so easy to find what I am looking for. (Are you getting a sense of how anal I am yet?)
The current line up is as follows: appetizers, beans, beef, breads, chicken, dressings, drinks, eggs, glazes and marinades, grains (corn, oats, quinoa, barley, farrow, etc.), how-to's, lamb, pasta, pizza, pork, potatoes, rice, salads, sandwiches, sauces, seafood, soups and stews, tarts and empanadas, Thai, turkey, and vegetables.
If you have a bunch of recipes lying around that you've clipped or inherited, I highly recommend doing something similar (though you don't have to go to the organizational extremes I naturally gravitate towards.) Creating a system will make it so much easier to use your recipes and vary what you cook. It's really worth it!
Sunday, April 20, 2008
Newsflash - Nalgene To Stop Using Toxic Chemical
Just wanted to share an update on a concern that I mentioned in my recent post, Say "Buh-Bye" to Bottled Water. At the time of writing, there was still some debate over whether or not BPA, one of the ingredients used to make Nalgene bottles and many other plastics, was truly a toxic chemical.
"My decision to ditch our Nalgenes came after I read the news stories about polycarbonate plastic bottles leaching bisphenol-A (BPA), a chemical that mimics the hormone estrogen and may be linked to increased cancer risks, infertility, autism, and developmental problems. There is still debate over how serious the risk is but I figure there's no need to keep drinking from a plastic bottle while the scientists hash it out with the plastics industry lobbyists, right?"
But it seems that the debate is finally over.
A recent New York Times article announced that Nalgene will stop using BPA in its products. The Times reports that Nalgene's decision, "came after reports that the Canadian government would declare the chemical bisphenol-a, or BPA, toxic. Some animal studies have linked the chemical to changes in the hormonal system. Those reports also prompted many of Canada’s largest retailers, including Wal-Mart Canada, to remove food-related products made with plastics containing the compound chemical, like baby bottles, toddler sipping cups and food containers, from their stores this week."
Hurray for Canada - way to protect public health! (Some might say Wal-Mart may be equally responsible for Nalgene's decision but I refuse to cheer for Wal-Mart.)
If you've been holding on to your old Nalgene bottle, please recycle it now.
Although this is encouraging news, Nalgene is going to replace BPA with another chemical and I have a hard time believing that plastic can ever be as safe as metal. So rather than wait for Nalgene's new plastic bottles to hit the shelves, why don't you go get yourself a stainless steel water bottle (and getnone for your toddler while you're at it, too)?
Click here to read my full post about breaking the bottled water habit.
"My decision to ditch our Nalgenes came after I read the news stories about polycarbonate plastic bottles leaching bisphenol-A (BPA), a chemical that mimics the hormone estrogen and may be linked to increased cancer risks, infertility, autism, and developmental problems. There is still debate over how serious the risk is but I figure there's no need to keep drinking from a plastic bottle while the scientists hash it out with the plastics industry lobbyists, right?"
But it seems that the debate is finally over.
A recent New York Times article announced that Nalgene will stop using BPA in its products. The Times reports that Nalgene's decision, "came after reports that the Canadian government would declare the chemical bisphenol-a, or BPA, toxic. Some animal studies have linked the chemical to changes in the hormonal system. Those reports also prompted many of Canada’s largest retailers, including Wal-Mart Canada, to remove food-related products made with plastics containing the compound chemical, like baby bottles, toddler sipping cups and food containers, from their stores this week."
Hurray for Canada - way to protect public health! (Some might say Wal-Mart may be equally responsible for Nalgene's decision but I refuse to cheer for Wal-Mart.)
If you've been holding on to your old Nalgene bottle, please recycle it now.
Although this is encouraging news, Nalgene is going to replace BPA with another chemical and I have a hard time believing that plastic can ever be as safe as metal. So rather than wait for Nalgene's new plastic bottles to hit the shelves, why don't you go get yourself a stainless steel water bottle (and getnone for your toddler while you're at it, too)?
Click here to read my full post about breaking the bottled water habit.
Saturday, April 19, 2008
Greening Your Kitchen: BYOB (Bring Your Own Bags)
I finally started bringing my own bags to the grocery store and farmers market about six months ago, after many years of feeling guilty about not bringing my own bags. Not only was I tired of feeling guilty about contributing to the destruction of our lovely planet, my kitchen was also getting way too FULL... You see, in a rather pathetic attempt to sidestep my guilt, I never threw out any of the hundreds of used bags I took home from the store with each purchase. As a result, my kitchen was literally overflowing with these visible reminders of my guilty conscience. To use the parlance of our times, this was clearly not a "sustainable" situation on any level...
I realized it was time to bite the bullet and start bringing my own bags. I decided to approach the problem like a management consultant (i.e., charge $350/hour to point out the obvious) and quickly realized that my main problem was plain old forgetfulness. Although I'd occasionally remember to grab my canvas tote bags before leaving the house, I'd forget them nine times out of ten (though I was GREAT at remembering them the moment I stepped into the store...) And I was even worse about remembering to bring the smaller produce plastic bags I'd saved with me to the market.
My other problem was that I was loathe to reuse the clear plastic produce bags because they were, well, dirty. The detritus of previous shopping excursions - fragments of old onion skins, clumps of dirt from a bundle of fresh spinach, sticky red strawberry juice, etc., left many of them kind of gross on the inside. So I'd stuff them under the sink in order to avoid the guilt that would inevitably accompany throwing them away. But then I would never actually use them...
Once I had identified these two main obstacles, I channeled my inner management consultant to devise a simple (yet brilliant) two-part plan to overcome them. Here's what I came up with.
Cleaning & Drying the Produce Bags
Although it's probably obvious to all of you rocket scientists, it actually took me a little while to figure out that you have to turn the used bag INSIDE-OUT in order to clean it properly (duh!) I had been trying to wash them without turning them inside out first -- it did not go so well. Flipping them inside out allows you to wash any dirt or gunk off with relative ease. Mostly you can just use your hand but if there's something particularly challenging on there, you can also wipe the bag with a sponge.
Once the bag is clean, it's time to dry it. Since you've already flipped it inside-out, all that's left to do is identify an appropriate protrusion to hang it over. All you need is something kind of tall and thin-shaped that will allow air to circulate in and around the bag. I am planning to buy one of those nifty wooden bag driers very soon but, for now, I use my spray bottle, mortar and pestle, and bottle of hand moisturizer to hang the bags on. It's not the most glamorous solution but it does work.
Making It Impossible To Forget (All) The Bags
My first step on this front was to move my reusable canvas tote bags from the dark hall closet they'd been inhabiting for the past few years to a sunnier, more prominent spot next to the front door where they would be hard to miss.
But just moving the tote bags to the doorway was not enough, I also needed help remembering to bring all those plastic produce bags with me when I went shopping. My husband and I store all our used plastic bags under our kitchen sink in a really great bag holder made by Simple Human. The only downside is that I rarely remembered to grab the bags from under the sink before leaving the house, after all, out of sight, out of mind, right? Luckily, I realized that filling the canvas tote bags by the door with the used plastic bags would eliminate the need to remember to grab them altogether. This brilliant innovation did the trick!
A quick note on bags: I have a veritable army of canvas tote bags at my disposal--one from a nonprofit I worked for, one from a nonprofit a friend worked for (nonprofits LOVE tote bags!), one from L.L. Bean, one from the Berkeley farmers market, and three from Trader Joes. I am partial to canvas bags because they are made of a natural, non-toxic, renewable material (cotton), you can stretch them to bursting, you can wash and dry them if they get stained, you can repair them if they tear, and they're very sturdy. I also appreciate their long straps because I do most of my shopping on foot and need to carry the bags over my shoulders to prevent my poor little hands from falling off on the way home.
However, any kind of large, sturdy bag will work and you've certainly got your pick of reusable bag options nowadays. Reusing bags has become hugely trendy and tons of eco-preneurs are cashing in on the craze. Below are a few examples of some of the bags on offer -- I'm really torn - clever and funny or image-oriented and "eco-elitist"? You decide!
If you don't already have good grocery/tote bags, you can either shell out some cash to get one of these clever, trendy numbers or you can spend $2-$3 to buy a more generic but equally useful bag from Trader Joes, Whole Foods, Andronicos, and many other chain grocery stores.
I won't pretend that changing my ways was quick or easy - it did take me a little while to break the plastic bag habit but, once I did, it became surprisingly easy and actually enjoyable. My feelings of guilt have been replaced with a much more enjoyable sense of self-reliance and environmental responsibility.
Although bringing your own bags may seem like a small action, it will add up to a big difference over time. According to the Worldwatch Institute, it takes 430,000 gallons of oil to produce 100 million non-biodegradable plastic bags. And each year, people use 4 to 5 trillion of these bags worldwide. If we cut down on the demand for these bags by reusing, we can save thousands of gallons of oil and prevent the bags from filling our landfills and waterways for centuries to come.
Ultimately, our governments and corporations should be leading the charge by either heavily taxing or banning the use of plastic bags and providing much stronger incentives to bring your own tote bags (that $0.10 bag credit just does not cut it!) Although San Francisco did become the first city in the U.S. to ban the use of plastic bags in major grocery stores and pharmacies last March, most governments and corporations are still dragging their feet.
Hopefully they'll catch up and passing laws like this one soon. And when they do, you'll already be bringing your own bags!
Good luck with starting to BYOB - I know you can do it! Feel free to contact me if you have any questions.
More Ways To Green Your Kitchen
I realized it was time to bite the bullet and start bringing my own bags. I decided to approach the problem like a management consultant (i.e., charge $350/hour to point out the obvious) and quickly realized that my main problem was plain old forgetfulness. Although I'd occasionally remember to grab my canvas tote bags before leaving the house, I'd forget them nine times out of ten (though I was GREAT at remembering them the moment I stepped into the store...) And I was even worse about remembering to bring the smaller produce plastic bags I'd saved with me to the market.
My other problem was that I was loathe to reuse the clear plastic produce bags because they were, well, dirty. The detritus of previous shopping excursions - fragments of old onion skins, clumps of dirt from a bundle of fresh spinach, sticky red strawberry juice, etc., left many of them kind of gross on the inside. So I'd stuff them under the sink in order to avoid the guilt that would inevitably accompany throwing them away. But then I would never actually use them...
Once I had identified these two main obstacles, I channeled my inner management consultant to devise a simple (yet brilliant) two-part plan to overcome them. Here's what I came up with.
Cleaning & Drying the Produce Bags
Although it's probably obvious to all of you rocket scientists, it actually took me a little while to figure out that you have to turn the used bag INSIDE-OUT in order to clean it properly (duh!) I had been trying to wash them without turning them inside out first -- it did not go so well. Flipping them inside out allows you to wash any dirt or gunk off with relative ease. Mostly you can just use your hand but if there's something particularly challenging on there, you can also wipe the bag with a sponge.
Once the bag is clean, it's time to dry it. Since you've already flipped it inside-out, all that's left to do is identify an appropriate protrusion to hang it over. All you need is something kind of tall and thin-shaped that will allow air to circulate in and around the bag. I am planning to buy one of those nifty wooden bag driers very soon but, for now, I use my spray bottle, mortar and pestle, and bottle of hand moisturizer to hang the bags on. It's not the most glamorous solution but it does work.
Making It Impossible To Forget (All) The Bags
My first step on this front was to move my reusable canvas tote bags from the dark hall closet they'd been inhabiting for the past few years to a sunnier, more prominent spot next to the front door where they would be hard to miss.
But just moving the tote bags to the doorway was not enough, I also needed help remembering to bring all those plastic produce bags with me when I went shopping. My husband and I store all our used plastic bags under our kitchen sink in a really great bag holder made by Simple Human. The only downside is that I rarely remembered to grab the bags from under the sink before leaving the house, after all, out of sight, out of mind, right? Luckily, I realized that filling the canvas tote bags by the door with the used plastic bags would eliminate the need to remember to grab them altogether. This brilliant innovation did the trick!
A quick note on bags: I have a veritable army of canvas tote bags at my disposal--one from a nonprofit I worked for, one from a nonprofit a friend worked for (nonprofits LOVE tote bags!), one from L.L. Bean, one from the Berkeley farmers market, and three from Trader Joes. I am partial to canvas bags because they are made of a natural, non-toxic, renewable material (cotton), you can stretch them to bursting, you can wash and dry them if they get stained, you can repair them if they tear, and they're very sturdy. I also appreciate their long straps because I do most of my shopping on foot and need to carry the bags over my shoulders to prevent my poor little hands from falling off on the way home.
However, any kind of large, sturdy bag will work and you've certainly got your pick of reusable bag options nowadays. Reusing bags has become hugely trendy and tons of eco-preneurs are cashing in on the craze. Below are a few examples of some of the bags on offer -- I'm really torn - clever and funny or image-oriented and "eco-elitist"? You decide!
If you don't already have good grocery/tote bags, you can either shell out some cash to get one of these clever, trendy numbers or you can spend $2-$3 to buy a more generic but equally useful bag from Trader Joes, Whole Foods, Andronicos, and many other chain grocery stores.
I won't pretend that changing my ways was quick or easy - it did take me a little while to break the plastic bag habit but, once I did, it became surprisingly easy and actually enjoyable. My feelings of guilt have been replaced with a much more enjoyable sense of self-reliance and environmental responsibility.
Although bringing your own bags may seem like a small action, it will add up to a big difference over time. According to the Worldwatch Institute, it takes 430,000 gallons of oil to produce 100 million non-biodegradable plastic bags. And each year, people use 4 to 5 trillion of these bags worldwide. If we cut down on the demand for these bags by reusing, we can save thousands of gallons of oil and prevent the bags from filling our landfills and waterways for centuries to come.
Ultimately, our governments and corporations should be leading the charge by either heavily taxing or banning the use of plastic bags and providing much stronger incentives to bring your own tote bags (that $0.10 bag credit just does not cut it!) Although San Francisco did become the first city in the U.S. to ban the use of plastic bags in major grocery stores and pharmacies last March, most governments and corporations are still dragging their feet.
Hopefully they'll catch up and passing laws like this one soon. And when they do, you'll already be bringing your own bags!
Good luck with starting to BYOB - I know you can do it! Feel free to contact me if you have any questions.
More Ways To Green Your Kitchen
- Nix the Antibacterials
- Slay the Energy Vampires
- Plant an Herb Garden
- Buy In Bulk
- Grow Your Own Garlic
- Say 'Buh-Bye' to Bottled Water
- How To Choose the "Right" Milk
- Skip the BPA, Switch to Glass Storage Containers
- Forget Free-Range, Buy Pasture-Raised Eggs From a Local Farm
- Buy BPA-Free Tomatoes & Beans
Wednesday, April 16, 2008
Take a Bite Out Of Climate Change
I wanted to let you all know about a new website that launched today called Take a Bite Out Of Climate Change at: http://www.takeabite.cc
I'll be doing some of the blogging for this site which was created by Anna Lappe at the Small Planet Institute.
The site aims to:
I'll be doing some of the blogging for this site which was created by Anna Lappe at the Small Planet Institute.
The site aims to:
- explain the connection between the food at the end of their forks and the global climate crisis
- connect people with actions they can take to “take a bite” out of climate change
- empower people to make climate friendly culinary choices every day
Check it out at: http://www.takeabite.cc
Tuesday, April 15, 2008
Holy Guacomole - This Green Stuff Is GOOOOD!
Yesterday, at precisely 1:17 PM PT, a guacomole storm hit my kitchen with deliciously devastating power. It was one of those "perfect storm" situations you hear about -- I was hungry, I had two ripe, organic avocados, a pile of sweet organic romanita tomatoes, a mound of fresh cilantro, an organic red onion, and a lime...
What happened next will undoubtedly go down in culinary history as one of the tastiest guacomole storms ever to hit north of the Oakland/Berkekley border. I gobbled it up with a pile of organic white corn chips.
The very simple recipe is below. I've mostly left out amounts since it is really up to you how much of any one ingredient to include - if you don't like onions or tomatoes you can leave them out, if you love garlic you can add some, if you like your guac spicy you should chop up a jalapeno, etc., etc.
Holy Guacomole!
Ingredients
* Ripe avocado, mashed
* Lime juice
* Red onion, finely chopped
* Tomatoes, chopped
* Fresh cilantro, washed and coarsely chopped
* Sea salt
Directions
Combine all the ingredients and taste. You may want to add more lime juice or salt or adjust the amount of tomato, onion, etc. You can also add some ground coriander or chili powder for additional flavor but I find that it's not necessary if you have good raw ingredients.
What happened next will undoubtedly go down in culinary history as one of the tastiest guacomole storms ever to hit north of the Oakland/Berkekley border. I gobbled it up with a pile of organic white corn chips.
The very simple recipe is below. I've mostly left out amounts since it is really up to you how much of any one ingredient to include - if you don't like onions or tomatoes you can leave them out, if you love garlic you can add some, if you like your guac spicy you should chop up a jalapeno, etc., etc.
Holy Guacomole!
Ingredients
* Ripe avocado, mashed
* Lime juice
* Red onion, finely chopped
* Tomatoes, chopped
* Fresh cilantro, washed and coarsely chopped
* Sea salt
Directions
Combine all the ingredients and taste. You may want to add more lime juice or salt or adjust the amount of tomato, onion, etc. You can also add some ground coriander or chili powder for additional flavor but I find that it's not necessary if you have good raw ingredients.
Wednesday, April 9, 2008
A Religious Experience: Thai Brunch at Wat Mongkolratanaram
My love of Thai food dates back exactly ten years to my junior year of college. My best friend and I had decided to take spring semester off to travel around the world. Although neither of us knew anything about Thailand (it was not yet the hot tourist destination it has since become), we chose Bangkok as our first stop on a whim.
We arrived horribly jetlagged after the 18+ hour flight and were practically flattened (minus our hair, which was pretty much the exact opposite of flattened) by the wall of intense heat and humidity that hit us when we stepped out of the airport. But after a good nights' sleep, we began to explore this strange and wonderful new land.
Despite the fact that Thailand is so humid that you have to take at least three showers a day just to feel semi-human, I spent next three weeks falling deeply in love with Thailand's gentle and friendly people, beautiful Buddhist temples, orange-clad monks, crowded (yet clean) streets, and noisy tuk-tuks. But all that was nothing compared to how hard I fell for the FOOD.
Thailand is truly a gastronomic wonderland. The food is fresh, cheap, and absolutely delicious. Although I wouldn't touch street food in India with a ten foot pole, I feel perfectly safe eating from Bangkok's army of street vendors. Mangos, rambutan, lychee, pineapple, bananas, champu, jackfruit, durian (if you're into that sort of thing...), noodles, sticky rice, green curry, red curry, yellow curry, rice dishes, beef, chicken, pork, shrimp, fish, you name it, they've got it.
So it was like walking into a wonderful dream when we stepped into the courtyard of Wat Mongkolratanaram this weekend for the Thai brunch the temple hosts each Sunday from 9-2. This brunch is like a little slice of Thailand in South Berkeley, complete with an equal number of neatly dressed Asian people and dreadlocked hippies.
Since a picture is worth a thousand words, I'm going to let the photos I took do most of the talking.
We arrived horribly jetlagged after the 18+ hour flight and were practically flattened (minus our hair, which was pretty much the exact opposite of flattened) by the wall of intense heat and humidity that hit us when we stepped out of the airport. But after a good nights' sleep, we began to explore this strange and wonderful new land.
Despite the fact that Thailand is so humid that you have to take at least three showers a day just to feel semi-human, I spent next three weeks falling deeply in love with Thailand's gentle and friendly people, beautiful Buddhist temples, orange-clad monks, crowded (yet clean) streets, and noisy tuk-tuks. But all that was nothing compared to how hard I fell for the FOOD.
Thailand is truly a gastronomic wonderland. The food is fresh, cheap, and absolutely delicious. Although I wouldn't touch street food in India with a ten foot pole, I feel perfectly safe eating from Bangkok's army of street vendors. Mangos, rambutan, lychee, pineapple, bananas, champu, jackfruit, durian (if you're into that sort of thing...), noodles, sticky rice, green curry, red curry, yellow curry, rice dishes, beef, chicken, pork, shrimp, fish, you name it, they've got it.
So it was like walking into a wonderful dream when we stepped into the courtyard of Wat Mongkolratanaram this weekend for the Thai brunch the temple hosts each Sunday from 9-2. This brunch is like a little slice of Thailand in South Berkeley, complete with an equal number of neatly dressed Asian people and dreadlocked hippies.
Since a picture is worth a thousand words, I'm going to let the photos I took do most of the talking.
Shot of the ceiling of the temple entranceway.
Two dragons guard the temple entrance.
List of the brunch prices - each token costs $1. All proceeds support the the temple.
Pile o' tokens - these Buddhists are raking in the cash for their delicious brunch foods!
My little cup of tokens. This turned out to be way more than I needed but it's no big deal since you can trade them back in for cash before you leave.
Two dragons guard the temple entrance.
List of the brunch prices - each token costs $1. All proceeds support the the temple.
Pile o' tokens - these Buddhists are raking in the cash for their delicious brunch foods!
My little cup of tokens. This turned out to be way more than I needed but it's no big deal since you can trade them back in for cash before you leave.
Scooping softened rice noodles out of a vat of boiling water and into a waiting bowl for noodle soup, a traditional South East Asian breakfast food. You start by specifying the type of noodles you want in your bowl of soup --vermicelli, medium, or wide rice noodles.
Two women making khanom krog, a sweet coconut pudding with green onions. Truly delicious!
A bowl of delicious noodle soup with beef, scallions, cilantro, and bean sprouts waiting to be devoured. After the vendor hands you your bowl, you head to a side table to add as much (or as little) fish sauce, sugar, vinegar, soy sauce, and chili peppers to it as you like.
Fresh vegetable and herb spring rolls in riceflour wrappers.
Diners wait with forks in hand to dig into the spread which includes fried chicken and sticky rice, several kinds of curry (my favorite was the pumpkin curry - so good!), banana fritters and khanom krog (in the blue paper on the left.)
Papaya salad!!!
View of the brunch scene in the temple's back courtyard.
A pile of soup bowls awaiting pick-up.
A bowl of delicious noodle soup with beef, scallions, cilantro, and bean sprouts waiting to be devoured. After the vendor hands you your bowl, you head to a side table to add as much (or as little) fish sauce, sugar, vinegar, soy sauce, and chili peppers to it as you like.
Fresh vegetable and herb spring rolls in riceflour wrappers.
Diners wait with forks in hand to dig into the spread which includes fried chicken and sticky rice, several kinds of curry (my favorite was the pumpkin curry - so good!), banana fritters and khanom krog (in the blue paper on the left.)
Papaya salad!!!
View of the brunch scene in the temple's back courtyard.
A pile of soup bowls awaiting pick-up.
A mother and son sharing a bowl of noodle soup by a Buddha statue in the temple garden.
The temple garden grows vegetables and herbs used in traditional Thai cooking, including lemongrass and holy basil.
A sign at the entrance to the temple garden offers both literal and figurative meanings.
Just a note about timing -- I'd recommend arriving either early or late since the crowds get pretty burly between 10:30 and 1:00 (the only downside to arriving later is that they may have run out of some dishes.)
Thai Brunch At Wat Mongkolratanaram
9:00 AM - 2:00 PM on Sundays
Thai Brunch At Wat Mongkolratanaram
9:00 AM - 2:00 PM on Sundays
1911 Russell Street (between Martin Luther King Jr. Way & Otis St)
Berkeley, CA 94703
(510) 849-3419
Berkeley, CA 94703
(510) 849-3419