Quick Coconut Vegetable Curry

Friday, July 31, 2009

Coconut Veggie Curry by Eve Fox, Garden of Eating blog

Simply put, this curry is "the bomb." It's simple, delicious, easy to make and good for you. It was inspired by a similar dish my brother-in-law, Daniel, made for dinner a few weeks ago. He's a loose kind of cook -- instead of reading a recipe he relies on gut instinct. And his instincts were right on in this case!
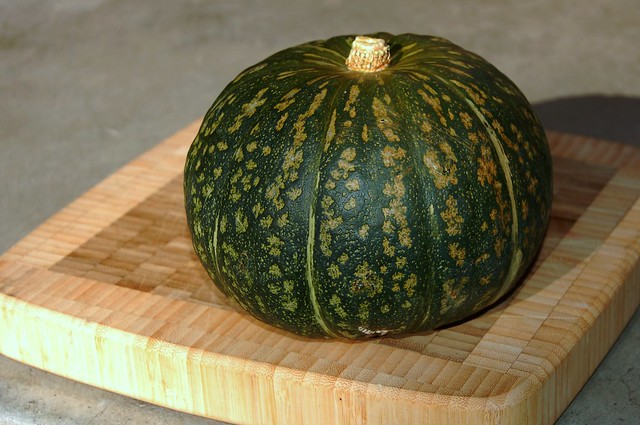
Kabocha

Although the recipe below calls for green beans, kabocha squash and chard since those are the things we'd received in our produce box this past week, you could just as easily substitute spinach or kale for the chard, turnips or carrots (or both) for the squash, add some potatoes, etc. Likewise, though I've listed curry powder below, you could toast your own spices if you've got the time and inclination or you could also use one of the jarred Thai curry pastes (Mae Ploy is my Thai cooking teacher's favorite brand and I agree that it's very good) with delightful results. The basic concept is very flexible so feel free to experiment.

That said, the kabocha squash is truly excellent in this curry -- its dense, starchy flesh lends lots of substance and its sweet, meaty flavor complements the coconut milk nicely.

Kabocha squash by Eve Fox, Garden of Eating blog

Besides tasting really good, one of the nicest things about this dish is its simplicity. It's a great way to work a bunch of fresh veggies into a delicious meal. I'd recommend serving it with short grain brown rice and a salad.

Coconut Veggie Curry by Eve Fox, Garden of Eating blog

-- print recipe --Quick Coconut Vegetable Curry
Serves 6

Ingredients

* 1 small to medium-sized kabocha squash, halved, seeds removed and cut into 1-inch cubes
* 1 bunch chard, washed, stems removed and chopped into 1-inch pieces, leaves cut into ribbons
* 2 big handfuls of green beans, washed and trimmed
* 2 medium onions, sliced
* 3 cloves of garlic, minced
* 1 tsp minced fresh ginger
* 2 cans of coconut milk (my Thai cooking teacher recommends the Chaokoh brand and after doing her blind taste-test, I have to agree with her!)
* 3 cups of vegetable broth
* A very large handful of fresh cilantro, washed and chopped
* Freshly ground black pepper
* 3 Tbsps curry powder and/or garam masala (you can use more if you like)
* 2 tsps canola oil or ghee
* A pinch of red pepper flakes
* 1 Tbsp sugar

Directions

1. Start by prepping the veggies: Cut the squash in half, remove the seeds and then cut the flesh into 1-inch cubes (there's no need to peel kabocha squash). Wash the chard and remove the stems, chopping them into 1-inch long pieces. Cut the chard leaves into ribbons. Slice the onions and mince the garlic and ginger. Wash and chop the cilantro.

2. Once all the veggies are prepped, put your rice on to cook. I recommend either short grain brown rice or basmati rice for this curry.

3. In a large pot, saute the onions, garlic, ginger and chili flakes in the oil or ghee for several minutes, cooking until the onions have begun to soften and become translucent. While that stuff is frying, boil the water for the vegetable bouillon and mix it well (unless you're using prepared vegetable broth).

4. Add the vegetable broth and the coconut milk to the pot then toss in the cubed kabocha squash and season it all with curry powder, garam masala, pepper and sugar (there's most likely no need for salt since the vegetable broth should be fairly salty.) Bring to a boil then reduce the heat to medium-high and simmer for 5-10 minutes or until the squash is beginning to feel tender when poked with a fork.

5. Add the green beans and the chard stems and simmer for another 3-5 minutes or until the green beans feel done to your liking. Then toss in the ribbons of chard leaf and the cilantro and cook for another 2-3 minutes.

6. Allow to cool slightly and serve over the warm rice.

A few other recipes you might like:
Like this recipe? Click here to browse through more Eatwell Recipes.


The Eatwell Project: a year of seasonal recipes -- logo by Eve Fox

Wild Blackberry Sorbet With Garden Mint & Lavender

Sunday, July 26, 2009

I grew up in the lush countryside of New York's Hudson River Valley. As a little girl, picking the wild blackberries that grew down the street from my house was one of my favorite things to do in the hot, hazy days of late summer.

Wild blackberries by Eve Fox copyright 2008
My friend Emily shared my enthusiasm for the berries and she would come over to play "blackberry factory" with me -- a game that was as simple and delicious as it sounds. We would wander down the road from my house, stopping every few feet to pop the black bubbles of tar that had formed in the heat. When we finally reached the bramble, we'd steal ourselves for a moment then plunge into the thick patch of blackberry canes, doing our best to avoid the thorns. The berries were abundant -- there were always plenty to bring home even after stuffing ourselves. Despite the rather capitalist sounding name we'd chosen, picking blackberries was one of the sacred rituals of summertime.

Handful of blackberries by Eve Fox copyright 2008
Unfortunately, in the decades since I left home my life as a city-dweller has not offered me many opportunities to pick berries. So I was delighted to discover upon moving to the East Bay a few years ago that blackberries flourish in many parts of this urban environment.

Yesterday, we joined our good friends for a picking expedition in their Oakland hills neighborhood. The steep, dry hillsides are covered in blackberries -- the canes seem to favor the rarely used public stairways that provide a shortcut through the hills.


Public stairway is home to many berries by Eve Fox copyright 2008
We started out with clean hands and empty buckets and worked our way through the neighborhood, relieving the canes of their ripe berries as we went. We picked in peace with only a few curious and amused glances from passing drivers and returned an hour later with our hands stained purple, our arms scratched, and our buckets brimming with blackberries!

Berry-stained hands, post-picking expedition by Eve Fox copyright 2008
Back at the house, we washed the berries carefully to remove the dust and dislodge the little bugs we'd carried home. When they'd drained, we laid the berries out singly on cookie sheets -- by far the easiest way to prepare them for freezing. Once frozen, you can use a metal spatula to simply scoop them off the tray into a ziplock bag or other container and then pop them back in the freezer to be used for smoothies, sauces, etc., whenever you want them.

Frozen Blackberries on Cookie Sheet by Eve Fox copyright 2008
My husband had made a simple yet delicious blackberry sorbet after similar picking expeditions last summer and we were eager to make our first batch of the season. But this time, I decided it would be fun to experiment with adding some fresh herbs from our garden-- mint and lavender.

After freezing the berries, the next step was to infuse the mint and lavender I'd picked into a simple syrup of organic sugar and water. After the syrup had cooled, I strained the herbs out and poured the liquid into an ice cube tray which then joined the berries in the freezer.

Sprigs of mint and lavender from our garden by Eve Fox copyright 2008
Once the berries and the herb-infused syrup cubes were fully frozen, we were ready to create this divine, locally foraged dessert. We poured some berries and a few cubes of simple syrup into the cuisinart, added a little water and processed until smooth - all of which took less than five minutes.

We sat back to appreciate our creation. The wild blackberry sorbet was a breathtakingly beautiful purple (J.Crew's colorists might call it either "burgundy" or "cabernet") and the taste was no less breathtaking - cool and smooth, sweet yet tart, with subtle notes of lavender and mint. The simple recipe is below - feel free to make slight adjustments to taste. Enjoy!


Wild Blackberry Sorbet With Garden Mint & Lavender By Eve Fox Copyright 2008
Wild Blackberry Sorbet with Garden Mint & Lavender
Makes 4 servings

Ingredients

* 3 cups fresh blackberries, washed and dried
* 1/4 cup organic sugar
* 1/4 cup water
* A handful of fresh mint leaves, washed and dried
* 2-3 sprigs of fresh lavender, washed and dried
* Ice water for blending

Directions

1. Lay the clean, drained berries in a single layer on a cookie sheet and place in the freezer until frozen through. It is best to do both this and the next step the day or night before you plan to make the sorbet - just make sure you leave enough time for everything to freeze.

2. Make the herb-infused simple syrup by combining the water and sugar in a small heavy-bottomed saucepot and heat over a medium flame until it comes to a boil. Turn it off and let cool completely.

3. Strain out the mint leaves and lavender and pour the cooled syrup into an ice cube tray - should make roughly 4 syrup cubes. Place the tray in the freezer until syrup is frozen (the cubes may remain a little mushy as a result of all the sugar.)

4. Once the berries and herb-infused syrup cubes have frozen, you can make the sorbet. Place the frozen berries and syrup cubes in the bowl of a cuisinart or blender and add a few teaspoons of ice water to aid in blending. Continue to process or blend, adding small amounts of the ice water as needed, until smooth.

5. Serve, topped with a sprig of mint leaves and/or lavender.


Wild Blackberry Sorbet With Garden Mint & Lavender By Eve Fox Copyright 2008
This recipe is included in the Foodista Best of the Food Blogs cookbook.

You might also like:

Provençal Vegetable Tian

ingredients for vegetable tian, Eve Fox, Garden of Eating blog

Several years ago, I clipped a recipe for vegetable tian from a Martha Stewart Living mag -- it just looked too pretty to pass up. Unfortunately, it's been languishing in my recipe file ever since then.

Since we received some lovely-looking tomatoes, zucchini, onions and the very first aubergine (eggplant) of the season in this week's produce box and we also happen to have potatoes and garlic left over from a previous produce box, it seemed like the perfect time to finally give this yummy recipe a try.

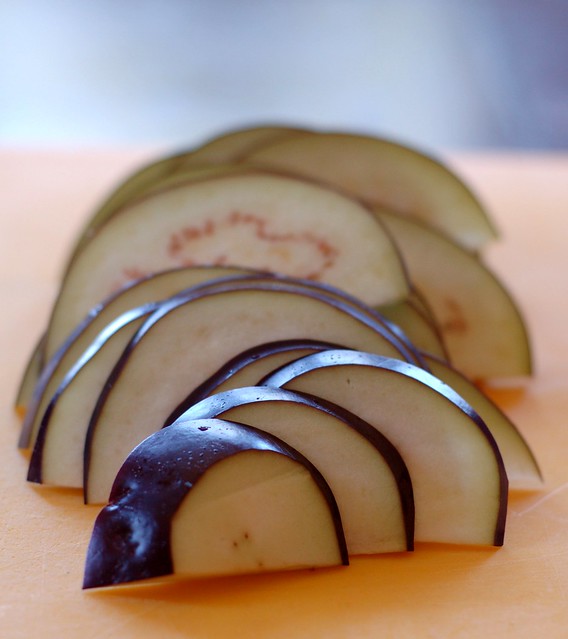
Sliced aubergine, first of the season by Eve Fox, the Garden of Eating, copyright 2009

The tian originated in Provence in the south of France and is similar to a gratin except for the fact that it does not include bread crumbs or cheese (though you can top it with gruyere if you like which is also very tasty). The baking concentrates the flavors of the vegetables so it is a great dish in which to showcase truly tasty veggies (but not a great dish to make if you have to use supermarket fare which often tends to taste kind of bland.)

Ingredients for vegetable tian, all sliced and ready to layer, Eve Fox, Garden of Eating blog

The traditional recipe calls for leeks but since we received red onions in our box, I've substituted those, instead. Some recipes seem to call for potatoes while others do not but I love potatoes so I've included them below. If you don't have thyme on hand, you can substitute basil or oregano.

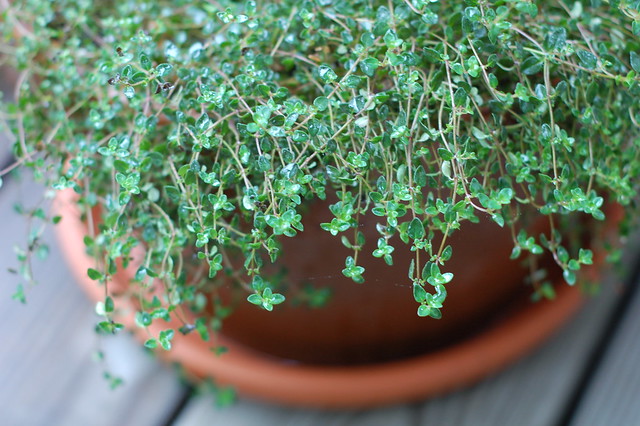
Our Thyme Plant by Eve Fox, Garden of Eating blog, copyright 2011

The amounts of each thing below are fairly rough; the trick is to use freshly picked, high-quality veggies and to cut them thinly. The recipe below is a mix of the Martha Stewart recipe and one I found on Slashfood with a few adjustments of my own.

Vegetable tian by Eve Fox, Garden of Eating blog

This can be a main dish, albeit a fairly light one, but it also goes very well with grilled meats or roast chicken, a green salad and some fresh bread to sop up the juices. Bon appetit!

-- print recipe --Provençal Vegetable Tian
Serves 4

Ingredients

* 1 large onion or 2 medium leeks
* 2 large cloves garlic
* 1 or 2 small zucchini
* 1 or 2 small aubergines (eggplants)
* 1 or 2 small potatoes
* 2 or 3 medium plum tomatoes
* 2 or 3 sprigs fresh thyme
* 1/4 cup dry white wine
* Extra virgin olive oil
* Butter
* Sea salt
* Freshly ground black pepper

Directions

1. Cut a piece of parchment paper to the size of a two-quart glass or ceramic baking dish. Set aside. Butter the inside of the dish and set aside. Preheat the oven to 375 degrees.

2. Slice the onions and peel and mince the garlic. (If you're using leeks, cut the root end off and chop where the green begins then slice the white part and rinse in cold water to remove any sand/dirt. Let dry in a collander.)

3. Remove the ends from the zucchini and aubergines and discard. Cut each crosswise into coins 1/8-inch thick. Remove the stem ends from the tomatoes and discard. Cut each crosswise into rounds 1/8-inch thick. Scrub and dry the potato(es) and cut into 1/8-inch thick slices.

4. Coat a small pan with a good dose of olive oil and heat until shimmering. Add the garlic and swirl to coat. Gently add the onions (or leeks). Cook, stirring frequently, until the onions (or leeks) have begun to soften and the garlic has released its fragrance, approximately two to five minutes.

5. Carefully spread the onion/leek-garlic mixture across the bottom of the baking dish. Sprinkle with salt and a few grindings of fresh black pepper; strip the leaves from one of the sprigs of thyme and sprinkle over the mixture.

6. Layer the zucchini, aubergines, potato, and tomato on top of the onion/leek-garlic mixture, alternating each and overlapping slightly. I made sure to put the juicier things (squash and tomato) between the drier veggies (eggplant and potato) to keep the whole thing consistently moist. If working with a square or rectangular dish, layer in rows; if working with a circular or oval dish, work in fans from the center. Drizzle with a two-count of olive oil and splash with the wine. Sprinkle with salt and a few grindings of fresh black pepper; strip the leaves from the remaining thyme and sprinkle over the casserole.

7. Butter the cut parchment and carefully place, buttered side down, on top of the vegetables. Bake for 35 to 45 minutes, depending on your oven, until the vegetables are soft but not mushy while the edges are nicely crisp and brown.

A few other recipes you might like:

For more delicious recipes, gardening ideas, foraging tips, and food-related inspiration "like" the Garden of Eating on Facebook, or follow me on Twitter and Pinterest.

Like this recipe? Click here to browse through more Eatwell Recipes.
The Eatwell Project: a year of seasonal recipes -- logo by Eve Fox

Friday, July 31, 2009

Quick Coconut Vegetable Curry

Coconut Veggie Curry by Eve Fox, Garden of Eating blog

Simply put, this curry is "the bomb." It's simple, delicious, easy to make and good for you. It was inspired by a similar dish my brother-in-law, Daniel, made for dinner a few weeks ago. He's a loose kind of cook -- instead of reading a recipe he relies on gut instinct. And his instincts were right on in this case!

Kabocha

Although the recipe below calls for green beans, kabocha squash and chard since those are the things we'd received in our produce box this past week, you could just as easily substitute spinach or kale for the chard, turnips or carrots (or both) for the squash, add some potatoes, etc. Likewise, though I've listed curry powder below, you could toast your own spices if you've got the time and inclination or you could also use one of the jarred Thai curry pastes (Mae Ploy is my Thai cooking teacher's favorite brand and I agree that it's very good) with delightful results. The basic concept is very flexible so feel free to experiment.

That said, the kabocha squash is truly excellent in this curry -- its dense, starchy flesh lends lots of substance and its sweet, meaty flavor complements the coconut milk nicely.

Kabocha squash by Eve Fox, Garden of Eating blog

Besides tasting really good, one of the nicest things about this dish is its simplicity. It's a great way to work a bunch of fresh veggies into a delicious meal. I'd recommend serving it with short grain brown rice and a salad.

Coconut Veggie Curry by Eve Fox, Garden of Eating blog

-- print recipe --Quick Coconut Vegetable Curry
Serves 6

Ingredients

* 1 small to medium-sized kabocha squash, halved, seeds removed and cut into 1-inch cubes
* 1 bunch chard, washed, stems removed and chopped into 1-inch pieces, leaves cut into ribbons
* 2 big handfuls of green beans, washed and trimmed
* 2 medium onions, sliced
* 3 cloves of garlic, minced
* 1 tsp minced fresh ginger
* 2 cans of coconut milk (my Thai cooking teacher recommends the Chaokoh brand and after doing her blind taste-test, I have to agree with her!)
* 3 cups of vegetable broth
* A very large handful of fresh cilantro, washed and chopped
* Freshly ground black pepper
* 3 Tbsps curry powder and/or garam masala (you can use more if you like)
* 2 tsps canola oil or ghee
* A pinch of red pepper flakes
* 1 Tbsp sugar

Directions

1. Start by prepping the veggies: Cut the squash in half, remove the seeds and then cut the flesh into 1-inch cubes (there's no need to peel kabocha squash). Wash the chard and remove the stems, chopping them into 1-inch long pieces. Cut the chard leaves into ribbons. Slice the onions and mince the garlic and ginger. Wash and chop the cilantro.

2. Once all the veggies are prepped, put your rice on to cook. I recommend either short grain brown rice or basmati rice for this curry.

3. In a large pot, saute the onions, garlic, ginger and chili flakes in the oil or ghee for several minutes, cooking until the onions have begun to soften and become translucent. While that stuff is frying, boil the water for the vegetable bouillon and mix it well (unless you're using prepared vegetable broth).

4. Add the vegetable broth and the coconut milk to the pot then toss in the cubed kabocha squash and season it all with curry powder, garam masala, pepper and sugar (there's most likely no need for salt since the vegetable broth should be fairly salty.) Bring to a boil then reduce the heat to medium-high and simmer for 5-10 minutes or until the squash is beginning to feel tender when poked with a fork.

5. Add the green beans and the chard stems and simmer for another 3-5 minutes or until the green beans feel done to your liking. Then toss in the ribbons of chard leaf and the cilantro and cook for another 2-3 minutes.

6. Allow to cool slightly and serve over the warm rice.

A few other recipes you might like:
Like this recipe? Click here to browse through more Eatwell Recipes.


The Eatwell Project: a year of seasonal recipes -- logo by Eve Fox

Sunday, July 26, 2009

Wild Blackberry Sorbet With Garden Mint & Lavender

I grew up in the lush countryside of New York's Hudson River Valley. As a little girl, picking the wild blackberries that grew down the street from my house was one of my favorite things to do in the hot, hazy days of late summer.

Wild blackberries by Eve Fox copyright 2008
My friend Emily shared my enthusiasm for the berries and she would come over to play "blackberry factory" with me -- a game that was as simple and delicious as it sounds. We would wander down the road from my house, stopping every few feet to pop the black bubbles of tar that had formed in the heat. When we finally reached the bramble, we'd steal ourselves for a moment then plunge into the thick patch of blackberry canes, doing our best to avoid the thorns. The berries were abundant -- there were always plenty to bring home even after stuffing ourselves. Despite the rather capitalist sounding name we'd chosen, picking blackberries was one of the sacred rituals of summertime.

Handful of blackberries by Eve Fox copyright 2008
Unfortunately, in the decades since I left home my life as a city-dweller has not offered me many opportunities to pick berries. So I was delighted to discover upon moving to the East Bay a few years ago that blackberries flourish in many parts of this urban environment.

Yesterday, we joined our good friends for a picking expedition in their Oakland hills neighborhood. The steep, dry hillsides are covered in blackberries -- the canes seem to favor the rarely used public stairways that provide a shortcut through the hills.


Public stairway is home to many berries by Eve Fox copyright 2008
We started out with clean hands and empty buckets and worked our way through the neighborhood, relieving the canes of their ripe berries as we went. We picked in peace with only a few curious and amused glances from passing drivers and returned an hour later with our hands stained purple, our arms scratched, and our buckets brimming with blackberries!

Berry-stained hands, post-picking expedition by Eve Fox copyright 2008
Back at the house, we washed the berries carefully to remove the dust and dislodge the little bugs we'd carried home. When they'd drained, we laid the berries out singly on cookie sheets -- by far the easiest way to prepare them for freezing. Once frozen, you can use a metal spatula to simply scoop them off the tray into a ziplock bag or other container and then pop them back in the freezer to be used for smoothies, sauces, etc., whenever you want them.

Frozen Blackberries on Cookie Sheet by Eve Fox copyright 2008
My husband had made a simple yet delicious blackberry sorbet after similar picking expeditions last summer and we were eager to make our first batch of the season. But this time, I decided it would be fun to experiment with adding some fresh herbs from our garden-- mint and lavender.

After freezing the berries, the next step was to infuse the mint and lavender I'd picked into a simple syrup of organic sugar and water. After the syrup had cooled, I strained the herbs out and poured the liquid into an ice cube tray which then joined the berries in the freezer.

Sprigs of mint and lavender from our garden by Eve Fox copyright 2008
Once the berries and the herb-infused syrup cubes were fully frozen, we were ready to create this divine, locally foraged dessert. We poured some berries and a few cubes of simple syrup into the cuisinart, added a little water and processed until smooth - all of which took less than five minutes.

We sat back to appreciate our creation. The wild blackberry sorbet was a breathtakingly beautiful purple (J.Crew's colorists might call it either "burgundy" or "cabernet") and the taste was no less breathtaking - cool and smooth, sweet yet tart, with subtle notes of lavender and mint. The simple recipe is below - feel free to make slight adjustments to taste. Enjoy!


Wild Blackberry Sorbet With Garden Mint & Lavender By Eve Fox Copyright 2008
Wild Blackberry Sorbet with Garden Mint & Lavender
Makes 4 servings

Ingredients

* 3 cups fresh blackberries, washed and dried
* 1/4 cup organic sugar
* 1/4 cup water
* A handful of fresh mint leaves, washed and dried
* 2-3 sprigs of fresh lavender, washed and dried
* Ice water for blending

Directions

1. Lay the clean, drained berries in a single layer on a cookie sheet and place in the freezer until frozen through. It is best to do both this and the next step the day or night before you plan to make the sorbet - just make sure you leave enough time for everything to freeze.

2. Make the herb-infused simple syrup by combining the water and sugar in a small heavy-bottomed saucepot and heat over a medium flame until it comes to a boil. Turn it off and let cool completely.

3. Strain out the mint leaves and lavender and pour the cooled syrup into an ice cube tray - should make roughly 4 syrup cubes. Place the tray in the freezer until syrup is frozen (the cubes may remain a little mushy as a result of all the sugar.)

4. Once the berries and herb-infused syrup cubes have frozen, you can make the sorbet. Place the frozen berries and syrup cubes in the bowl of a cuisinart or blender and add a few teaspoons of ice water to aid in blending. Continue to process or blend, adding small amounts of the ice water as needed, until smooth.

5. Serve, topped with a sprig of mint leaves and/or lavender.


Wild Blackberry Sorbet With Garden Mint & Lavender By Eve Fox Copyright 2008
This recipe is included in the Foodista Best of the Food Blogs cookbook.

You might also like:

Provençal Vegetable Tian

ingredients for vegetable tian, Eve Fox, Garden of Eating blog

Several years ago, I clipped a recipe for vegetable tian from a Martha Stewart Living mag -- it just looked too pretty to pass up. Unfortunately, it's been languishing in my recipe file ever since then.

Since we received some lovely-looking tomatoes, zucchini, onions and the very first aubergine (eggplant) of the season in this week's produce box and we also happen to have potatoes and garlic left over from a previous produce box, it seemed like the perfect time to finally give this yummy recipe a try.

Sliced aubergine, first of the season by Eve Fox, the Garden of Eating, copyright 2009

The tian originated in Provence in the south of France and is similar to a gratin except for the fact that it does not include bread crumbs or cheese (though you can top it with gruyere if you like which is also very tasty). The baking concentrates the flavors of the vegetables so it is a great dish in which to showcase truly tasty veggies (but not a great dish to make if you have to use supermarket fare which often tends to taste kind of bland.)

Ingredients for vegetable tian, all sliced and ready to layer, Eve Fox, Garden of Eating blog

The traditional recipe calls for leeks but since we received red onions in our box, I've substituted those, instead. Some recipes seem to call for potatoes while others do not but I love potatoes so I've included them below. If you don't have thyme on hand, you can substitute basil or oregano.

Our Thyme Plant by Eve Fox, Garden of Eating blog, copyright 2011

The amounts of each thing below are fairly rough; the trick is to use freshly picked, high-quality veggies and to cut them thinly. The recipe below is a mix of the Martha Stewart recipe and one I found on Slashfood with a few adjustments of my own.

Vegetable tian by Eve Fox, Garden of Eating blog

This can be a main dish, albeit a fairly light one, but it also goes very well with grilled meats or roast chicken, a green salad and some fresh bread to sop up the juices. Bon appetit!

-- print recipe --Provençal Vegetable Tian
Serves 4

Ingredients

* 1 large onion or 2 medium leeks
* 2 large cloves garlic
* 1 or 2 small zucchini
* 1 or 2 small aubergines (eggplants)
* 1 or 2 small potatoes
* 2 or 3 medium plum tomatoes
* 2 or 3 sprigs fresh thyme
* 1/4 cup dry white wine
* Extra virgin olive oil
* Butter
* Sea salt
* Freshly ground black pepper

Directions

1. Cut a piece of parchment paper to the size of a two-quart glass or ceramic baking dish. Set aside. Butter the inside of the dish and set aside. Preheat the oven to 375 degrees.

2. Slice the onions and peel and mince the garlic. (If you're using leeks, cut the root end off and chop where the green begins then slice the white part and rinse in cold water to remove any sand/dirt. Let dry in a collander.)

3. Remove the ends from the zucchini and aubergines and discard. Cut each crosswise into coins 1/8-inch thick. Remove the stem ends from the tomatoes and discard. Cut each crosswise into rounds 1/8-inch thick. Scrub and dry the potato(es) and cut into 1/8-inch thick slices.

4. Coat a small pan with a good dose of olive oil and heat until shimmering. Add the garlic and swirl to coat. Gently add the onions (or leeks). Cook, stirring frequently, until the onions (or leeks) have begun to soften and the garlic has released its fragrance, approximately two to five minutes.

5. Carefully spread the onion/leek-garlic mixture across the bottom of the baking dish. Sprinkle with salt and a few grindings of fresh black pepper; strip the leaves from one of the sprigs of thyme and sprinkle over the mixture.

6. Layer the zucchini, aubergines, potato, and tomato on top of the onion/leek-garlic mixture, alternating each and overlapping slightly. I made sure to put the juicier things (squash and tomato) between the drier veggies (eggplant and potato) to keep the whole thing consistently moist. If working with a square or rectangular dish, layer in rows; if working with a circular or oval dish, work in fans from the center. Drizzle with a two-count of olive oil and splash with the wine. Sprinkle with salt and a few grindings of fresh black pepper; strip the leaves from the remaining thyme and sprinkle over the casserole.

7. Butter the cut parchment and carefully place, buttered side down, on top of the vegetables. Bake for 35 to 45 minutes, depending on your oven, until the vegetables are soft but not mushy while the edges are nicely crisp and brown.

A few other recipes you might like:

For more delicious recipes, gardening ideas, foraging tips, and food-related inspiration "like" the Garden of Eating on Facebook, or follow me on Twitter and Pinterest.

Like this recipe? Click here to browse through more Eatwell Recipes.
The Eatwell Project: a year of seasonal recipes -- logo by Eve Fox