Cooking With Your Kids

Tuesday, May 1, 2012

As a little girl, I loved sitting on the kitchen counter while my mom cooked. While I kicked my feet against the cabinets, she taught me how to peel an onion efficiently and how to crack an egg and use my index fingers to get all the white out before tossing the shells into the compost bin. And I still vividly recall the excitement I felt over the beautiful, golden, sesame seed-studded  loaves of braided challah we baked in my second grade class at the Woodstock Children's Center - they were like some kind of miracle...

Childhood is such an important, impressionable time of life when the vast majority of our lifelong habits are formed, or at least pointed in the direction in which they'll head. That's why my husband and I want to introduce our son, Will, to growing and cooking food alongside us.

First ripe cherry tomatoes in our garden by Eve Fox, Garden of Eating blog, copyright 2011

Will, who is just shy of three, watches and "helps" us with our container garden where we grow tomatoes, greens, peas, beans and herbs. At this point, it mostly means he digs in the dirt but he's learning.
Will really digs dirt by Eve Fox, Garden of Eating blog, copyright 2011

He had the heady experience of drinking cold, clear, slightly sweet maple sap straight from the spile (was this a new vocab word for you, too?) during our first foray into maple sugaring last winter.

Maple sap dripping out of the stile by Eve Fox, Garden of Eating blog, copyright 2011

And we brought him with us to forage for ramps a few weeks ago (although we confined his enthusiastic excavation efforts to a patch of ground that was not home to this fragile delicacy.) We've also gone strawberry, raspberry, blueberry and apple picking as a family - all activities we plan to repeat on a yearly basis since we all enjoy it. 

Will LOVES Berry Picking by Eve Fox, Garden of Eating blog, copyright 2011

We've taken him to local farms and friends' houses to gather eggs so fresh you have to chase the hens off their nests to pick them up. In addition to teaching him where his food comes from, it's a great way to kill an hour or so that does not involve us having to play with digging machines. We have not yet taught him about where the meat we eat comes from, both because we don't have a great local source and we're also both a little wimpy about exposing him to something so bloody at a tender age (or to being exposed to it, ourselves, at our not so tender ages...)

My husband sometimes plans baking projects in their hours together. At this point, Will's attention span is still remarkably short so he mostly just enjoys the idea of helping and participates in the "dumping" portion of the experience where he moves pre-measured amounts of flour, sugar, nuts, raisins, etc., into the mixing bowl. Then he gets bored, climbs down from his stool and runs off to do something else.

It takes about 2-3 times as long to bake something when Will is involved and is inevitably messier and more work but not only are we laying the groundwork for future cooking projects and appreciation of real food, we have also noticed that our notoriously picky eater is MUCH more likely to eat foods he has helped prepare in some way (score!)

Will eating a slice of pumpkin bread by Eve Fox, Garden of Eating blog, copyright 2011

Will also enjoys using the salad spinner to dry greens and cutting food (cucumbers and tofu are perfect!) with the adorable toddler knife Rahm got him recently after being inspired by this Slate magazine piece by Nicholas Day on the topic of cooking with pre-schoolers. And he LOVES sitting on the counter smelling and identifying spices (cinnamon is his favorite; cloves and star anise rank second and third.)

I recently made him a child-sized apron to help him feel at home in the kitchen and, hopefully, keep him slightly cleaner, though it's a bit of a lost cause at this point in his life. I chose the fabric (called "Dig It" by Michael Miller, in case you're curious) since he is 100% obsessed with digging and construction machines and I thought I should go with something he's already into.

Will baking cookies in his new digger apron by Eve Fox, Garden of Eating blog, copyright 2012

We figure that laying the groundwork now will not only encourage him to appreciate good food, eat more healthfully, and enjoy growing and cooking his own food from scratch someday, but if we're really strategic about it, in a few years, we might even get him to cook meals for us! If you are shaking your head in disbelief, check out this NYTimes piece by Leslie Kaufman, who got her two sons (ages 10 and 14) to each cook dinner for the family one night a week.

One thing I love about Kaufman's article is that she does not gloss over the challenges inherent in giving up control in the kitchen -- she squirms in discomfort when a  flame is left on too long for her taste and has to repeatedly battle her impulse to step in--something she unthinkingly does early on in the experiment that backfires - her son storms off to his room and misses the meal he'd prepared altogether, despite her apology.

As a perfectionist (fine, I'll just say it, I'm anal) who views cooking as somewhat of a devotional, semi-meditative practice--I like to clean up as I go and put everything in its place so that there's no mess left at the end--this kind of letting go is very HARD for me! I think it's good to be realistic about the fact that this is not an easy process - it requires a lot of patience, faith in your child, and a willingness to spend more time and do more cleaning up than you would if you just handled it all on your own. But the end result should be worth it.

Will picks the first ripe tomato in our garden by Eve Fox, Garden of Eating blog, copyright 2011

If this sounds appealing to you, I've compiled some resources to help you in this journey.
Please add your own thoughts and any recommendations you have on approach, books, tools, etc., via comments.

Pickled Wild Ramps

Monday, April 23, 2012

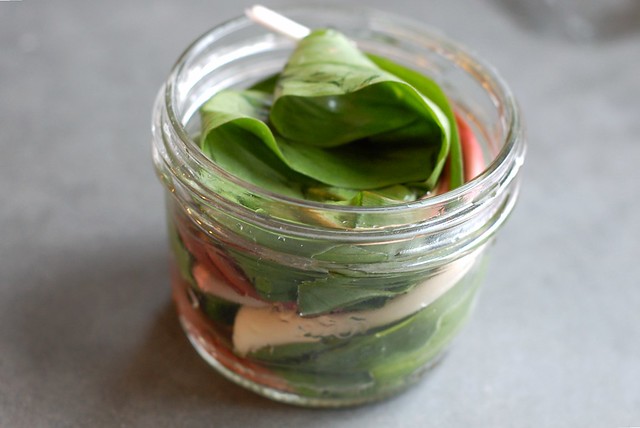
Pickling wild ramps by Eve Fox, Garden of Eating blog copyright 2012

We took Will ramp foraging with us last week. He brought a trowel and a dump truck. But don't fret, we confined his excavation to a patch of dirt that did not contain any ramps - they're far too precious and fragile for the likes of him.

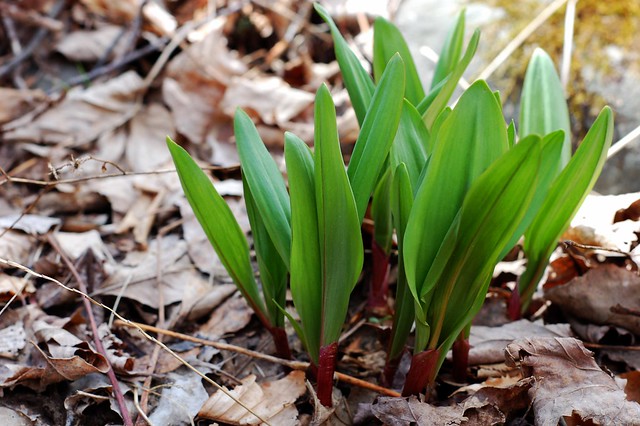
A clump of wild leeks growing near a streambed by Eve Fox, Garden of Eating blog, copyright 2011

We harvested very cautiously and left with a small bag of green treasure. I plan to make this delicious ramp and lemon risotto that we enjoyed last year. And my husband just started a small jar of these pickled ramps.

Pickling wild ramps by Eve Fox, Garden of Eating blog copyright 2012

The simple recipe comes from Kenji Lopez-Alt at Serious Eats via the lovely new cookbook I posted about a few weeks ago, Ramps: Cooking with the Best Kept Secret of the Appalachian Trail. You know, the one with my photo on the cover :)

There are a LOT of good recipes in this book. Time to start growing our own patch of ramps, methinks. A slow process but well worth the effort and time.

The new Ramps Cookbook - my photo is on the cover! by Eve Fox, Garden of Eating blog, copyright 2012

The flavors are intense and good. Great with cheese, charcuterie, on a sandwich, etc. Though you will have ramp breath for hours afterwards, just to warn you.

Pickling wild ramps by Eve Fox, Garden of Eating blog copyright 2012

-- print recipe --
Pickled Ramps
Makes 1 quart jar

Ingredients

* 1 pound ramps, carefully washed, ends trimmed
* 1 1/2 cups white wine vinegar or rice vinegar
* 1 1/2 cups water
* 1 1/2 cups sugar
* 1/4 cup salt
* 3 bay leaves
* 1 tablespoon yellow or black mustard seed
* 6 allspice berries
* 1 pinch red pepper flakes

Special equipment: Quart-sized canning jar and lid

Directions

1. Carefully pack ramps into a sterilized quart-sized jar with a screw-top lid.

2. Combine remaining ingredients in a medium saucepan over medium high heat and bring to a boil, whisking until sugar and salt are dissolved.

3. Pour hot brine over ramps (it should fill the jar completely, if you have excess, discard). Screw on lid and allow to cool at room temperature.

4. Transfer to refrigerator and allow to rest for at least 3 weeks and up to a year before consuming.

You might also like:

Chocolate Sour Cream Layer Cake

Saturday, April 21, 2012

Chocolate sour cream layer cake by Eve Fox, Garden of Eating blog, copyright 2012

Spring is birthday season in my family. My mom's, mine, my big brother's, my son's and my husband's birthday all fall within April and May. This means there is lots of cake baking and eating going on. Which brings me to this particularly delicious cake.

I found this recipe in Maida Heatter's Book of Great Desserts, given to me by my mom who is too busy to do much baking these days.

My old copy of Maida Heatter's Book of Great Desserts by Eve Fox, Garden of Eating blog, copyright 2012

It's the only chocolate cake I've made since I discovered it last year (and I have made it a number of times...) I love the moistness, the amount of sweetness (not overpowering), and the fact that it is wonderfully chocolatey without being at all overwhelming. I also like that I can turn leftover sour cream into something so yummy when it might otherwise just sprout green mold while languishing in the back of our fridge...

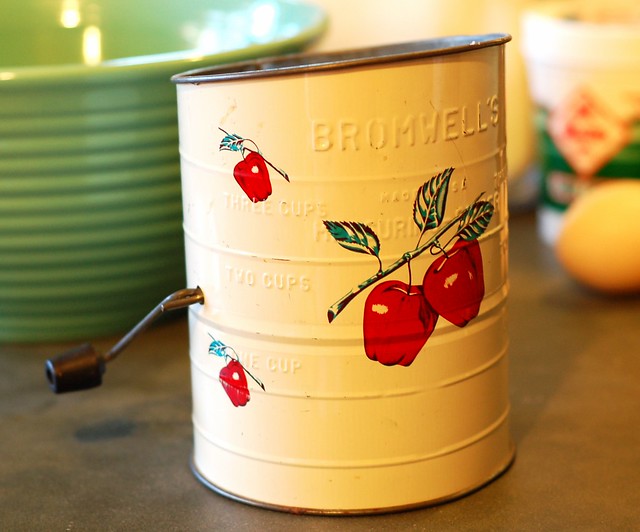
So I got out the cake flour, chocolate, sugar, eggs, butter, sour cream, vanilla and more one early morning to make one for my mom's 65th b-day. I like this cake enough that I have a semi-reverent approach to it. Which means that I do not cut any of the baking corners I might normally cut. For example - I bought cake flour instead of just using all-purpose like I normally would, and I dug out this adorable flour sifter that I've loved since I was a child (another hand-me-down from my mom) to actually sift the flour - something I almost never do.

My adorable flour sifter by Eve Fox, Garden of Eating blog, copyright 2012

And I actually made the cake release of butter and fine bread crumbs as Maida instructed (though I'm not actually convinced it works any better than butter and flour).

Cake release of fine breadcrumbs in pan by Eve Fox, Garden of Eating blog, copyright 2012

Then I got down to business...This is what it looked like.

Mixing the chocolate and sour cream by Eve Fox, Garden of Eating blog, copyright 2012

Mixing the batter for the chocolate sour cream layer cake by Eve Fox, Garden of Eating blog, copyright 2012

Two pans of cake batter for chocolate sour cream layer cake by Eve Fox, Garden of Eating blog, copyright 2012

About an hour later, two pans of chocolate cake were cooling on the counter and the house was filled with the smell of sheer happiness.

One layer of the chocolate sour cream layer cake cooling down by Eve Fox, Garden of Eating blog, copyright 2012

After everything cooled, it was time to frost those suckers. Unfortunately, I failed to read Maida's excellent instructions before I began so I ended up having to flip one of the layers after I'd frosted it already (a sticky situation, you might say) but I had enough frosting to make it all come out okay in the end. And now I'm pretty sure I'll never forget to FLIP THE BOTTOM LAYER UPSIDE DOWN BEFORE FROSTING IT again. It's brilliant advice - no need to mess with cutting layers flat or any of that crap - the weight of the cake on top presses it nice and flat.

Beginning to frost the chocolate sour cream layer cake by Eve Fox, Garden of Eating blog, copyright 2012

I decorated my brown beauty with a few of the lovely little violets growing in our yard. Then there was nothing left to do but light some candles, sing Happy Birthday to my dear maman and devour a big slice with some Ronnybrook Farm vanilla ice cream.

Chocolate sour cream layer cake by Eve Fox, Garden of Eating blog, copyright 2012

-- print recipe --Chocolate Sour Cream Layer Cake (from Maida Heatter's Book of Great Desserts)
Makes one gorgeous cake

Ingredients

* 3 squares (3 ounces) unsweetened chocolate
* 1/2 cup boiling water
* 2 cups sifted flour
* 1 1/2 teaspoons double-acting baking powder
* 1 teaspoon baking soda
* 1/4 teaspoon salt
* 3/4 cups butter (use organic)
* 2 teaspoons vanilla extract
* 1 cup granulated sugar
* 2/3 cup light brown sugar, firmly packed
* 3 eggs (use organic, free range if you can get 'em)
* 1 cup sour cream (use organic)

Directions

1. Adjust rack to center of oven and preheat oven to 375°F. Butter two 9 inch round layer cake pans and dust both lightly with fine, dry bread crumbs (though I think flour works just as well if you don't have any breadcrumbs on hand.)

2. In a small heavy saucepan over low heat melt the chocolate with the boiling water. Stir occasionally with a small wire whisk until smooth. Set aside. You can also zap these things together in the microwave for about 30 seconds if you're in a hurry.

3. Meanwhile, sift together the flour, baking powder, baking soda and salt. Set aside. In large bowl of electric mixer, cream the butter. Add vanilla, granulated sugar and brown sugar and beat well, scraping the bowl with a rubber spatula as necessary to keep mixture smooth. Beat in eggs one at a time, beating well after each.

4. Stir sour cream and cooled chocolate together until smooth and add to batter, beating only until mixed. On lowest speed, add the sifted ingredients continuing to scrape the bowl with a rubber spatula. Beat only until smooth.

5. Turn into prepared pans. With rubber spatula spread tops smooth and then run the batter up on the sides a bit, leaving the batter slightly lower in the centers.

6. Bake 35 minutes or until tops spring back when lightly touched and layers come away from sides of pans. Cool in pans for about 5 minutes. Place racks over the cakes and invert. Remove pans. Cover with racks and invert again to cool right side up.

For the Icing/Frosting

Ingredients

* 3 squares (3 ounces) unsweetened chocolate)
* 2 Tablespoons butter
* 3/4 cup sour cream
* 1 teaspoon vanilla extract
* 1/4 teaspoon salt
* 1 pound unsifted confectioners sugar.

Directions

1. In top of small double boiler over hot water on low heat, melt butter and chocolate together. Stir until smooth and let cool completely.

2. In small bowl of electric mixer at low speed, beat sour cream, vanilla and salt just to mix. Gradually beat in the sugar, scraping the bowl with a rubber spatula. When smooth, add cooled melted chocolate and beat at high speed for 1/2 a minute or until very smooth.

3. Place four strips of wax paper around the edges of a cake plate to protect it while icing cake. (Note, this is one step I skipped - you can always just wipe the frosting off the plate later - it's actually rather enjoyable...)

4. Place one layer upside down. Spread with filling. Cover with second layer, right side up so that both bottom sides meet in the middle (brilliant, Maida!!!) Cover the sides and then the top with remaining filling and icing, smoothing it with a long, narrow, metal spatula; then if you wish use the pack of a teaspoon to form swirls and peaks all over the sides and the top.

5. If you did the wax paper bit in step 3, remove the wax paper by pulling each strip by a narrow end. Needless to say, this goes well with ice cream! I'd say vanilla, coffee or hazelnut are all good bets.

You might also like:
Want even more recipes, photos, giveaways, and food-related inspiration? "Like" the Garden of Eating on Facebook, or follow me on Twitter or Pinterest.

Tuesday, May 1, 2012

Cooking With Your Kids

As a little girl, I loved sitting on the kitchen counter while my mom cooked. While I kicked my feet against the cabinets, she taught me how to peel an onion efficiently and how to crack an egg and use my index fingers to get all the white out before tossing the shells into the compost bin. And I still vividly recall the excitement I felt over the beautiful, golden, sesame seed-studded  loaves of braided challah we baked in my second grade class at the Woodstock Children's Center - they were like some kind of miracle...

Childhood is such an important, impressionable time of life when the vast majority of our lifelong habits are formed, or at least pointed in the direction in which they'll head. That's why my husband and I want to introduce our son, Will, to growing and cooking food alongside us.

First ripe cherry tomatoes in our garden by Eve Fox, Garden of Eating blog, copyright 2011

Will, who is just shy of three, watches and "helps" us with our container garden where we grow tomatoes, greens, peas, beans and herbs. At this point, it mostly means he digs in the dirt but he's learning.
Will really digs dirt by Eve Fox, Garden of Eating blog, copyright 2011

He had the heady experience of drinking cold, clear, slightly sweet maple sap straight from the spile (was this a new vocab word for you, too?) during our first foray into maple sugaring last winter.

Maple sap dripping out of the stile by Eve Fox, Garden of Eating blog, copyright 2011

And we brought him with us to forage for ramps a few weeks ago (although we confined his enthusiastic excavation efforts to a patch of ground that was not home to this fragile delicacy.) We've also gone strawberry, raspberry, blueberry and apple picking as a family - all activities we plan to repeat on a yearly basis since we all enjoy it. 

Will LOVES Berry Picking by Eve Fox, Garden of Eating blog, copyright 2011

We've taken him to local farms and friends' houses to gather eggs so fresh you have to chase the hens off their nests to pick them up. In addition to teaching him where his food comes from, it's a great way to kill an hour or so that does not involve us having to play with digging machines. We have not yet taught him about where the meat we eat comes from, both because we don't have a great local source and we're also both a little wimpy about exposing him to something so bloody at a tender age (or to being exposed to it, ourselves, at our not so tender ages...)

My husband sometimes plans baking projects in their hours together. At this point, Will's attention span is still remarkably short so he mostly just enjoys the idea of helping and participates in the "dumping" portion of the experience where he moves pre-measured amounts of flour, sugar, nuts, raisins, etc., into the mixing bowl. Then he gets bored, climbs down from his stool and runs off to do something else.

It takes about 2-3 times as long to bake something when Will is involved and is inevitably messier and more work but not only are we laying the groundwork for future cooking projects and appreciation of real food, we have also noticed that our notoriously picky eater is MUCH more likely to eat foods he has helped prepare in some way (score!)

Will eating a slice of pumpkin bread by Eve Fox, Garden of Eating blog, copyright 2011

Will also enjoys using the salad spinner to dry greens and cutting food (cucumbers and tofu are perfect!) with the adorable toddler knife Rahm got him recently after being inspired by this Slate magazine piece by Nicholas Day on the topic of cooking with pre-schoolers. And he LOVES sitting on the counter smelling and identifying spices (cinnamon is his favorite; cloves and star anise rank second and third.)

I recently made him a child-sized apron to help him feel at home in the kitchen and, hopefully, keep him slightly cleaner, though it's a bit of a lost cause at this point in his life. I chose the fabric (called "Dig It" by Michael Miller, in case you're curious) since he is 100% obsessed with digging and construction machines and I thought I should go with something he's already into.

Will baking cookies in his new digger apron by Eve Fox, Garden of Eating blog, copyright 2012

We figure that laying the groundwork now will not only encourage him to appreciate good food, eat more healthfully, and enjoy growing and cooking his own food from scratch someday, but if we're really strategic about it, in a few years, we might even get him to cook meals for us! If you are shaking your head in disbelief, check out this NYTimes piece by Leslie Kaufman, who got her two sons (ages 10 and 14) to each cook dinner for the family one night a week.

One thing I love about Kaufman's article is that she does not gloss over the challenges inherent in giving up control in the kitchen -- she squirms in discomfort when a  flame is left on too long for her taste and has to repeatedly battle her impulse to step in--something she unthinkingly does early on in the experiment that backfires - her son storms off to his room and misses the meal he'd prepared altogether, despite her apology.

As a perfectionist (fine, I'll just say it, I'm anal) who views cooking as somewhat of a devotional, semi-meditative practice--I like to clean up as I go and put everything in its place so that there's no mess left at the end--this kind of letting go is very HARD for me! I think it's good to be realistic about the fact that this is not an easy process - it requires a lot of patience, faith in your child, and a willingness to spend more time and do more cleaning up than you would if you just handled it all on your own. But the end result should be worth it.

Will picks the first ripe tomato in our garden by Eve Fox, Garden of Eating blog, copyright 2011

If this sounds appealing to you, I've compiled some resources to help you in this journey.
Please add your own thoughts and any recommendations you have on approach, books, tools, etc., via comments.

Monday, April 23, 2012

Pickled Wild Ramps

Pickling wild ramps by Eve Fox, Garden of Eating blog copyright 2012

We took Will ramp foraging with us last week. He brought a trowel and a dump truck. But don't fret, we confined his excavation to a patch of dirt that did not contain any ramps - they're far too precious and fragile for the likes of him.

A clump of wild leeks growing near a streambed by Eve Fox, Garden of Eating blog, copyright 2011

We harvested very cautiously and left with a small bag of green treasure. I plan to make this delicious ramp and lemon risotto that we enjoyed last year. And my husband just started a small jar of these pickled ramps.

Pickling wild ramps by Eve Fox, Garden of Eating blog copyright 2012

The simple recipe comes from Kenji Lopez-Alt at Serious Eats via the lovely new cookbook I posted about a few weeks ago, Ramps: Cooking with the Best Kept Secret of the Appalachian Trail. You know, the one with my photo on the cover :)

There are a LOT of good recipes in this book. Time to start growing our own patch of ramps, methinks. A slow process but well worth the effort and time.

The new Ramps Cookbook - my photo is on the cover! by Eve Fox, Garden of Eating blog, copyright 2012

The flavors are intense and good. Great with cheese, charcuterie, on a sandwich, etc. Though you will have ramp breath for hours afterwards, just to warn you.

Pickling wild ramps by Eve Fox, Garden of Eating blog copyright 2012

-- print recipe --
Pickled Ramps
Makes 1 quart jar

Ingredients

* 1 pound ramps, carefully washed, ends trimmed
* 1 1/2 cups white wine vinegar or rice vinegar
* 1 1/2 cups water
* 1 1/2 cups sugar
* 1/4 cup salt
* 3 bay leaves
* 1 tablespoon yellow or black mustard seed
* 6 allspice berries
* 1 pinch red pepper flakes

Special equipment: Quart-sized canning jar and lid

Directions

1. Carefully pack ramps into a sterilized quart-sized jar with a screw-top lid.

2. Combine remaining ingredients in a medium saucepan over medium high heat and bring to a boil, whisking until sugar and salt are dissolved.

3. Pour hot brine over ramps (it should fill the jar completely, if you have excess, discard). Screw on lid and allow to cool at room temperature.

4. Transfer to refrigerator and allow to rest for at least 3 weeks and up to a year before consuming.

You might also like:

Saturday, April 21, 2012

Chocolate Sour Cream Layer Cake

Chocolate sour cream layer cake by Eve Fox, Garden of Eating blog, copyright 2012

Spring is birthday season in my family. My mom's, mine, my big brother's, my son's and my husband's birthday all fall within April and May. This means there is lots of cake baking and eating going on. Which brings me to this particularly delicious cake.

I found this recipe in Maida Heatter's Book of Great Desserts, given to me by my mom who is too busy to do much baking these days.

My old copy of Maida Heatter's Book of Great Desserts by Eve Fox, Garden of Eating blog, copyright 2012

It's the only chocolate cake I've made since I discovered it last year (and I have made it a number of times...) I love the moistness, the amount of sweetness (not overpowering), and the fact that it is wonderfully chocolatey without being at all overwhelming. I also like that I can turn leftover sour cream into something so yummy when it might otherwise just sprout green mold while languishing in the back of our fridge...

So I got out the cake flour, chocolate, sugar, eggs, butter, sour cream, vanilla and more one early morning to make one for my mom's 65th b-day. I like this cake enough that I have a semi-reverent approach to it. Which means that I do not cut any of the baking corners I might normally cut. For example - I bought cake flour instead of just using all-purpose like I normally would, and I dug out this adorable flour sifter that I've loved since I was a child (another hand-me-down from my mom) to actually sift the flour - something I almost never do.

My adorable flour sifter by Eve Fox, Garden of Eating blog, copyright 2012

And I actually made the cake release of butter and fine bread crumbs as Maida instructed (though I'm not actually convinced it works any better than butter and flour).

Cake release of fine breadcrumbs in pan by Eve Fox, Garden of Eating blog, copyright 2012

Then I got down to business...This is what it looked like.

Mixing the chocolate and sour cream by Eve Fox, Garden of Eating blog, copyright 2012

Mixing the batter for the chocolate sour cream layer cake by Eve Fox, Garden of Eating blog, copyright 2012

Two pans of cake batter for chocolate sour cream layer cake by Eve Fox, Garden of Eating blog, copyright 2012

About an hour later, two pans of chocolate cake were cooling on the counter and the house was filled with the smell of sheer happiness.

One layer of the chocolate sour cream layer cake cooling down by Eve Fox, Garden of Eating blog, copyright 2012

After everything cooled, it was time to frost those suckers. Unfortunately, I failed to read Maida's excellent instructions before I began so I ended up having to flip one of the layers after I'd frosted it already (a sticky situation, you might say) but I had enough frosting to make it all come out okay in the end. And now I'm pretty sure I'll never forget to FLIP THE BOTTOM LAYER UPSIDE DOWN BEFORE FROSTING IT again. It's brilliant advice - no need to mess with cutting layers flat or any of that crap - the weight of the cake on top presses it nice and flat.

Beginning to frost the chocolate sour cream layer cake by Eve Fox, Garden of Eating blog, copyright 2012

I decorated my brown beauty with a few of the lovely little violets growing in our yard. Then there was nothing left to do but light some candles, sing Happy Birthday to my dear maman and devour a big slice with some Ronnybrook Farm vanilla ice cream.

Chocolate sour cream layer cake by Eve Fox, Garden of Eating blog, copyright 2012

-- print recipe --Chocolate Sour Cream Layer Cake (from Maida Heatter's Book of Great Desserts)
Makes one gorgeous cake

Ingredients

* 3 squares (3 ounces) unsweetened chocolate
* 1/2 cup boiling water
* 2 cups sifted flour
* 1 1/2 teaspoons double-acting baking powder
* 1 teaspoon baking soda
* 1/4 teaspoon salt
* 3/4 cups butter (use organic)
* 2 teaspoons vanilla extract
* 1 cup granulated sugar
* 2/3 cup light brown sugar, firmly packed
* 3 eggs (use organic, free range if you can get 'em)
* 1 cup sour cream (use organic)

Directions

1. Adjust rack to center of oven and preheat oven to 375°F. Butter two 9 inch round layer cake pans and dust both lightly with fine, dry bread crumbs (though I think flour works just as well if you don't have any breadcrumbs on hand.)

2. In a small heavy saucepan over low heat melt the chocolate with the boiling water. Stir occasionally with a small wire whisk until smooth. Set aside. You can also zap these things together in the microwave for about 30 seconds if you're in a hurry.

3. Meanwhile, sift together the flour, baking powder, baking soda and salt. Set aside. In large bowl of electric mixer, cream the butter. Add vanilla, granulated sugar and brown sugar and beat well, scraping the bowl with a rubber spatula as necessary to keep mixture smooth. Beat in eggs one at a time, beating well after each.

4. Stir sour cream and cooled chocolate together until smooth and add to batter, beating only until mixed. On lowest speed, add the sifted ingredients continuing to scrape the bowl with a rubber spatula. Beat only until smooth.

5. Turn into prepared pans. With rubber spatula spread tops smooth and then run the batter up on the sides a bit, leaving the batter slightly lower in the centers.

6. Bake 35 minutes or until tops spring back when lightly touched and layers come away from sides of pans. Cool in pans for about 5 minutes. Place racks over the cakes and invert. Remove pans. Cover with racks and invert again to cool right side up.

For the Icing/Frosting

Ingredients

* 3 squares (3 ounces) unsweetened chocolate)
* 2 Tablespoons butter
* 3/4 cup sour cream
* 1 teaspoon vanilla extract
* 1/4 teaspoon salt
* 1 pound unsifted confectioners sugar.

Directions

1. In top of small double boiler over hot water on low heat, melt butter and chocolate together. Stir until smooth and let cool completely.

2. In small bowl of electric mixer at low speed, beat sour cream, vanilla and salt just to mix. Gradually beat in the sugar, scraping the bowl with a rubber spatula. When smooth, add cooled melted chocolate and beat at high speed for 1/2 a minute or until very smooth.

3. Place four strips of wax paper around the edges of a cake plate to protect it while icing cake. (Note, this is one step I skipped - you can always just wipe the frosting off the plate later - it's actually rather enjoyable...)

4. Place one layer upside down. Spread with filling. Cover with second layer, right side up so that both bottom sides meet in the middle (brilliant, Maida!!!) Cover the sides and then the top with remaining filling and icing, smoothing it with a long, narrow, metal spatula; then if you wish use the pack of a teaspoon to form swirls and peaks all over the sides and the top.

5. If you did the wax paper bit in step 3, remove the wax paper by pulling each strip by a narrow end. Needless to say, this goes well with ice cream! I'd say vanilla, coffee or hazelnut are all good bets.

You might also like:
Want even more recipes, photos, giveaways, and food-related inspiration? "Like" the Garden of Eating on Facebook, or follow me on Twitter or Pinterest.