Pickled Wild Ramps

Monday, April 23, 2012

Pickling wild ramps by Eve Fox, Garden of Eating blog copyright 2012

We took Will ramp foraging with us last week. He brought a trowel and a dump truck. But don't fret, we confined his excavation to a patch of dirt that did not contain any ramps - they're far too precious and fragile for the likes of him.

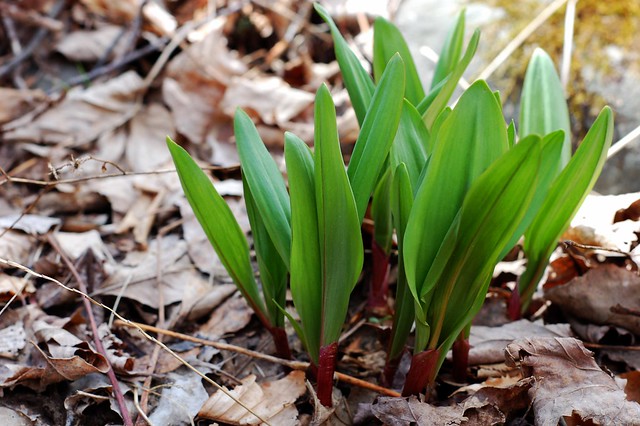
A clump of wild leeks growing near a streambed by Eve Fox, Garden of Eating blog, copyright 2011

We harvested very cautiously and left with a small bag of green treasure. I plan to make this delicious ramp and lemon risotto that we enjoyed last year. And my husband just started a small jar of these pickled ramps.

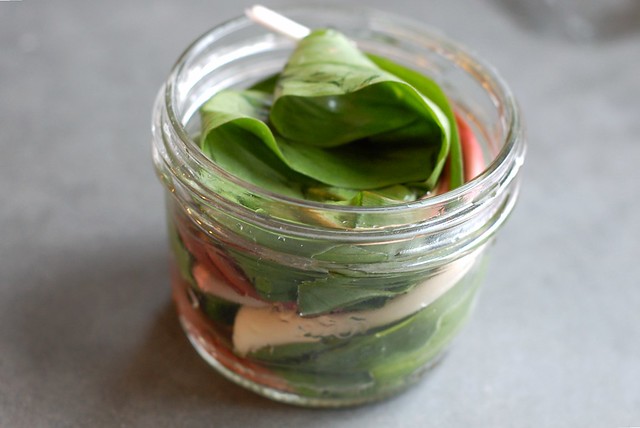
Pickling wild ramps by Eve Fox, Garden of Eating blog copyright 2012

The simple recipe comes from Kenji Lopez-Alt at Serious Eats via the lovely new cookbook I posted about a few weeks ago, Ramps: Cooking with the Best Kept Secret of the Appalachian Trail. You know, the one with my photo on the cover :)

There are a LOT of good recipes in this book. Time to start growing our own patch of ramps, methinks. A slow process but well worth the effort and time.

The new Ramps Cookbook - my photo is on the cover! by Eve Fox, Garden of Eating blog, copyright 2012

The flavors are intense and good. Great with cheese, charcuterie, on a sandwich, etc. Though you will have ramp breath for hours afterwards, just to warn you.

Pickling wild ramps by Eve Fox, Garden of Eating blog copyright 2012

-- print recipe --
Pickled Ramps
Makes 1 quart jar

Ingredients

* 1 pound ramps, carefully washed, ends trimmed
* 1 1/2 cups white wine vinegar or rice vinegar
* 1 1/2 cups water
* 1 1/2 cups sugar
* 1/4 cup salt
* 3 bay leaves
* 1 tablespoon yellow or black mustard seed
* 6 allspice berries
* 1 pinch red pepper flakes

Special equipment: Quart-sized canning jar and lid

Directions

1. Carefully pack ramps into a sterilized quart-sized jar with a screw-top lid.

2. Combine remaining ingredients in a medium saucepan over medium high heat and bring to a boil, whisking until sugar and salt are dissolved.

3. Pour hot brine over ramps (it should fill the jar completely, if you have excess, discard). Screw on lid and allow to cool at room temperature.

4. Transfer to refrigerator and allow to rest for at least 3 weeks and up to a year before consuming.

You might also like:

Chocolate Sour Cream Layer Cake

Saturday, April 21, 2012

Chocolate sour cream layer cake by Eve Fox, Garden of Eating blog, copyright 2012

Spring is birthday season in my family. My mom's, mine, my big brother's, my son's and my husband's birthday all fall within April and May. This means there is lots of cake baking and eating going on. Which brings me to this particularly delicious cake.

I found this recipe in Maida Heatter's Book of Great Desserts, given to me by my mom who is too busy to do much baking these days.

My old copy of Maida Heatter's Book of Great Desserts by Eve Fox, Garden of Eating blog, copyright 2012

It's the only chocolate cake I've made since I discovered it last year (and I have made it a number of times...) I love the moistness, the amount of sweetness (not overpowering), and the fact that it is wonderfully chocolatey without being at all overwhelming. I also like that I can turn leftover sour cream into something so yummy when it might otherwise just sprout green mold while languishing in the back of our fridge...

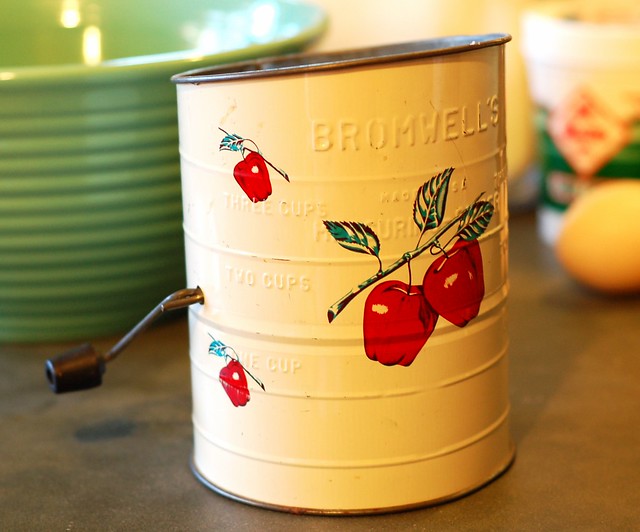
So I got out the cake flour, chocolate, sugar, eggs, butter, sour cream, vanilla and more one early morning to make one for my mom's 65th b-day. I like this cake enough that I have a semi-reverent approach to it. Which means that I do not cut any of the baking corners I might normally cut. For example - I bought cake flour instead of just using all-purpose like I normally would, and I dug out this adorable flour sifter that I've loved since I was a child (another hand-me-down from my mom) to actually sift the flour - something I almost never do.

My adorable flour sifter by Eve Fox, Garden of Eating blog, copyright 2012

And I actually made the cake release of butter and fine bread crumbs as Maida instructed (though I'm not actually convinced it works any better than butter and flour).

Cake release of fine breadcrumbs in pan by Eve Fox, Garden of Eating blog, copyright 2012

Then I got down to business...This is what it looked like.

Mixing the chocolate and sour cream by Eve Fox, Garden of Eating blog, copyright 2012

Mixing the batter for the chocolate sour cream layer cake by Eve Fox, Garden of Eating blog, copyright 2012

Two pans of cake batter for chocolate sour cream layer cake by Eve Fox, Garden of Eating blog, copyright 2012

About an hour later, two pans of chocolate cake were cooling on the counter and the house was filled with the smell of sheer happiness.

One layer of the chocolate sour cream layer cake cooling down by Eve Fox, Garden of Eating blog, copyright 2012

After everything cooled, it was time to frost those suckers. Unfortunately, I failed to read Maida's excellent instructions before I began so I ended up having to flip one of the layers after I'd frosted it already (a sticky situation, you might say) but I had enough frosting to make it all come out okay in the end. And now I'm pretty sure I'll never forget to FLIP THE BOTTOM LAYER UPSIDE DOWN BEFORE FROSTING IT again. It's brilliant advice - no need to mess with cutting layers flat or any of that crap - the weight of the cake on top presses it nice and flat.

Beginning to frost the chocolate sour cream layer cake by Eve Fox, Garden of Eating blog, copyright 2012

I decorated my brown beauty with a few of the lovely little violets growing in our yard. Then there was nothing left to do but light some candles, sing Happy Birthday to my dear maman and devour a big slice with some Ronnybrook Farm vanilla ice cream.

Chocolate sour cream layer cake by Eve Fox, Garden of Eating blog, copyright 2012

-- print recipe --Chocolate Sour Cream Layer Cake (from Maida Heatter's Book of Great Desserts)
Makes one gorgeous cake

Ingredients

* 3 squares (3 ounces) unsweetened chocolate
* 1/2 cup boiling water
* 2 cups sifted flour
* 1 1/2 teaspoons double-acting baking powder
* 1 teaspoon baking soda
* 1/4 teaspoon salt
* 3/4 cups butter (use organic)
* 2 teaspoons vanilla extract
* 1 cup granulated sugar
* 2/3 cup light brown sugar, firmly packed
* 3 eggs (use organic, free range if you can get 'em)
* 1 cup sour cream (use organic)

Directions

1. Adjust rack to center of oven and preheat oven to 375°F. Butter two 9 inch round layer cake pans and dust both lightly with fine, dry bread crumbs (though I think flour works just as well if you don't have any breadcrumbs on hand.)

2. In a small heavy saucepan over low heat melt the chocolate with the boiling water. Stir occasionally with a small wire whisk until smooth. Set aside. You can also zap these things together in the microwave for about 30 seconds if you're in a hurry.

3. Meanwhile, sift together the flour, baking powder, baking soda and salt. Set aside. In large bowl of electric mixer, cream the butter. Add vanilla, granulated sugar and brown sugar and beat well, scraping the bowl with a rubber spatula as necessary to keep mixture smooth. Beat in eggs one at a time, beating well after each.

4. Stir sour cream and cooled chocolate together until smooth and add to batter, beating only until mixed. On lowest speed, add the sifted ingredients continuing to scrape the bowl with a rubber spatula. Beat only until smooth.

5. Turn into prepared pans. With rubber spatula spread tops smooth and then run the batter up on the sides a bit, leaving the batter slightly lower in the centers.

6. Bake 35 minutes or until tops spring back when lightly touched and layers come away from sides of pans. Cool in pans for about 5 minutes. Place racks over the cakes and invert. Remove pans. Cover with racks and invert again to cool right side up.

For the Icing/Frosting

Ingredients

* 3 squares (3 ounces) unsweetened chocolate)
* 2 Tablespoons butter
* 3/4 cup sour cream
* 1 teaspoon vanilla extract
* 1/4 teaspoon salt
* 1 pound unsifted confectioners sugar.

Directions

1. In top of small double boiler over hot water on low heat, melt butter and chocolate together. Stir until smooth and let cool completely.

2. In small bowl of electric mixer at low speed, beat sour cream, vanilla and salt just to mix. Gradually beat in the sugar, scraping the bowl with a rubber spatula. When smooth, add cooled melted chocolate and beat at high speed for 1/2 a minute or until very smooth.

3. Place four strips of wax paper around the edges of a cake plate to protect it while icing cake. (Note, this is one step I skipped - you can always just wipe the frosting off the plate later - it's actually rather enjoyable...)

4. Place one layer upside down. Spread with filling. Cover with second layer, right side up so that both bottom sides meet in the middle (brilliant, Maida!!!) Cover the sides and then the top with remaining filling and icing, smoothing it with a long, narrow, metal spatula; then if you wish use the pack of a teaspoon to form swirls and peaks all over the sides and the top.

5. If you did the wax paper bit in step 3, remove the wax paper by pulling each strip by a narrow end. Needless to say, this goes well with ice cream! I'd say vanilla, coffee or hazelnut are all good bets.

You might also like:
Want even more recipes, photos, giveaways, and food-related inspiration? "Like" the Garden of Eating on Facebook, or follow me on Twitter or Pinterest.

Green Bean & Potato Salad With Lemon-Dill Aioli

Thursday, April 12, 2012

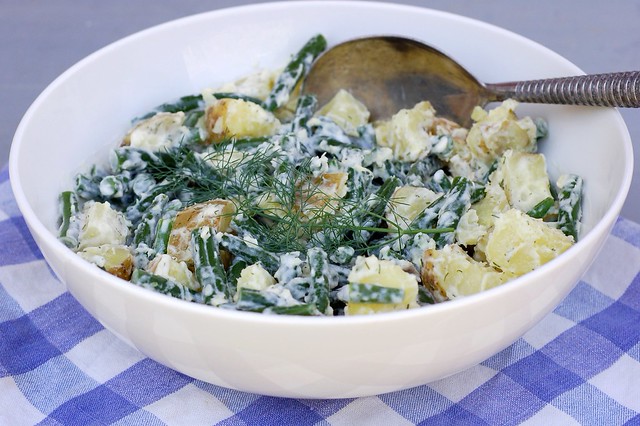
Greenbean, potato salad with lemon dill aioli by Eve Fox, Garden of Eating blog, copyright 2012

This salad is about my favorite thing in the world lately. I made it up which gives me a special feeling of pride about how good it is.

It started with the sauce - something I'd whipped up to serve with grilled salmon. It's so simple yet so delicious - just mayonnaise, lemon juice, fresh dill, garlic, salt and pepper. It only occurred to me as I sat down to write this post that it's actually an aioli...

Lemon dill aioli by Eve Fox, Garden of Eating blog, copyright 2012

Then I was thinking about accompaniments to grilled salmon and thought, potatoes and green beans. Then I thought, what if I mixed the sauce with those two things? It sounded promising...

Potatoes by Eve Fox, Garden of Eating blog, copyright 2012

So I steamed some Yukon Golds and blanched some green beans and tossed them with the sauce and voila, my new favorite salad was born! It's a great dish for spring and will be an even better one for summer when fresh beans and new potatoes are coming right out of the garden or the farmers' market. And, I can report, it does go very nicely with grilled salmon.

Green beans by Eve Fox, Garden of Eating blog, copyright 2012

One of the things I love about this hearty salad is the relative ease of putting it together BUT if you are in a slow food mood and have a little extra time, you could take it one step further by making your own mayo for the aioli.

Greenbean, potato salad with lemon dill aioli by Eve Fox, Garden of Eating blog, copyright 2012

Please note that this is a flexible recipe so these amounts are just a rough guide - you should taste as you go and adjust as you see fit. And if you want to throw other ingredients into the salad that sound good to you, you should. Without further ado, enjoy!

-- print recipe --
Green Bean & Potato Salad With Lemon-Dill Aioli
Serves 4 as a side

Ingredients

For the salad
* 4 cups of fresh green beans, rinsed with the ends trimmed off
* 3 large or 4 medium potatoes, scrubbed and chopped into equal-sized cubes (I like Yukon Gold or Yellow Finn for this salad)
* Tray or two of ice cubes and lots of cold water

For the aioli
* 1 tsp sea salt
* 1 tsp freshly ground black pepper
* 3/4 cup mayonnaise
* 2-3 garlic cloves, minced or pressed (go heavy if you like garlic, light if you don't!)
* 3-4 tsp fresh lemon juice
* 3 tsp fresh dill, chopped

Directions

1. Make the aioli by combining all the sauce ingredients and stirring well. Taste and adjust the flavors as needed. It's okay if it seems a bit salty and garlic-y - remember, this is going to cover a whole lot of unseasoned vegetables.

2. Place the cubed potatoes in a steamer pot over an inch or so of water and steam, covered until tender when pierced with a fork, roughly 15-20 minutes, depending on the size of the cubes.Then remove from the pot and allow to cool slightly.

3. Meanwhile, bring a large pot of water to the boil. Then add the green beans and blanch then until they're just a little bit tender but still bright green - probably 3-4 minutes or so. While they're cooking, prepare a large pot of very cold water mixed with ice cubes so that you'll have it at the ready to put the blanched beans in - this is important so that you can stop the cooking process (otherwise, they'll continue to cook and end up overdone). Once the beans are done, remove them from the water with a slotted spoon or by pouring them into a colander, then place them in the ice water bath for 5 minutes to ensure that the cooking stops.

4. Combine the steamed potatoes, blanched beans and the sauce, stirring with a large spoon to ensure that everything gets well-coated with the aioli and serve. Goes amazingly well with grilled or poached salmon, grilled chicken, burgers or really anything you can throw at it.

You might also like:
Want even more recipes, photos, giveaways, and food-related inspiration? "Like" the Garden of Eating on Facebook, or follow me on Twitter or Pinterest.

Monday, April 23, 2012

Pickled Wild Ramps

Pickling wild ramps by Eve Fox, Garden of Eating blog copyright 2012

We took Will ramp foraging with us last week. He brought a trowel and a dump truck. But don't fret, we confined his excavation to a patch of dirt that did not contain any ramps - they're far too precious and fragile for the likes of him.

A clump of wild leeks growing near a streambed by Eve Fox, Garden of Eating blog, copyright 2011

We harvested very cautiously and left with a small bag of green treasure. I plan to make this delicious ramp and lemon risotto that we enjoyed last year. And my husband just started a small jar of these pickled ramps.

Pickling wild ramps by Eve Fox, Garden of Eating blog copyright 2012

The simple recipe comes from Kenji Lopez-Alt at Serious Eats via the lovely new cookbook I posted about a few weeks ago, Ramps: Cooking with the Best Kept Secret of the Appalachian Trail. You know, the one with my photo on the cover :)

There are a LOT of good recipes in this book. Time to start growing our own patch of ramps, methinks. A slow process but well worth the effort and time.

The new Ramps Cookbook - my photo is on the cover! by Eve Fox, Garden of Eating blog, copyright 2012

The flavors are intense and good. Great with cheese, charcuterie, on a sandwich, etc. Though you will have ramp breath for hours afterwards, just to warn you.

Pickling wild ramps by Eve Fox, Garden of Eating blog copyright 2012

-- print recipe --
Pickled Ramps
Makes 1 quart jar

Ingredients

* 1 pound ramps, carefully washed, ends trimmed
* 1 1/2 cups white wine vinegar or rice vinegar
* 1 1/2 cups water
* 1 1/2 cups sugar
* 1/4 cup salt
* 3 bay leaves
* 1 tablespoon yellow or black mustard seed
* 6 allspice berries
* 1 pinch red pepper flakes

Special equipment: Quart-sized canning jar and lid

Directions

1. Carefully pack ramps into a sterilized quart-sized jar with a screw-top lid.

2. Combine remaining ingredients in a medium saucepan over medium high heat and bring to a boil, whisking until sugar and salt are dissolved.

3. Pour hot brine over ramps (it should fill the jar completely, if you have excess, discard). Screw on lid and allow to cool at room temperature.

4. Transfer to refrigerator and allow to rest for at least 3 weeks and up to a year before consuming.

You might also like:

Saturday, April 21, 2012

Chocolate Sour Cream Layer Cake

Chocolate sour cream layer cake by Eve Fox, Garden of Eating blog, copyright 2012

Spring is birthday season in my family. My mom's, mine, my big brother's, my son's and my husband's birthday all fall within April and May. This means there is lots of cake baking and eating going on. Which brings me to this particularly delicious cake.

I found this recipe in Maida Heatter's Book of Great Desserts, given to me by my mom who is too busy to do much baking these days.

My old copy of Maida Heatter's Book of Great Desserts by Eve Fox, Garden of Eating blog, copyright 2012

It's the only chocolate cake I've made since I discovered it last year (and I have made it a number of times...) I love the moistness, the amount of sweetness (not overpowering), and the fact that it is wonderfully chocolatey without being at all overwhelming. I also like that I can turn leftover sour cream into something so yummy when it might otherwise just sprout green mold while languishing in the back of our fridge...

So I got out the cake flour, chocolate, sugar, eggs, butter, sour cream, vanilla and more one early morning to make one for my mom's 65th b-day. I like this cake enough that I have a semi-reverent approach to it. Which means that I do not cut any of the baking corners I might normally cut. For example - I bought cake flour instead of just using all-purpose like I normally would, and I dug out this adorable flour sifter that I've loved since I was a child (another hand-me-down from my mom) to actually sift the flour - something I almost never do.

My adorable flour sifter by Eve Fox, Garden of Eating blog, copyright 2012

And I actually made the cake release of butter and fine bread crumbs as Maida instructed (though I'm not actually convinced it works any better than butter and flour).

Cake release of fine breadcrumbs in pan by Eve Fox, Garden of Eating blog, copyright 2012

Then I got down to business...This is what it looked like.

Mixing the chocolate and sour cream by Eve Fox, Garden of Eating blog, copyright 2012

Mixing the batter for the chocolate sour cream layer cake by Eve Fox, Garden of Eating blog, copyright 2012

Two pans of cake batter for chocolate sour cream layer cake by Eve Fox, Garden of Eating blog, copyright 2012

About an hour later, two pans of chocolate cake were cooling on the counter and the house was filled with the smell of sheer happiness.

One layer of the chocolate sour cream layer cake cooling down by Eve Fox, Garden of Eating blog, copyright 2012

After everything cooled, it was time to frost those suckers. Unfortunately, I failed to read Maida's excellent instructions before I began so I ended up having to flip one of the layers after I'd frosted it already (a sticky situation, you might say) but I had enough frosting to make it all come out okay in the end. And now I'm pretty sure I'll never forget to FLIP THE BOTTOM LAYER UPSIDE DOWN BEFORE FROSTING IT again. It's brilliant advice - no need to mess with cutting layers flat or any of that crap - the weight of the cake on top presses it nice and flat.

Beginning to frost the chocolate sour cream layer cake by Eve Fox, Garden of Eating blog, copyright 2012

I decorated my brown beauty with a few of the lovely little violets growing in our yard. Then there was nothing left to do but light some candles, sing Happy Birthday to my dear maman and devour a big slice with some Ronnybrook Farm vanilla ice cream.

Chocolate sour cream layer cake by Eve Fox, Garden of Eating blog, copyright 2012

-- print recipe --Chocolate Sour Cream Layer Cake (from Maida Heatter's Book of Great Desserts)
Makes one gorgeous cake

Ingredients

* 3 squares (3 ounces) unsweetened chocolate
* 1/2 cup boiling water
* 2 cups sifted flour
* 1 1/2 teaspoons double-acting baking powder
* 1 teaspoon baking soda
* 1/4 teaspoon salt
* 3/4 cups butter (use organic)
* 2 teaspoons vanilla extract
* 1 cup granulated sugar
* 2/3 cup light brown sugar, firmly packed
* 3 eggs (use organic, free range if you can get 'em)
* 1 cup sour cream (use organic)

Directions

1. Adjust rack to center of oven and preheat oven to 375°F. Butter two 9 inch round layer cake pans and dust both lightly with fine, dry bread crumbs (though I think flour works just as well if you don't have any breadcrumbs on hand.)

2. In a small heavy saucepan over low heat melt the chocolate with the boiling water. Stir occasionally with a small wire whisk until smooth. Set aside. You can also zap these things together in the microwave for about 30 seconds if you're in a hurry.

3. Meanwhile, sift together the flour, baking powder, baking soda and salt. Set aside. In large bowl of electric mixer, cream the butter. Add vanilla, granulated sugar and brown sugar and beat well, scraping the bowl with a rubber spatula as necessary to keep mixture smooth. Beat in eggs one at a time, beating well after each.

4. Stir sour cream and cooled chocolate together until smooth and add to batter, beating only until mixed. On lowest speed, add the sifted ingredients continuing to scrape the bowl with a rubber spatula. Beat only until smooth.

5. Turn into prepared pans. With rubber spatula spread tops smooth and then run the batter up on the sides a bit, leaving the batter slightly lower in the centers.

6. Bake 35 minutes or until tops spring back when lightly touched and layers come away from sides of pans. Cool in pans for about 5 minutes. Place racks over the cakes and invert. Remove pans. Cover with racks and invert again to cool right side up.

For the Icing/Frosting

Ingredients

* 3 squares (3 ounces) unsweetened chocolate)
* 2 Tablespoons butter
* 3/4 cup sour cream
* 1 teaspoon vanilla extract
* 1/4 teaspoon salt
* 1 pound unsifted confectioners sugar.

Directions

1. In top of small double boiler over hot water on low heat, melt butter and chocolate together. Stir until smooth and let cool completely.

2. In small bowl of electric mixer at low speed, beat sour cream, vanilla and salt just to mix. Gradually beat in the sugar, scraping the bowl with a rubber spatula. When smooth, add cooled melted chocolate and beat at high speed for 1/2 a minute or until very smooth.

3. Place four strips of wax paper around the edges of a cake plate to protect it while icing cake. (Note, this is one step I skipped - you can always just wipe the frosting off the plate later - it's actually rather enjoyable...)

4. Place one layer upside down. Spread with filling. Cover with second layer, right side up so that both bottom sides meet in the middle (brilliant, Maida!!!) Cover the sides and then the top with remaining filling and icing, smoothing it with a long, narrow, metal spatula; then if you wish use the pack of a teaspoon to form swirls and peaks all over the sides and the top.

5. If you did the wax paper bit in step 3, remove the wax paper by pulling each strip by a narrow end. Needless to say, this goes well with ice cream! I'd say vanilla, coffee or hazelnut are all good bets.

You might also like:
Want even more recipes, photos, giveaways, and food-related inspiration? "Like" the Garden of Eating on Facebook, or follow me on Twitter or Pinterest.

Thursday, April 12, 2012

Green Bean & Potato Salad With Lemon-Dill Aioli

Greenbean, potato salad with lemon dill aioli by Eve Fox, Garden of Eating blog, copyright 2012

This salad is about my favorite thing in the world lately. I made it up which gives me a special feeling of pride about how good it is.

It started with the sauce - something I'd whipped up to serve with grilled salmon. It's so simple yet so delicious - just mayonnaise, lemon juice, fresh dill, garlic, salt and pepper. It only occurred to me as I sat down to write this post that it's actually an aioli...

Lemon dill aioli by Eve Fox, Garden of Eating blog, copyright 2012

Then I was thinking about accompaniments to grilled salmon and thought, potatoes and green beans. Then I thought, what if I mixed the sauce with those two things? It sounded promising...

Potatoes by Eve Fox, Garden of Eating blog, copyright 2012

So I steamed some Yukon Golds and blanched some green beans and tossed them with the sauce and voila, my new favorite salad was born! It's a great dish for spring and will be an even better one for summer when fresh beans and new potatoes are coming right out of the garden or the farmers' market. And, I can report, it does go very nicely with grilled salmon.

Green beans by Eve Fox, Garden of Eating blog, copyright 2012

One of the things I love about this hearty salad is the relative ease of putting it together BUT if you are in a slow food mood and have a little extra time, you could take it one step further by making your own mayo for the aioli.

Greenbean, potato salad with lemon dill aioli by Eve Fox, Garden of Eating blog, copyright 2012

Please note that this is a flexible recipe so these amounts are just a rough guide - you should taste as you go and adjust as you see fit. And if you want to throw other ingredients into the salad that sound good to you, you should. Without further ado, enjoy!

-- print recipe --
Green Bean & Potato Salad With Lemon-Dill Aioli
Serves 4 as a side

Ingredients

For the salad
* 4 cups of fresh green beans, rinsed with the ends trimmed off
* 3 large or 4 medium potatoes, scrubbed and chopped into equal-sized cubes (I like Yukon Gold or Yellow Finn for this salad)
* Tray or two of ice cubes and lots of cold water

For the aioli
* 1 tsp sea salt
* 1 tsp freshly ground black pepper
* 3/4 cup mayonnaise
* 2-3 garlic cloves, minced or pressed (go heavy if you like garlic, light if you don't!)
* 3-4 tsp fresh lemon juice
* 3 tsp fresh dill, chopped

Directions

1. Make the aioli by combining all the sauce ingredients and stirring well. Taste and adjust the flavors as needed. It's okay if it seems a bit salty and garlic-y - remember, this is going to cover a whole lot of unseasoned vegetables.

2. Place the cubed potatoes in a steamer pot over an inch or so of water and steam, covered until tender when pierced with a fork, roughly 15-20 minutes, depending on the size of the cubes.Then remove from the pot and allow to cool slightly.

3. Meanwhile, bring a large pot of water to the boil. Then add the green beans and blanch then until they're just a little bit tender but still bright green - probably 3-4 minutes or so. While they're cooking, prepare a large pot of very cold water mixed with ice cubes so that you'll have it at the ready to put the blanched beans in - this is important so that you can stop the cooking process (otherwise, they'll continue to cook and end up overdone). Once the beans are done, remove them from the water with a slotted spoon or by pouring them into a colander, then place them in the ice water bath for 5 minutes to ensure that the cooking stops.

4. Combine the steamed potatoes, blanched beans and the sauce, stirring with a large spoon to ensure that everything gets well-coated with the aioli and serve. Goes amazingly well with grilled or poached salmon, grilled chicken, burgers or really anything you can throw at it.

You might also like:
Want even more recipes, photos, giveaways, and food-related inspiration? "Like" the Garden of Eating on Facebook, or follow me on Twitter or Pinterest.