And the winners are...

Tuesday, August 30, 2011

So sorry for the delay in posting the winners of the Can You Can It? contest.

Can You Can It? logo by Eve Fox, The Garden of Eating blog, copyright 2011

I've got a good excuse though, I swear! Hurricane Irene meant business here in upstate New York - we got 9 inches of rain in 24 hours, and gusts of wind up to 60 mph. It was a looong, scary storm that left tons of trees and power lines down and lots of flooding.

So we're still without power or internet chez nous and it may take up to 10 days to get it back. But we were much more fortunate than some of the neighboring towns in our area which suffered such severe flooding that there's not much left to call a town. Poor Prattsville and Windham have been basically washed away.

I am extremely grateful that we were spared that level of devastation. And also very grateful that my mom never lost power. I'm at her house right now, luxuriating in a couple hours of lovely electricity and wifi - just like a pig in shit!

But I'm rambling on - you want to know who won the contest, don't you? Those of you who followed the voting know that we had a real neck and neck race. And it ended in a tie!

So first place goes to both Julianne Puckett, the Kitchen Ninja for her Zucchini Chips - shown below

And first place also goes to Jen Barthell, the Neighborhood Foodie for her Blackberry Kumquat Cardamom Jam - shown below.

Congratulations to you both!!! I'll be in touch shortly to get your mailing addresses so I know where to send the prizes.

Thank you again to all of you who entered - I was inspired by your beautiful, yummy entries. Hope to hear from you again soon.

And a huge thank you to both Storey Publishing and to Mighty Nest for "putting up" (sorry, could not resist a good canning pun...) the lovely prizes!

Spicy-Sweet Moroccan Chickpea Spread With Blood Orange

Friday, August 26, 2011

I've been thinking about making this spread ever since my friend, Kirsten, who is an excellent and adventurous cook, made something very similar to it at a lavish Moroccan-themed dinner party she hosted a while back, when we all lived in Berkeley.

Sweet, spicy chickpea spread by Eve Fox, Garden of Eating blog copyright 2011

But my son was born a few months later and everything kind of went to hell what with adjusting to motherhood and the resulting horrendous sleep deprivation so it's taken me a little while more than two years to get around to it... Nonetheless, I think it was worth the wait. (And I cannot say enough good things about sleep training -- thank you, Dr. Ferber!)

Chickpeas draining in colander in sink by Eve Fox, Garden of Eating blog copyright 2011

I was primarily inspired by Kirsten's use of blood orange juice and chipotles -- such interesting, delightful additions! It had never occurred to me before to make a hummus-y type spread sweet. Turns out she's a genius 'cause it's really good.

Mildly bloody blood oranges  by Eve Fox, Garden of Eating blog copyright 2011

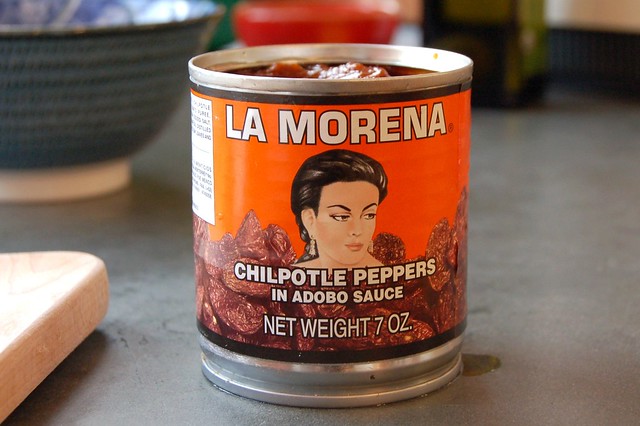
I also used lime juice, chipotle peppers, garlic, cumin, cilantro, salt and pepper. I chose chipotles over jalapeños because I like their smoky flavor and relatively mild spice level and because I love the La Morena label.

"La Morena" brand Chipotles in Adobo by Eve Fox, Garden of Eating blog copyright 2011

The result is an addictive combination that is slightly spicy, slightly sweet, and deliciously savory. And super easy to make, too - I love posting a recipe that includes only one step in the directions (and not just because I am lazy, though I admit that I am.)

In the hopper, waiting to be processed by Eve Fox, Garden of Eating blog, copyright 2011

This spread goes well with toasted pita bread, olives, feta cheese, lamb, chicken or shrimp kabobs, pickled beets, tzatziki, chopped salad, and couscous. (And now I am drooling...)

Sweet, spicy chickpea spread by Eve Fox, Garden of Eating blog copyright 2011

-- print recipe --
Spicy-Sweet Moroccan Chickpea Spread With Blood Orange
Serves 4-6 as an appetizer

Ingredients

* 1 can (1 ½ cups) cooked chickpeas
* ½ cup citrus juice (you can use any kind but I used a mix of blood orange and lime juice - the blood orange will turn the spread a little pink but I think it looks nice)
* ½ cup cilantro, chopped
* 2 cloves garlic, peeled
* 1-2 chipotle peppers (you can use more or less pepper depending on how spicy you like your food, and you can substitute a small jalapeño for the chipotles, too - they're spicier)
* 1/4 cup olive oil
* 1-2 teaspoons honey or maple syrup
* 1 teaspoon cumin
* Sea salt to taste

Directions

1. Place all the ingredients in the bowl of a food processor and blend until smooth. Adjust for salt, honey, lime and spice. It's as simple as that!

You might also like:
For more delicious recipes, gardening ideas, foraging tips, and food-related inspiration "like" the Garden of Eating on Facebook, or follow me on Twitter and Pinterest.

Just a note that I am submitting this recipe for the August edition of My Legume Love Affair, hosted by Preeti of Relishing Recipes.

Cast Your Vote For The Can You Can It? Winner!

Sunday, August 21, 2011

It seems the answer to "Can You Can It?" is, "Yes, You Most Certainly CAN!" Just feast your eyes on these amazing entries!

So which one is your favorite?

I've posted the entries in the order in which they were received. Please browse through the entries below, then cast your vote for the winner via the poll that pops up on the right (there is only one vote per person). Or, if you do not see the poll pop up, just click here to view it on its own web page.

Whoever receives the most votes by August 29th will win a set of Weck canning jars from Mighty Nest. Whoever receives the second most votes will win a copy of Put 'Em Up!: A Comprehensive Home Preserving Guide for the Creative Cook, From Drying and Freezing To Pickling and Canning from Storey Publishing.

I'll announce the winner here on August 30th. If you're worried you'll forget, you can sign up to get posts by email, like me on Facebook, or follow me on Twitter to ensure that you don't miss it. Good luck!


1. Apricot Jam With Saffron & Rose from Yossy Arefi-Afshar who writes the delectable Apt. 2B Baking Co. in New York, NY


2. Grapefruit In Pineapple Juice from SJ Smith whose grapefruit tree has had a banner year in Lake Elsinore, CA


3. Spicy Plum Chutney from Emmeline Craig of Emmeline's Bolinas Watercolors Blog in Bolinas, CA.


4. Highbush Blueberry Lemon Verbena Jam from Lindsay Murray who writes the yummy blog Uncanny Preserves from Sackville, NB.


5. DIY Cornichons - French Tarragon Pickles from Kirsten Lindquist who writes the inspiring and delectable From Kirsten's Kitchen To Yours from Santa Monica, CA.


6. Senfgurken a mustardy pickled cucumber that is popular in Germany from Eszter Befőz who writes an eponymous blog all about pickling and preserving from her home in Hungary.


7. Pickled Cippolini Onions from my extraordinarily culinarily gifted cousin, Nina Lesser-Goldsmith of the amazing Learning Center at Healthy Living Market in Burlington, VT.


8. Blackberry Kumquat Cardamom Jam from Jen Barthell who writes Neighborhood Foodie from San Diego.


9. Pickled Chayote Slaw from Renée Joslyn who writes Flamingo Musings from South Miami, FL.


10. Pickled Grapes with Cinnamon and Black Pepper inspired by Molly Wizenberg's book, A Homemade Life, from my friend and colleague, Elizabeth Brookbank in Seattle, WA.


11. Mango Magma Salsa from Erica Bruielly who writes The Gritty Girl Blog from Northwest Ohio.


12. Zucchini Chips from Julianne Puckett who writes Adventures of the Kitchen Ninja from Jericho, VT way up in the North Country.


13. Caramelized Onion Jam from Leena Trivedi-Grenier who writes Leena Eats from Oakland, CA - my old stomping grounds!


14. Spiced Peach Jam from Teresa Riley who writes a blog called PaperOnParade from Asheville, NC.


15. Sicilian Tomato Sauce from Angela Hallisy who writes Cooking For Peace of Mind from Warren, MI.

Southwestern Quinoa Salad With Black Beans, Corn & Peppers

Thursday, August 18, 2011

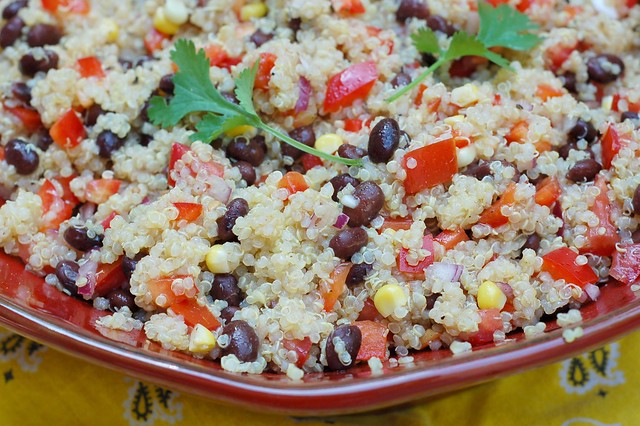
Southwestern Quinoa Salad by Eve Fox, Garden of Eating blog, copyright 2011

After getting off to a shaky start several years ago, my relationship with quinoa has blossomed into something beautiful. I find that its mild, nutty flavor goes well with pretty much everything and I love dressing it up in various costumes.

This simple salad has a decidedly southwestern feel to it - black beans, sweet corn, crunchy red peppers and a generous dose of fresh cilantro, lime juice and cumin. Mmmmmm....

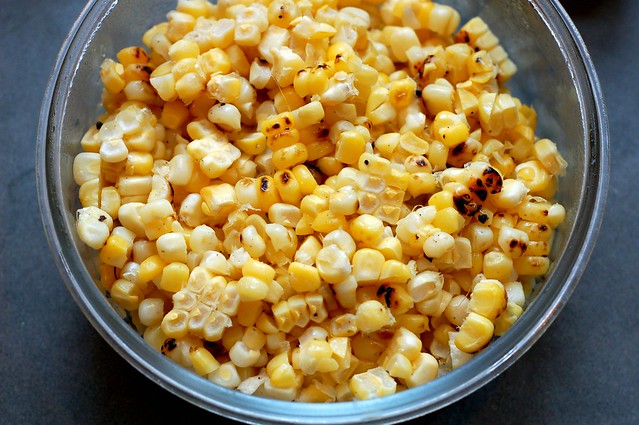
Leftover grilled corn by Eve Fox, Garden of Eating blog, copyright 2011

It's easy, tasty, filling and remarkably good for you -- what's not to love, eh? Although I did not have any on hand when I made my salad, I've included tomatoes and feta cheese in the recipe below as they'd both be very welcome additions.

Corn, onion, and pepper by Eve Fox, Garden of Eating blog, copyright 2011

I'd write more but our son keeps waking up at an ungodly hour in the morning so I am feeling a bit less lyrical than usual and also need to keep things short so I can go research toddler alarm clocks - a brilliant invention  designed to keep your child in bed longer by telling them when it's okay to get up and when they need to sit tight because it's only, say, 4:45 AM...

Southwestern Quinoa Salad by Eve Fox, Garden of Eating blog, copyright 2011

-- print recipe --
Southwestern Quinoa Salad
Serves 6 as a side

Ingredients

For the salad:
* 1 cup organic quinoa, rinsed and drained
* 2 cups water
* 1 cup cooked sweet corn kernels
* 1 cup cooked black beans, rinsed and drained
* 1 small red or green bell pepper, de-seeded, de-stemmed and chopped
* 1 medium tomato, chopped
* 1/4 -1/2 cup minced red onion
* 1/2 cup fresh cilantro leaves, washed, dried and coarsely chopped
* 1/2 cup feta cheese (optional)

For the dressing:
* 4 Tbsps fresh lime juice, or to taste
* 2 Tbsps red wine vinegar
* 4 Tbsps olive oil
* 1 clove garlic, minced or pressed
* 1 Tbsp honey or agave
* 1 tablespoon ground cumin
* Sea salt and freshly ground black pepper to taste

Directions

1. Bring the water to a boil, then stir in the quinoa, lower the heat and reduce to a simmer. Cover for 15-20 minutes until done - you'll know the quinoa is ready when you see the little white "tail" of the germ around the outside edge of each seed. If you're starting to see the little white tails but the quinoa seems too soggy, remove the lid for the last few minutes of cooking. And if the water is all gone but the tails are not visible yet, add a little more water and simmer for a few more minutes, covered. Then remove from heat and set aside to cool.

2. While the quinoa is cooking, you can make the dressing. Place all the ingredients in a jar with a tight fitting lid and shake well to combine.

3. Once the quinoa has cooled down and the dressing is ready, it's time to put it all together. Combine all the ingredients in a large bowl, drizzle with the dressing and toss well to make sure everything is equally coated. Top with more cilantro leaves and if you've got a ripe avocado lying around, cut it up and lay those lovely green slices on top before serving.

You might also like these recipes from the Garden of Eating:
Or these yummy-looking quinoa recipes from other bloggers:

Homemade Maraschino Cherries

Friday, August 12, 2011

Homemade maraschino cherries by Eve Fox, Garden of Eating blog, copyright 2011

I don't care how gauche or tacky they are, I LOVE maraschino cherries. I love them so much that I even eat the stems, in fact, crunching through the woody stems may be my favorite part.

My love affair with maraschinos dates back to our first meeting -- I was seven years old and my family had gone out for dinner to one of our favorite restaurants, The Little Bear, a then-newish Chinese restaurant perched on the side of a stream in Woodstock, NY. My parents let me order my first Shirley Temple. I've always had a much larger than average sweet tooth so the pink-tinted beverage was like heaven in a glass... And the crowning glory was the big maraschino cherry perched daintily atop the ice, practically glowing an unnatural and alluring shade of red. I made short work of it, stem and all.

Cherries by Eve Fox, Garden of Eating blog, copyright 2011

Although I still love them, I have since become much more aware of all the yucky ingredients in most maraschino cherries - red dye number 5 million, high fructose corn syrup, etc. And I have always wanted to try making maraschinos myself so when I saw this simple recipe on the blog In Jennie's Kitchen, I knew the time had come.

I ran out the next day and purchased a big load of cherries at Sunfrost and a cherry pitter from the new kitchen shop in town, Diane's Kitchen.

Cherries get to know the new pitter by Eve Fox, Garden of Eating blog, copyright 2011

The process of making my own maraschinos was surprisingly quick and easy. The pitting did not take long though I was a bit surprised by how violent it seemed. No doubt this impression was enhanced by cherry juice's strong resemblance to blood... Our sink and the surrounding areas looked like the set of Apocalypse Now by the time I was done. And my apron will never be the same...

Cherry pitting carnage by Eve Fox, Garden of Eating blog, copyright 2011

But it took mere minutes to juice the lemons while I heated the cherry juice, water and sugar until the sugar had dissolved completely.

Juicing the lemons by Eve Fox, Garden of Eating blog, copyright 2011

Then I tossed in the cherries, lemon juice and pure almond extract and cooked them briefly - no need to cook for very long if you plan to can them since the cherries will get cooked for 10 minutes during the hot water process.

Cooking the cherries by Eve Fox, Garden of Eating blog, copyright 2011

Meanwhile, I sterilized my jars in my canning pot and got things ready for the brief canning that followed. 15 minutes later, two jars of maraschinos were cooling on the counter. Let's hear it for the Good Shop Lollipop!

Homemade maraschino cherries by Eve Fox, Garden of Eating blog, copyright 2011

A note that this is all a fry cry from real maraschino cherries which were originally made from a type of sour cherry grown in Croatia called a Marasca cherry. The Croats crushed their Marascas to make a sweet liqueur which I am guessing derived its almond-like flavor from the cherry pits. And the cherries that were then preserved in that liqueur were called Maraschino cherries. But since I am not interested in liquor-soaked cherries, the bastardization does not bother me one bit.

-- print recipe --
Homemade Maraschino Cherries adapted from Nick Mautone's Raising the Bar
Makes one quart

Ingredients

* 1/2 cup (125 ml) water
* 1/2 cup (125 ml) black cherry or concord grape juice
* 1/2 cup (4 ounces) natural cane sugar
* Freshly juice (3 tablespoons/1 1/2 ounces/50 ml) of 1 lemon
* 1/2 teaspoon pure almond extract
* 2 cups (9 1/2 ounces/266 grams) sweet bing cherries, pitted

Directions

1. Add the water, cherry or grape juice and sugar to a 2-quart pot. Bring to a boil over high heat and let cook 1 to 2 minutes until the sugar is completely dissolved. Reduce the heat to medium-low. Add the lemon juice, extract and cherries. Cook 5 minutes to let the cherries absorb the flavors, then remove the pot from the heat.

2. Transfer to a clean sterilized jar and process in a hot water bath for 10 minutes for long-term storage, or just put the jar in the fridge if you plan on using them within one month.


Here are some good-lookin' cherry recipes from other folks:
You might also like:
Homemade Maraschino Cherries on Punk Domestics

Savory Corn Fritters

Tuesday, August 9, 2011

Savory Corn Cheddar Fritters by Eve Fox, Garden of Eating blog, copyright 2011

I whipped up a batch of savory corn fritters for lunch. They were such fun to eat - crispy fried edges, sweet corn kernels, with a nice hint of herbs and sharp cheddar cheese.

The idea to make fritters had come on gradually. We had grilled the six ears of corn we received from our CSA, Hearty Roots Community Farm, a few nights ago. I'd cut the kernels off the uneaten cobs with the intention of using it to make something tasty. We'd also received two gorgeous red peppers in that same haul of fresh veggies from the farm. But what to make to properly honor these fine summertime ingredients?

Fritter ingredients by Eve Fox, Garden of Eating blog, copyright 2011

I found myself thinking about these delicious sweet corn fritters my mom used to make for breakfast. Fritters sounded fun, but I wanted to put a savory twist on them. So I looked around for inspiration. Food 52 offered an intriguing recipe for cheddar corn fritters but it seemed a lot sweeter than what I was looking for so after checking the Joy of Cooking (my fall back resource for any untried recipe), I decided to wing it.

Making the fritter batter by Eve Fox, Garden of Eating blog, copyright 2011

The result was damn good, if I do say so myself. Not that I can take much credit, I feel like food more or less speaks for itself at this time of the year.

Savory Corn Cheddar Fritters by Eve Fox, Garden of Eating blog, copyright 2011

I served these crispy little corn zeppole with a big dollop of plain yogurt, a spoonful of mango ginger chutney and a very simple salad of fresh cucumbers and the first ripe tomatoes (which were amazing!) from our garden, tossed with olive oil, a splash of balsamic vinegar, salt and freshly ground pepper.

Savory Corn Cheddar Fritters by Eve Fox, Garden of Eating blog, copyright 2011

It was hard to stop eating them... Hope you enjoy!

-- print recipe --
Savory Corn Fritters
Serves 4

Ingredients

* 2-3 cups of cooked corn kernels
* 2 eggs, beaten
* 1 cup flour (or gluten-free flour if you can't eat wheat)
* 1 tsp baking powder
* 1 onion, chopped
* Large handful fresh herbs (cilantro, basil, parsley, thyme - whatever you have on hand), washed and chopped
* 1 red pepper, washed, de-stemmed, de-seeded and chopped
* 1/2 - 1 cup milk
* 1 cup sharp cheddar cheese, grated
* 1 tsp sea salt
* Several grinds fresh black pepper
* 1/2 - 1 cup canola or peanut oil for frying

Directions

1. Sautée the onion in some oil until translucent. In a medium-sized bowl, combine the corn, red pepper, onion, herbs, cheese, flour, baking powder, salt, pepper, eggs and milk. Stir until well mixed. If the batter does not seem wet enough, add more milk until the consistency is loose.

2. Add the canola or peanut oil to a large cast iron skillet and heat over medium high heat until a drop of batter sizzles when you drop it in. Drop the batter in one large spoonful at a time. Fry until brown, 2-3 minutes on each side. Remove from the pan and drain on a paper bag.

3. Serve warm with a dollop of yogurt or sour cream and a spoonful of chutney or applesauce.

You might also like:

For more delicious recipes, gardening ideas, foraging tips, and food-related inspiration "like" the Garden of Eating on Facebook, or follow me on Twitter and Pinterest.

Tuesday, August 30, 2011

And the winners are...

So sorry for the delay in posting the winners of the Can You Can It? contest.

Can You Can It? logo by Eve Fox, The Garden of Eating blog, copyright 2011

I've got a good excuse though, I swear! Hurricane Irene meant business here in upstate New York - we got 9 inches of rain in 24 hours, and gusts of wind up to 60 mph. It was a looong, scary storm that left tons of trees and power lines down and lots of flooding.

So we're still without power or internet chez nous and it may take up to 10 days to get it back. But we were much more fortunate than some of the neighboring towns in our area which suffered such severe flooding that there's not much left to call a town. Poor Prattsville and Windham have been basically washed away.

I am extremely grateful that we were spared that level of devastation. And also very grateful that my mom never lost power. I'm at her house right now, luxuriating in a couple hours of lovely electricity and wifi - just like a pig in shit!

But I'm rambling on - you want to know who won the contest, don't you? Those of you who followed the voting know that we had a real neck and neck race. And it ended in a tie!

So first place goes to both Julianne Puckett, the Kitchen Ninja for her Zucchini Chips - shown below

And first place also goes to Jen Barthell, the Neighborhood Foodie for her Blackberry Kumquat Cardamom Jam - shown below.

Congratulations to you both!!! I'll be in touch shortly to get your mailing addresses so I know where to send the prizes.

Thank you again to all of you who entered - I was inspired by your beautiful, yummy entries. Hope to hear from you again soon.

And a huge thank you to both Storey Publishing and to Mighty Nest for "putting up" (sorry, could not resist a good canning pun...) the lovely prizes!

Friday, August 26, 2011

Spicy-Sweet Moroccan Chickpea Spread With Blood Orange

I've been thinking about making this spread ever since my friend, Kirsten, who is an excellent and adventurous cook, made something very similar to it at a lavish Moroccan-themed dinner party she hosted a while back, when we all lived in Berkeley.

Sweet, spicy chickpea spread by Eve Fox, Garden of Eating blog copyright 2011

But my son was born a few months later and everything kind of went to hell what with adjusting to motherhood and the resulting horrendous sleep deprivation so it's taken me a little while more than two years to get around to it... Nonetheless, I think it was worth the wait. (And I cannot say enough good things about sleep training -- thank you, Dr. Ferber!)

Chickpeas draining in colander in sink by Eve Fox, Garden of Eating blog copyright 2011

I was primarily inspired by Kirsten's use of blood orange juice and chipotles -- such interesting, delightful additions! It had never occurred to me before to make a hummus-y type spread sweet. Turns out she's a genius 'cause it's really good.

Mildly bloody blood oranges  by Eve Fox, Garden of Eating blog copyright 2011

I also used lime juice, chipotle peppers, garlic, cumin, cilantro, salt and pepper. I chose chipotles over jalapeños because I like their smoky flavor and relatively mild spice level and because I love the La Morena label.

"La Morena" brand Chipotles in Adobo by Eve Fox, Garden of Eating blog copyright 2011

The result is an addictive combination that is slightly spicy, slightly sweet, and deliciously savory. And super easy to make, too - I love posting a recipe that includes only one step in the directions (and not just because I am lazy, though I admit that I am.)

In the hopper, waiting to be processed by Eve Fox, Garden of Eating blog, copyright 2011

This spread goes well with toasted pita bread, olives, feta cheese, lamb, chicken or shrimp kabobs, pickled beets, tzatziki, chopped salad, and couscous. (And now I am drooling...)

Sweet, spicy chickpea spread by Eve Fox, Garden of Eating blog copyright 2011

-- print recipe --
Spicy-Sweet Moroccan Chickpea Spread With Blood Orange
Serves 4-6 as an appetizer

Ingredients

* 1 can (1 ½ cups) cooked chickpeas
* ½ cup citrus juice (you can use any kind but I used a mix of blood orange and lime juice - the blood orange will turn the spread a little pink but I think it looks nice)
* ½ cup cilantro, chopped
* 2 cloves garlic, peeled
* 1-2 chipotle peppers (you can use more or less pepper depending on how spicy you like your food, and you can substitute a small jalapeño for the chipotles, too - they're spicier)
* 1/4 cup olive oil
* 1-2 teaspoons honey or maple syrup
* 1 teaspoon cumin
* Sea salt to taste

Directions

1. Place all the ingredients in the bowl of a food processor and blend until smooth. Adjust for salt, honey, lime and spice. It's as simple as that!

You might also like:
For more delicious recipes, gardening ideas, foraging tips, and food-related inspiration "like" the Garden of Eating on Facebook, or follow me on Twitter and Pinterest.

Just a note that I am submitting this recipe for the August edition of My Legume Love Affair, hosted by Preeti of Relishing Recipes.

Sunday, August 21, 2011

Cast Your Vote For The Can You Can It? Winner!

It seems the answer to "Can You Can It?" is, "Yes, You Most Certainly CAN!" Just feast your eyes on these amazing entries!

So which one is your favorite?

I've posted the entries in the order in which they were received. Please browse through the entries below, then cast your vote for the winner via the poll that pops up on the right (there is only one vote per person). Or, if you do not see the poll pop up, just click here to view it on its own web page.

Whoever receives the most votes by August 29th will win a set of Weck canning jars from Mighty Nest. Whoever receives the second most votes will win a copy of Put 'Em Up!: A Comprehensive Home Preserving Guide for the Creative Cook, From Drying and Freezing To Pickling and Canning from Storey Publishing.

I'll announce the winner here on August 30th. If you're worried you'll forget, you can sign up to get posts by email, like me on Facebook, or follow me on Twitter to ensure that you don't miss it. Good luck!


1. Apricot Jam With Saffron & Rose from Yossy Arefi-Afshar who writes the delectable Apt. 2B Baking Co. in New York, NY


2. Grapefruit In Pineapple Juice from SJ Smith whose grapefruit tree has had a banner year in Lake Elsinore, CA


3. Spicy Plum Chutney from Emmeline Craig of Emmeline's Bolinas Watercolors Blog in Bolinas, CA.


4. Highbush Blueberry Lemon Verbena Jam from Lindsay Murray who writes the yummy blog Uncanny Preserves from Sackville, NB.


5. DIY Cornichons - French Tarragon Pickles from Kirsten Lindquist who writes the inspiring and delectable From Kirsten's Kitchen To Yours from Santa Monica, CA.


6. Senfgurken a mustardy pickled cucumber that is popular in Germany from Eszter Befőz who writes an eponymous blog all about pickling and preserving from her home in Hungary.


7. Pickled Cippolini Onions from my extraordinarily culinarily gifted cousin, Nina Lesser-Goldsmith of the amazing Learning Center at Healthy Living Market in Burlington, VT.


8. Blackberry Kumquat Cardamom Jam from Jen Barthell who writes Neighborhood Foodie from San Diego.


9. Pickled Chayote Slaw from Renée Joslyn who writes Flamingo Musings from South Miami, FL.


10. Pickled Grapes with Cinnamon and Black Pepper inspired by Molly Wizenberg's book, A Homemade Life, from my friend and colleague, Elizabeth Brookbank in Seattle, WA.


11. Mango Magma Salsa from Erica Bruielly who writes The Gritty Girl Blog from Northwest Ohio.


12. Zucchini Chips from Julianne Puckett who writes Adventures of the Kitchen Ninja from Jericho, VT way up in the North Country.


13. Caramelized Onion Jam from Leena Trivedi-Grenier who writes Leena Eats from Oakland, CA - my old stomping grounds!


14. Spiced Peach Jam from Teresa Riley who writes a blog called PaperOnParade from Asheville, NC.


15. Sicilian Tomato Sauce from Angela Hallisy who writes Cooking For Peace of Mind from Warren, MI.

Thursday, August 18, 2011

Southwestern Quinoa Salad With Black Beans, Corn & Peppers

Southwestern Quinoa Salad by Eve Fox, Garden of Eating blog, copyright 2011

After getting off to a shaky start several years ago, my relationship with quinoa has blossomed into something beautiful. I find that its mild, nutty flavor goes well with pretty much everything and I love dressing it up in various costumes.

This simple salad has a decidedly southwestern feel to it - black beans, sweet corn, crunchy red peppers and a generous dose of fresh cilantro, lime juice and cumin. Mmmmmm....

Leftover grilled corn by Eve Fox, Garden of Eating blog, copyright 2011

It's easy, tasty, filling and remarkably good for you -- what's not to love, eh? Although I did not have any on hand when I made my salad, I've included tomatoes and feta cheese in the recipe below as they'd both be very welcome additions.

Corn, onion, and pepper by Eve Fox, Garden of Eating blog, copyright 2011

I'd write more but our son keeps waking up at an ungodly hour in the morning so I am feeling a bit less lyrical than usual and also need to keep things short so I can go research toddler alarm clocks - a brilliant invention  designed to keep your child in bed longer by telling them when it's okay to get up and when they need to sit tight because it's only, say, 4:45 AM...

Southwestern Quinoa Salad by Eve Fox, Garden of Eating blog, copyright 2011

-- print recipe --
Southwestern Quinoa Salad
Serves 6 as a side

Ingredients

For the salad:
* 1 cup organic quinoa, rinsed and drained
* 2 cups water
* 1 cup cooked sweet corn kernels
* 1 cup cooked black beans, rinsed and drained
* 1 small red or green bell pepper, de-seeded, de-stemmed and chopped
* 1 medium tomato, chopped
* 1/4 -1/2 cup minced red onion
* 1/2 cup fresh cilantro leaves, washed, dried and coarsely chopped
* 1/2 cup feta cheese (optional)

For the dressing:
* 4 Tbsps fresh lime juice, or to taste
* 2 Tbsps red wine vinegar
* 4 Tbsps olive oil
* 1 clove garlic, minced or pressed
* 1 Tbsp honey or agave
* 1 tablespoon ground cumin
* Sea salt and freshly ground black pepper to taste

Directions

1. Bring the water to a boil, then stir in the quinoa, lower the heat and reduce to a simmer. Cover for 15-20 minutes until done - you'll know the quinoa is ready when you see the little white "tail" of the germ around the outside edge of each seed. If you're starting to see the little white tails but the quinoa seems too soggy, remove the lid for the last few minutes of cooking. And if the water is all gone but the tails are not visible yet, add a little more water and simmer for a few more minutes, covered. Then remove from heat and set aside to cool.

2. While the quinoa is cooking, you can make the dressing. Place all the ingredients in a jar with a tight fitting lid and shake well to combine.

3. Once the quinoa has cooled down and the dressing is ready, it's time to put it all together. Combine all the ingredients in a large bowl, drizzle with the dressing and toss well to make sure everything is equally coated. Top with more cilantro leaves and if you've got a ripe avocado lying around, cut it up and lay those lovely green slices on top before serving.

You might also like these recipes from the Garden of Eating:
Or these yummy-looking quinoa recipes from other bloggers:

Friday, August 12, 2011

Homemade Maraschino Cherries

Homemade maraschino cherries by Eve Fox, Garden of Eating blog, copyright 2011

I don't care how gauche or tacky they are, I LOVE maraschino cherries. I love them so much that I even eat the stems, in fact, crunching through the woody stems may be my favorite part.

My love affair with maraschinos dates back to our first meeting -- I was seven years old and my family had gone out for dinner to one of our favorite restaurants, The Little Bear, a then-newish Chinese restaurant perched on the side of a stream in Woodstock, NY. My parents let me order my first Shirley Temple. I've always had a much larger than average sweet tooth so the pink-tinted beverage was like heaven in a glass... And the crowning glory was the big maraschino cherry perched daintily atop the ice, practically glowing an unnatural and alluring shade of red. I made short work of it, stem and all.

Cherries by Eve Fox, Garden of Eating blog, copyright 2011

Although I still love them, I have since become much more aware of all the yucky ingredients in most maraschino cherries - red dye number 5 million, high fructose corn syrup, etc. And I have always wanted to try making maraschinos myself so when I saw this simple recipe on the blog In Jennie's Kitchen, I knew the time had come.

I ran out the next day and purchased a big load of cherries at Sunfrost and a cherry pitter from the new kitchen shop in town, Diane's Kitchen.

Cherries get to know the new pitter by Eve Fox, Garden of Eating blog, copyright 2011

The process of making my own maraschinos was surprisingly quick and easy. The pitting did not take long though I was a bit surprised by how violent it seemed. No doubt this impression was enhanced by cherry juice's strong resemblance to blood... Our sink and the surrounding areas looked like the set of Apocalypse Now by the time I was done. And my apron will never be the same...

Cherry pitting carnage by Eve Fox, Garden of Eating blog, copyright 2011

But it took mere minutes to juice the lemons while I heated the cherry juice, water and sugar until the sugar had dissolved completely.

Juicing the lemons by Eve Fox, Garden of Eating blog, copyright 2011

Then I tossed in the cherries, lemon juice and pure almond extract and cooked them briefly - no need to cook for very long if you plan to can them since the cherries will get cooked for 10 minutes during the hot water process.

Cooking the cherries by Eve Fox, Garden of Eating blog, copyright 2011

Meanwhile, I sterilized my jars in my canning pot and got things ready for the brief canning that followed. 15 minutes later, two jars of maraschinos were cooling on the counter. Let's hear it for the Good Shop Lollipop!

Homemade maraschino cherries by Eve Fox, Garden of Eating blog, copyright 2011

A note that this is all a fry cry from real maraschino cherries which were originally made from a type of sour cherry grown in Croatia called a Marasca cherry. The Croats crushed their Marascas to make a sweet liqueur which I am guessing derived its almond-like flavor from the cherry pits. And the cherries that were then preserved in that liqueur were called Maraschino cherries. But since I am not interested in liquor-soaked cherries, the bastardization does not bother me one bit.

-- print recipe --
Homemade Maraschino Cherries adapted from Nick Mautone's Raising the Bar
Makes one quart

Ingredients

* 1/2 cup (125 ml) water
* 1/2 cup (125 ml) black cherry or concord grape juice
* 1/2 cup (4 ounces) natural cane sugar
* Freshly juice (3 tablespoons/1 1/2 ounces/50 ml) of 1 lemon
* 1/2 teaspoon pure almond extract
* 2 cups (9 1/2 ounces/266 grams) sweet bing cherries, pitted

Directions

1. Add the water, cherry or grape juice and sugar to a 2-quart pot. Bring to a boil over high heat and let cook 1 to 2 minutes until the sugar is completely dissolved. Reduce the heat to medium-low. Add the lemon juice, extract and cherries. Cook 5 minutes to let the cherries absorb the flavors, then remove the pot from the heat.

2. Transfer to a clean sterilized jar and process in a hot water bath for 10 minutes for long-term storage, or just put the jar in the fridge if you plan on using them within one month.


Here are some good-lookin' cherry recipes from other folks:
You might also like:
Homemade Maraschino Cherries on Punk Domestics

Tuesday, August 9, 2011

Savory Corn Fritters

Savory Corn Cheddar Fritters by Eve Fox, Garden of Eating blog, copyright 2011

I whipped up a batch of savory corn fritters for lunch. They were such fun to eat - crispy fried edges, sweet corn kernels, with a nice hint of herbs and sharp cheddar cheese.

The idea to make fritters had come on gradually. We had grilled the six ears of corn we received from our CSA, Hearty Roots Community Farm, a few nights ago. I'd cut the kernels off the uneaten cobs with the intention of using it to make something tasty. We'd also received two gorgeous red peppers in that same haul of fresh veggies from the farm. But what to make to properly honor these fine summertime ingredients?

Fritter ingredients by Eve Fox, Garden of Eating blog, copyright 2011

I found myself thinking about these delicious sweet corn fritters my mom used to make for breakfast. Fritters sounded fun, but I wanted to put a savory twist on them. So I looked around for inspiration. Food 52 offered an intriguing recipe for cheddar corn fritters but it seemed a lot sweeter than what I was looking for so after checking the Joy of Cooking (my fall back resource for any untried recipe), I decided to wing it.

Making the fritter batter by Eve Fox, Garden of Eating blog, copyright 2011

The result was damn good, if I do say so myself. Not that I can take much credit, I feel like food more or less speaks for itself at this time of the year.

Savory Corn Cheddar Fritters by Eve Fox, Garden of Eating blog, copyright 2011

I served these crispy little corn zeppole with a big dollop of plain yogurt, a spoonful of mango ginger chutney and a very simple salad of fresh cucumbers and the first ripe tomatoes (which were amazing!) from our garden, tossed with olive oil, a splash of balsamic vinegar, salt and freshly ground pepper.

Savory Corn Cheddar Fritters by Eve Fox, Garden of Eating blog, copyright 2011

It was hard to stop eating them... Hope you enjoy!

-- print recipe --
Savory Corn Fritters
Serves 4

Ingredients

* 2-3 cups of cooked corn kernels
* 2 eggs, beaten
* 1 cup flour (or gluten-free flour if you can't eat wheat)
* 1 tsp baking powder
* 1 onion, chopped
* Large handful fresh herbs (cilantro, basil, parsley, thyme - whatever you have on hand), washed and chopped
* 1 red pepper, washed, de-stemmed, de-seeded and chopped
* 1/2 - 1 cup milk
* 1 cup sharp cheddar cheese, grated
* 1 tsp sea salt
* Several grinds fresh black pepper
* 1/2 - 1 cup canola or peanut oil for frying

Directions

1. Sautée the onion in some oil until translucent. In a medium-sized bowl, combine the corn, red pepper, onion, herbs, cheese, flour, baking powder, salt, pepper, eggs and milk. Stir until well mixed. If the batter does not seem wet enough, add more milk until the consistency is loose.

2. Add the canola or peanut oil to a large cast iron skillet and heat over medium high heat until a drop of batter sizzles when you drop it in. Drop the batter in one large spoonful at a time. Fry until brown, 2-3 minutes on each side. Remove from the pan and drain on a paper bag.

3. Serve warm with a dollop of yogurt or sour cream and a spoonful of chutney or applesauce.

You might also like:
For more delicious recipes, gardening ideas, foraging tips, and food-related inspiration "like" the Garden of Eating on Facebook, or follow me on Twitter and Pinterest.