Meyer Lemon Sorbet -- Dessert Don't Get More Local Than This

Saturday, May 29, 2010

A quick glance at the original date of this post confirms that I began writing about this scrumptiously fresh citrus dessert nearly two years ago, in July of 2008. I guess it's true that good things come to those who wait...

Meyer lemon sorbet topped with mint by Eve Fox, Garden of Eating blog

I think of this delightful sorbet as a uniquely Californian dessert, mostly because I had never heard of or seen a Meyer lemon before we moved here.  But here in Berkeley, they are practically ubiquitous. (For those of you who are interested in the fruit's actual provenance, this type of lemon is originally from China.)

A ripening Meyer lemon on our tree by Eve Fox, Garden of Eating blog

Our yard is graced by an outrageously abundant Meyer lemon tree. We're thoroughly mystified by its fecundity -- we never water it (which is significant since it does not rain for 6 months out of the year here), nor have we ever fertilized it, yet it churns out Meyer lemons like they were going out of style.

Basket of Meyer lemons

The tree has such a prolific presence in our yard that "memon" is one of our son, Will's first words. As soon as we take him outside, he toddles over to the tree saying "memon" over and over in a soft, delighted, little voice that he reserves for the lemons, alone. Then he picks one (there is some parental assistance involved in that process) and walks around sucking on it and biting off small pieces of the soft peel with his three little teeth.

Will with his Meyer "memon" by Eve Fox, Garden of Eating blog

But back to the sorbet. While the subtle, floral flavor of the Meyer lemons is uniquely lovely, you can easily substitute regular lemons or another citrus fruit if you can't find Meyers.

Meyer lemon sorbet topped with mint by Eve Fox, Garden of Eating blog

It turns out that sorbet is surprisingly easy to make, especially if you have an ice cream maker (or have a friend who has one - thanks again, Ben!)

Scooping the sorbet out of the icecream maker by Eve Fox, Garden of Eating blog

I've included the instructions for what to do if you do not have one, though. Thanks to Elise at Simply Recipes for providing the recipe below.

Meyer Lemon Sorbet
Makes 2 1/2 cups

Ingredients

* 1 cup sugar
* 1 cup water
* 1 cup freshly squeezed juice from meyer lemons (about 4-5 lemons)
* 2 teaspoons fine lemon zest
* Mint leaves (for garnish)

Directions

1. Freeze your ice cream maker according to the manufacturer's instructions (it's probably easiest just to keep the freezer container in your freezer so that you can be ready to go whenever the urge to make sorbet or ice cream strikes you.)

2. In a small saucepan on medium high heat, make a simple syrup by heating sugar and water until the sugar has completely dissolved. Remove from heat and let cool. Mix in the lemon juice and zest. Chill in the refrigerator.

3. Once the mixture has thoroughly chilled, pour it into the ice cream maker and process per the instructions for sorbet (most likely you will need to run it for 20-30 minutes.) If you don't have an ice cream maker, you can pour the mixture into a shallow pan and freeze in your freezer until semi-solid. Then take a fork and fluff it up, returning it the the freezer to freeze firm. Then put in a food-processor or blender to process until smooth.

4. Transfer the sorbet to an airtight container and freeze until ready to serve. A melon-baller works well to scoop this out when you're ready to serve. Garnish with the mint leaves.

You may also like:

Salade de Carottes Râpées (Grated Carrot Salad)

Sunday, May 23, 2010

There are such lovely fresh carrots for sale at all the farmers' markets lately; I can't resist them. It's a perfect time to make this classic French grated carrot salad. It's so simple, fresh and tasty. You can order this in pretty much any cafe or restaurant in France and it's almost always good (and cheap!)

Carrots

While you can certainly use a food processor with a grating attachment to grate the carrots, I think they turn out a little better if you grate them by hand. It may just be the blade on my Cuisinart but I find that the grating attachment tends to tear the veggies up a little in the process of grating them. So I did these by hand though my right arm started aching about 2/3 of the way through and my husband obligingly offered to finish up the grating for me (he's very nice like that.)

Salade de carottes râpées by Eve Fox, Garden of Eating blog

Although I stuck with the traditional French preparation in the recipe below, you are welcome to shake things up a bit by adding dried currants and/or thinly sliced red onion or some grated beets to the salad or throwing a little Dijon mustard into the dressing, etc. Bon appetit!

Salade de carottes râpées by Eve Fox, Garden of Eating blog

-- print recipe --
Salade de Carottes Râpées (Grated Carrot Salad)
Serves 6

Ingredients

* 7 large, sweet carrots, peeled
* 1/2 bunch of large, flat-leaf parsley (Italian works better than curly), rinsed and dried
* Juice of 2 lemons
* 2-3 Tbsps olive oil
* 2 tsps sugar or honey
* Sea salt to taste
* Freshly ground black pepper to taste

Directions

1.Grate the carrots as finely as possible and place in a medium-sized bowl (you want it to be big enough to make it easy to toss everything together with the dressing.) Coarsely chop the parsley and toss it in with the carrots.

2. Make the dressing by whisking together the lemon juice, olive oil, sugar and salt and pepper until the sugar and salt have dissolved. Drizzle it over the carrot/parsley mixture and toss to coat. Taste and adjust the seasonings as needed (you may want to add more lemon juice, salt or pepper).

You might also like:
For more delicious recipes, gardening ideas, foraging tips, and food-related inspiration "like" the Garden of Eating on Facebook, or follow me on Twitter and Pinterest.

Chimichurri - Argentina's Dangerously Addictive Sauce

Sunday, May 9, 2010

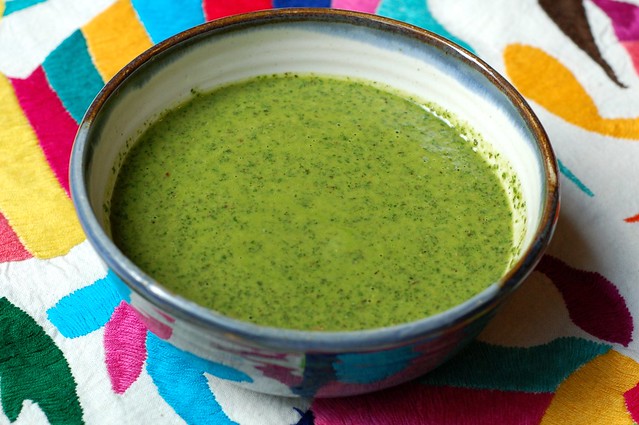
Chimichurri Sauce by Eve Fox, Garden of Eating blog

Chimichurri is fun to say but the enjoyment level pales in comparison to how fun it is to eat. This traditional Argentine sauce is made from a mixture of fresh herbs, garlic, olive oil, vinegar and lemon juice. The combination is fresh, flavorful and slightly eye-popping in a way that makes you want more and more of the stuff.

Although it's traditionally used as a marinade and a dipping sauce for grilled beef (Argentina is the culinary epicenter of grilled meats, especially beef), it is also a great accompaniment to chicken, pork, lamb, and fish. And if you add a bit more oil and vinegar, it makes quite a tasty salad dressing, too.

Herbs For Chimichurri Sauce by Eve Fox, Garden of Eating blog

The recipe below is flexible. For example, you can use all lemon juice or all vinegar if you prefer, play around with the ratio of the various herbs, or experiment with adding some different herbs to the mix. I added some marjoram to my chimichurri and liked it a lot even though it's not typically included.  I think fresh mint would also be delicious in this sauce.

In addition to being yummy and easy to make, this parsley-based sauce is a godsend for any CSA members who have the "good luck" to receive bunch after bunch of parsley in their produce boxes.

Grass-fed steak with chimichurri sauce, roasted new potatoes and artichoke with meyer lemon mayo by Eve Fox, Garden of Eating blog

I served the sauce over some really good grass-fed organic beef steaks from Marin Sun Farms along with oven roasted potatoes with garlic and herbs, artichokes with Meyer lemon mayo, and a salad. ¡Muy sabroso!

-- print recipe --
Chimichurri Sauce
Serves 4

Ingredients

* 1/2 cup extra-virgin olive oil
* 2 Tbsps fresh lemon juice
* 2 Tbsps apple cider vinegar, red wine or sherry vinegar
* 1 cup flat-leaf parsley leaves, washed and dried
* 1 cup cilantro leaves, washed and dried
* 1/4 cup fresh basil leaves, washed and dried
* 1/4 cup oregano leaves, washed and dried
* 2 cloves garlic, roughly chopped
* 1/2 shallot, roughly chopped
* 1/4 teaspoon fresh cracked black pepper
* 1/2 teaspoons kosher salt
* 1/4 teaspoon crushed red pepper flakes (you can also use half a small jalapeno if you have one on hand, just remember to remove the seeds unless you like it hot and don't touch your eyes after handling them - I learned that the hard way...)

Directions

Combine all the ingredients in the bowl of a food processor and blend until smooth. Place the sauce in a non-reactive bowl or storage container, cover and refrigerate for 2-6 hours (this will allow the flavors to develop some more depth.) Remove from the fridge half an hour before using. This sauce should keep for up to a week if kept in an airtight container in the refrigerator.

You might also like:
For more delicious recipes, gardening ideas, foraging tips, and food-related inspiration "like" the Garden of Eating on Facebook, or follow me on Twitter and Pinterest.

Sticky Rice With Mango - A Thai Treasure

Wednesday, May 5, 2010

Although I am truly devoted to chocolate, this classic Thai dessert holds a very special place in my heart. It may not sound like much, but I assure you, the taste is life-altering.

Sticky rice with mango by Eve Fox, Garden of Eating blog

I remember the first time I tasted sticky rice with mango quite clearly. It was 1997, I was 20 years old and my friend, Katie and I were newly arrived in Bangkok, Thailand, our first stop on a trip round the world in lieu of our second semester of junior year at Wesleyan University -- and an excellent trade off at that!

We were with our wonderful hostess, Sumitmai, an amazingly generous, fun-loving, retired Thai woman who had more or less adopted us shortly after we landed in Bangkok's oppressive heat and humidity.

She guided us to a booth in one of Bangkok's many markets where she procured a large serving of kao niow mamuang (a.k.a. sticky rice with mango) which she assured us we would like. We dug in, not realizing that our minds were about to be blown.

Bamboo sticky rice steamer by Eve Fox, Garden of Eating blog

The sweet, coconut milk-flavored rice was warm, chewy and delicious on its own. But paired with the expertly sliced (cutting fruit is truly an art in Thailand) buttery, perfectly ripe, yellow mango, it became something else entirely.

Naturally, Katie and I polished it all off within minutes, looking sadly at the empty container when the last grains of sweet, sticky rice were gone. From that point on, we bought sticky rice with mango at every opportunity, something I've continued to do in the 13 years since then.

Two ripe Manila mangoes by Eve Fox, Garden of Eating blog

I made two attempts at making sticky rice with mango at home - both ended in utter disaster... So I've settled for ordering it at Thai restaurants from time to time.

Given the depth of my passion for kao niow mamuang, you can probably imagine my delight when I saw it on the list of recipes I'd be learning at the excellent Thai cooking class I took three years ago. The class was taught by Kasma Loha Unchit, an expat Thai woman who lives in Oakland, California. It was hands-down the best cooking class I've ever taken. One night a week for a month, Kasma covered the basic philosophy of Thai cuisine, where to find the best ingredients in the Bay area, what brands were best (preservative and additive-free and made with the highest quality ingredients), fascinating bits of Thai history (for example, did you know that pad thai, Thailand's national dish, was invented by the Chinese?!), and a dizzying array of delicious Thai recipes.

Enough yammering though. It's time for the recipe. It's very easy to make sticky rice. But you must follow a few basic rules:

1. Buy the right rice! Sticky rice is not sushi rice, that is a different variety that won't work for this (I've tried and failed). Sticky rice is also called "sweet rice" or "glutinous rice". According to Kasma, who has certainly done her research, the best brands to buy are Buddha, Golden Phoenix or Butterfly. If at all possible, buy a rice from Thailand to make sure you're getting the right kind.

Sticky rice by Eve Fox, Garden of Eating blog

2. Buy the right equipment. It's super easy to make delicious sticky rice if you have the right equipment, namely a bamboo steamer and a steamer pot made specifically for this purpose. The bamboo steamer looks like a sort of odd, pointy hat and it sits point-down in the steamer pot. Here is a blurry picture I took of me wearing the steamer basket as a hat.

Eve wearing the bamboo sticky rice steamer "hat" by Eve Fox, Garden of Eating blog

The pot is shaped more like a jug. You can probably find these things at Asian markets (if they stock South East Asian goods) if you have one close by. However, if not, you can also buy them online for $12 - $30

Kasma's instructions were to boil the bamboo steamer/hat before using it the first time to make sure it does not impart a really bamboo-y taste to the rice and to ensure that it is clean since it's probably traveled quite a distance to reach your kitchen. Just submerge it in a large pot of boiling water for a few minutes.

Bamboo sticky rice steamer by Eve Fox, Garden of Eating blog

3. Don't forget to soak the rice! This is the part that has derailed my plans a couple of times... You must soak the rice before steaming for at least 4 hours (or overnight) to allow it to soak up extra water before you cook it.

4. Get good mangoes. The rice will still be tasty but pairing it with ripe, delicious mangoes will make a big difference. Manila mangoes are probably the best fit for this recipe - they have a soft, yellow, string-free flesh that is most similar to the Thai mangoes.

Sticky rice with mango by Eve Fox, Garden of Eating blog

Follow these rules and you'll be golden!

-- print recipe --
Sticky Rice with Mango (Kao Niow Mamuang)
Serves 4

Ingredients

* 2 cups long-grain white sticky rice, sweet rice or glutinous rice
* 2 cups or 1 can coconut milk (Chao Koh brand is a good one)
* 1/2 cup granulated sugar
* 1 tsp salt
* Optional: 3-4 fresh or frozen whole pandanus leaves (bai toey) or a few drops of jasmine (mali) essence
* 1-2 ripe mangoes, peeled and sliced

Directions

1. Rise the sticky rice once or twice, cover with tap water 2-3 inches and soak for four hours (or overnight). The rice will absorb much of the water and grow in size. It will also soften such that the grains will easily break if pressed between the fingers.

2. Drain the rice and pour it into the bamboo basket. Place the bamboo basket to steam over 2-3 inches of water in the metal pot. Cover the top of the bamboo basket with a smallish pot lid and steam for 40-45 minutes, until the rice is thoroughly cooked and, well, sticky.

3. While the rice is steaming, make the coconut sauce: heat the can of coconut milk with the sugar and salt and stir until the grains have all dissolved.

4. Once the rice is finished, dump it out of the basket into a bowl and stir in half of the coconut mixture, mixing well to combine. Slice the mango and serve with the rice, drizzling more of the coconut sauce over the rice before serving.

You might also like:


For more delicious recipes, gardening ideas, foraging tips, and food-related inspiration "like" the Garden of Eating on Facebook, or follow me on Twitter and Pinterest.

Saturday, May 29, 2010

Meyer Lemon Sorbet -- Dessert Don't Get More Local Than This

A quick glance at the original date of this post confirms that I began writing about this scrumptiously fresh citrus dessert nearly two years ago, in July of 2008. I guess it's true that good things come to those who wait...

Meyer lemon sorbet topped with mint by Eve Fox, Garden of Eating blog

I think of this delightful sorbet as a uniquely Californian dessert, mostly because I had never heard of or seen a Meyer lemon before we moved here.  But here in Berkeley, they are practically ubiquitous. (For those of you who are interested in the fruit's actual provenance, this type of lemon is originally from China.)

A ripening Meyer lemon on our tree by Eve Fox, Garden of Eating blog

Our yard is graced by an outrageously abundant Meyer lemon tree. We're thoroughly mystified by its fecundity -- we never water it (which is significant since it does not rain for 6 months out of the year here), nor have we ever fertilized it, yet it churns out Meyer lemons like they were going out of style.

Basket of Meyer lemons

The tree has such a prolific presence in our yard that "memon" is one of our son, Will's first words. As soon as we take him outside, he toddles over to the tree saying "memon" over and over in a soft, delighted, little voice that he reserves for the lemons, alone. Then he picks one (there is some parental assistance involved in that process) and walks around sucking on it and biting off small pieces of the soft peel with his three little teeth.

Will with his Meyer "memon" by Eve Fox, Garden of Eating blog

But back to the sorbet. While the subtle, floral flavor of the Meyer lemons is uniquely lovely, you can easily substitute regular lemons or another citrus fruit if you can't find Meyers.

Meyer lemon sorbet topped with mint by Eve Fox, Garden of Eating blog

It turns out that sorbet is surprisingly easy to make, especially if you have an ice cream maker (or have a friend who has one - thanks again, Ben!)

Scooping the sorbet out of the icecream maker by Eve Fox, Garden of Eating blog

I've included the instructions for what to do if you do not have one, though. Thanks to Elise at Simply Recipes for providing the recipe below.

Meyer Lemon Sorbet
Makes 2 1/2 cups

Ingredients

* 1 cup sugar
* 1 cup water
* 1 cup freshly squeezed juice from meyer lemons (about 4-5 lemons)
* 2 teaspoons fine lemon zest
* Mint leaves (for garnish)

Directions

1. Freeze your ice cream maker according to the manufacturer's instructions (it's probably easiest just to keep the freezer container in your freezer so that you can be ready to go whenever the urge to make sorbet or ice cream strikes you.)

2. In a small saucepan on medium high heat, make a simple syrup by heating sugar and water until the sugar has completely dissolved. Remove from heat and let cool. Mix in the lemon juice and zest. Chill in the refrigerator.

3. Once the mixture has thoroughly chilled, pour it into the ice cream maker and process per the instructions for sorbet (most likely you will need to run it for 20-30 minutes.) If you don't have an ice cream maker, you can pour the mixture into a shallow pan and freeze in your freezer until semi-solid. Then take a fork and fluff it up, returning it the the freezer to freeze firm. Then put in a food-processor or blender to process until smooth.

4. Transfer the sorbet to an airtight container and freeze until ready to serve. A melon-baller works well to scoop this out when you're ready to serve. Garnish with the mint leaves.

You may also like:
Sunday, May 23, 2010

Salade de Carottes Râpées (Grated Carrot Salad)

There are such lovely fresh carrots for sale at all the farmers' markets lately; I can't resist them. It's a perfect time to make this classic French grated carrot salad. It's so simple, fresh and tasty. You can order this in pretty much any cafe or restaurant in France and it's almost always good (and cheap!)

Carrots

While you can certainly use a food processor with a grating attachment to grate the carrots, I think they turn out a little better if you grate them by hand. It may just be the blade on my Cuisinart but I find that the grating attachment tends to tear the veggies up a little in the process of grating them. So I did these by hand though my right arm started aching about 2/3 of the way through and my husband obligingly offered to finish up the grating for me (he's very nice like that.)

Salade de carottes râpées by Eve Fox, Garden of Eating blog

Although I stuck with the traditional French preparation in the recipe below, you are welcome to shake things up a bit by adding dried currants and/or thinly sliced red onion or some grated beets to the salad or throwing a little Dijon mustard into the dressing, etc. Bon appetit!

Salade de carottes râpées by Eve Fox, Garden of Eating blog

-- print recipe --
Salade de Carottes Râpées (Grated Carrot Salad)
Serves 6

Ingredients

* 7 large, sweet carrots, peeled
* 1/2 bunch of large, flat-leaf parsley (Italian works better than curly), rinsed and dried
* Juice of 2 lemons
* 2-3 Tbsps olive oil
* 2 tsps sugar or honey
* Sea salt to taste
* Freshly ground black pepper to taste

Directions

1.Grate the carrots as finely as possible and place in a medium-sized bowl (you want it to be big enough to make it easy to toss everything together with the dressing.) Coarsely chop the parsley and toss it in with the carrots.

2. Make the dressing by whisking together the lemon juice, olive oil, sugar and salt and pepper until the sugar and salt have dissolved. Drizzle it over the carrot/parsley mixture and toss to coat. Taste and adjust the seasonings as needed (you may want to add more lemon juice, salt or pepper).

You might also like:
For more delicious recipes, gardening ideas, foraging tips, and food-related inspiration "like" the Garden of Eating on Facebook, or follow me on Twitter and Pinterest.

Sunday, May 9, 2010

Chimichurri - Argentina's Dangerously Addictive Sauce

Chimichurri Sauce by Eve Fox, Garden of Eating blog

Chimichurri is fun to say but the enjoyment level pales in comparison to how fun it is to eat. This traditional Argentine sauce is made from a mixture of fresh herbs, garlic, olive oil, vinegar and lemon juice. The combination is fresh, flavorful and slightly eye-popping in a way that makes you want more and more of the stuff.

Although it's traditionally used as a marinade and a dipping sauce for grilled beef (Argentina is the culinary epicenter of grilled meats, especially beef), it is also a great accompaniment to chicken, pork, lamb, and fish. And if you add a bit more oil and vinegar, it makes quite a tasty salad dressing, too.

Herbs For Chimichurri Sauce by Eve Fox, Garden of Eating blog

The recipe below is flexible. For example, you can use all lemon juice or all vinegar if you prefer, play around with the ratio of the various herbs, or experiment with adding some different herbs to the mix. I added some marjoram to my chimichurri and liked it a lot even though it's not typically included.  I think fresh mint would also be delicious in this sauce.

In addition to being yummy and easy to make, this parsley-based sauce is a godsend for any CSA members who have the "good luck" to receive bunch after bunch of parsley in their produce boxes.

Grass-fed steak with chimichurri sauce, roasted new potatoes and artichoke with meyer lemon mayo by Eve Fox, Garden of Eating blog

I served the sauce over some really good grass-fed organic beef steaks from Marin Sun Farms along with oven roasted potatoes with garlic and herbs, artichokes with Meyer lemon mayo, and a salad. ¡Muy sabroso!

-- print recipe --
Chimichurri Sauce
Serves 4

Ingredients

* 1/2 cup extra-virgin olive oil
* 2 Tbsps fresh lemon juice
* 2 Tbsps apple cider vinegar, red wine or sherry vinegar
* 1 cup flat-leaf parsley leaves, washed and dried
* 1 cup cilantro leaves, washed and dried
* 1/4 cup fresh basil leaves, washed and dried
* 1/4 cup oregano leaves, washed and dried
* 2 cloves garlic, roughly chopped
* 1/2 shallot, roughly chopped
* 1/4 teaspoon fresh cracked black pepper
* 1/2 teaspoons kosher salt
* 1/4 teaspoon crushed red pepper flakes (you can also use half a small jalapeno if you have one on hand, just remember to remove the seeds unless you like it hot and don't touch your eyes after handling them - I learned that the hard way...)

Directions

Combine all the ingredients in the bowl of a food processor and blend until smooth. Place the sauce in a non-reactive bowl or storage container, cover and refrigerate for 2-6 hours (this will allow the flavors to develop some more depth.) Remove from the fridge half an hour before using. This sauce should keep for up to a week if kept in an airtight container in the refrigerator.

You might also like:
For more delicious recipes, gardening ideas, foraging tips, and food-related inspiration "like" the Garden of Eating on Facebook, or follow me on Twitter and Pinterest.

Wednesday, May 5, 2010

Sticky Rice With Mango - A Thai Treasure

Although I am truly devoted to chocolate, this classic Thai dessert holds a very special place in my heart. It may not sound like much, but I assure you, the taste is life-altering.

Sticky rice with mango by Eve Fox, Garden of Eating blog

I remember the first time I tasted sticky rice with mango quite clearly. It was 1997, I was 20 years old and my friend, Katie and I were newly arrived in Bangkok, Thailand, our first stop on a trip round the world in lieu of our second semester of junior year at Wesleyan University -- and an excellent trade off at that!

We were with our wonderful hostess, Sumitmai, an amazingly generous, fun-loving, retired Thai woman who had more or less adopted us shortly after we landed in Bangkok's oppressive heat and humidity.

She guided us to a booth in one of Bangkok's many markets where she procured a large serving of kao niow mamuang (a.k.a. sticky rice with mango) which she assured us we would like. We dug in, not realizing that our minds were about to be blown.

Bamboo sticky rice steamer by Eve Fox, Garden of Eating blog

The sweet, coconut milk-flavored rice was warm, chewy and delicious on its own. But paired with the expertly sliced (cutting fruit is truly an art in Thailand) buttery, perfectly ripe, yellow mango, it became something else entirely.

Naturally, Katie and I polished it all off within minutes, looking sadly at the empty container when the last grains of sweet, sticky rice were gone. From that point on, we bought sticky rice with mango at every opportunity, something I've continued to do in the 13 years since then.

Two ripe Manila mangoes by Eve Fox, Garden of Eating blog

I made two attempts at making sticky rice with mango at home - both ended in utter disaster... So I've settled for ordering it at Thai restaurants from time to time.

Given the depth of my passion for kao niow mamuang, you can probably imagine my delight when I saw it on the list of recipes I'd be learning at the excellent Thai cooking class I took three years ago. The class was taught by Kasma Loha Unchit, an expat Thai woman who lives in Oakland, California. It was hands-down the best cooking class I've ever taken. One night a week for a month, Kasma covered the basic philosophy of Thai cuisine, where to find the best ingredients in the Bay area, what brands were best (preservative and additive-free and made with the highest quality ingredients), fascinating bits of Thai history (for example, did you know that pad thai, Thailand's national dish, was invented by the Chinese?!), and a dizzying array of delicious Thai recipes.

Enough yammering though. It's time for the recipe. It's very easy to make sticky rice. But you must follow a few basic rules:

1. Buy the right rice! Sticky rice is not sushi rice, that is a different variety that won't work for this (I've tried and failed). Sticky rice is also called "sweet rice" or "glutinous rice". According to Kasma, who has certainly done her research, the best brands to buy are Buddha, Golden Phoenix or Butterfly. If at all possible, buy a rice from Thailand to make sure you're getting the right kind.

Sticky rice by Eve Fox, Garden of Eating blog

2. Buy the right equipment. It's super easy to make delicious sticky rice if you have the right equipment, namely a bamboo steamer and a steamer pot made specifically for this purpose. The bamboo steamer looks like a sort of odd, pointy hat and it sits point-down in the steamer pot. Here is a blurry picture I took of me wearing the steamer basket as a hat.

Eve wearing the bamboo sticky rice steamer "hat" by Eve Fox, Garden of Eating blog

The pot is shaped more like a jug. You can probably find these things at Asian markets (if they stock South East Asian goods) if you have one close by. However, if not, you can also buy them online for $12 - $30

Kasma's instructions were to boil the bamboo steamer/hat before using it the first time to make sure it does not impart a really bamboo-y taste to the rice and to ensure that it is clean since it's probably traveled quite a distance to reach your kitchen. Just submerge it in a large pot of boiling water for a few minutes.

Bamboo sticky rice steamer by Eve Fox, Garden of Eating blog

3. Don't forget to soak the rice! This is the part that has derailed my plans a couple of times... You must soak the rice before steaming for at least 4 hours (or overnight) to allow it to soak up extra water before you cook it.

4. Get good mangoes. The rice will still be tasty but pairing it with ripe, delicious mangoes will make a big difference. Manila mangoes are probably the best fit for this recipe - they have a soft, yellow, string-free flesh that is most similar to the Thai mangoes.

Sticky rice with mango by Eve Fox, Garden of Eating blog

Follow these rules and you'll be golden!

-- print recipe --
Sticky Rice with Mango (Kao Niow Mamuang)
Serves 4

Ingredients

* 2 cups long-grain white sticky rice, sweet rice or glutinous rice
* 2 cups or 1 can coconut milk (Chao Koh brand is a good one)
* 1/2 cup granulated sugar
* 1 tsp salt
* Optional: 3-4 fresh or frozen whole pandanus leaves (bai toey) or a few drops of jasmine (mali) essence
* 1-2 ripe mangoes, peeled and sliced

Directions

1. Rise the sticky rice once or twice, cover with tap water 2-3 inches and soak for four hours (or overnight). The rice will absorb much of the water and grow in size. It will also soften such that the grains will easily break if pressed between the fingers.

2. Drain the rice and pour it into the bamboo basket. Place the bamboo basket to steam over 2-3 inches of water in the metal pot. Cover the top of the bamboo basket with a smallish pot lid and steam for 40-45 minutes, until the rice is thoroughly cooked and, well, sticky.

3. While the rice is steaming, make the coconut sauce: heat the can of coconut milk with the sugar and salt and stir until the grains have all dissolved.

4. Once the rice is finished, dump it out of the basket into a bowl and stir in half of the coconut mixture, mixing well to combine. Slice the mango and serve with the rice, drizzling more of the coconut sauce over the rice before serving.

You might also like:


For more delicious recipes, gardening ideas, foraging tips, and food-related inspiration "like" the Garden of Eating on Facebook, or follow me on Twitter and Pinterest.