Eatwell Recipe 29: Cool as a Cucumber -- Refrigerator Pickles

Monday, August 31, 2009

The summer after my freshman year of college, I planted my first garden at my parents' place in upstate NY. I also started a compost heap in a crude structure I'd created using some old wooden pallets my dad had lying around. I was so excited about the composting process that I actually looked forward to taking the food scraps out to the heap and would do so several times a day (quite a switch from the way I'd regarded this chore when I was a child...) and turned the pile religiously. I was so proactive that by the time I left for school in the fall, there were actually a few inches of rich, new, friable dirt at the bottom of the heap. It was pretty thrilling.

compost bin made of old pallets, courtesy of google imagesAlthough I suffered some heartbreaking losses in the garden that summer (namely, almost all of my tomatoes), I also had some triumphs including two small eggplants, okra, and lots of gorgeous lettuces. But my favorite plants were the cucumbers. I had never grown them before and was completely awed by their cleverness. The vines climb by sending out straight, thin, green tendrils which reach in all directions until they find something (in my case, the deer fence my dad had built around my little raised bed garden) to grab onto.

Image courtesy of WhiteOakArt (http://www.flickr.com/photos/whiteoakart)and is protected by a Creative Commons licenseThen the tendril wraps itself around that thing and coils the rest of itself into a little green spring, pulling the rest of the plant up as it coils. Then it begins the process all over again. This struck me as nothing short of spectacular.
Image courtesy of WhiteOakArt (http://www.flickr.com/photos/whiteoakart)and is protected by a Creative Commons licenseBy climbing the fence, the plant keeps the cucumbers off the ground where they can grow in relative safety -- free from the unwanted advances of slugs and mold, etc. And grow they did. There may not be anything quite as satisfying as biting into a crunchy cucumber fresh off the vine from your own garden.But even if you don't have a garden, there are tons of delicious cukes out there right now for the taking at farmers markets and farm stands.

Pickling cukes

And while there are lots of yummy ways to eat cucumbers, including
tzatziki, raita, and chopped salad, I want to talk about pickles.

Cucumber by Eve Fox, Garden of Eating blog

Although you can make delicious pickles to see you through the winter if you want to bust out your canning equipment, there is an easy way to make equally tasty pickles with a minimum of time and effort and without having to turn on your stove.
While refrigerator pickles don't have the shelf life of canned pickles they're so good that they probably won't last long enough for that to be a problem.

Refrigerator Pickles

Refrigerator Pickles
Makes a 1-Quart Jar

Ingredients

* 2-3 small pickling cucumbers, washed and sliced lengthwise
* 1 cup vinegar (apple cider or white will work best)
* 1 cup water
* 2 garlic cloves, smashed
* Small handful of black peppercorns, crushed*
* 2-3 sprigs of fresh dill, washed
* 1/8 tsp red pepper flakes*
* 1/4 tsp dill seed, lightly crushed*
* 1/4 tsp mustard seed, lightly crushed*
* 1 Tbsp sea salt
* 1 wide-mouthed quart mason or ball jar

(* These spices are just suggestions -- you can skip any or all of them without any real problem, or substitute other spices you think might work well)

Directions

1. Place the garlic cloves in the bottom of the jar, then pack it with the cucumber spears and dill sprigs.

2. Combine the other ingredients and pour the liquid over the cucumbers until they're fully covered. Close the jar and refrigerate. It may take up to a day for them to begin to taste pickled. They should last in the fridge for a few weeks though they'll begin to lose their crunchiness at some point.

A few other recipes you might like:

Like this recipe? Click here to browse through more Eatwell Recipes.

The Eatwell Project: a year of seasonal recipes -- logo by Eve Fox

Late Summer Bounty in Berkeley

Saturday, August 29, 2009

Just wanted to share a few photos I took of the late summer bounty at the downtown Berkeley farmers' market this morning. It was hot but that did not stop tons of people from turning out.

Enjoy this slide show of some gorgeous vegetables and fruits.

Roasted Eggplant & Tomato Gratin (Eatwell Recipe 28)

Sunday, August 23, 2009

Fresh eggplant and tomatoes by Eve Fox, Garden of Eating blog

Last fall, I printed out this delicious recipe by Martha Rose Shulman who writes the excellent Recipes for Health series for the NY Times. Recipes for Health is a great place to find tasty recipes that showcase fresh ingredients with a heavy focus on vegetables and they have a very handy recipe index that allows you to search by ingredient. Be sure to check it out!

This is basically a delicious, low-fat version of eggplant Parmesan. Instead of breaded, fried eggplant, the eggplant is roasted and sliced, layered with a rich tomato sauce and freshly grated Parmesan, and baked in a hot oven until bubbly.

Roasted Eggplant and Tomato Gratin

Since I sometimes find the Recipes for Health a tad too healthy for my taste, I've made a few small modifications, namely adding mozzarella cheese and pumping up the breadcrumbs.

Not only is this dish mighty tasty, it is also much easier to make than traditional eggplant parm. Personally, I find the process of slicing and salting all that eggplant and then dealing with the mess of egging, breading and frying kind of tedious. And I always feel guilty about using (and then throwing away) so much oil, too.

Shady Lady and Yellow Cherry Tomatoes by Eve Fox, Garden of Eating blog

But this lighter version lets you simply cut the eggplant in half, brush it with olive oil and roast it for a short while, then let it cool and slice it before layering it with the other ingredients. So simple. And so good!

Fresh tomato sauce

It does take some time to make tomato sauce from scratch but the taste makes it worthwhile (though you could certainly use a jar of store-bought sauce, too.) I enjoyed it because it gave me an excuse to take my brand new food mill for its maiden voyage. The food mill worked perfectly, removing both the tomato skins and the seeds from the cooked sauce. It was also a great use for the many delicious heirloom tomatoes we received in our box this week.
-- print recipe --

Roasted Eggplant & Tomato Gratin
Serves 6

Ingredients

For the tomato sauce:
* 1 tablespoon extra virgin olive oil
* 1 small or 1/2 medium onion, chopped
* 2 to 4 garlic cloves (to taste)
* 2 pounds fresh tomatoes, quartered if you have a food mill or else peeled and chopped; or 1 1/2 * (28-ounce) cans chopped tomatoes, with juice
* Salt and freshly ground pepper to taste
* 1 teaspoon sugar
* 2 sprigs fresh basil

For the gratin:
* 2 pounds eggplant, roasted
* Salt and freshly ground pepper
* 2 tablespoons slivered fresh basil leaves
* 2/3 cup freshly grated Parmesan
* 8 oz fresh mozzarella cheese, grated or sliced
* 1/2 cup bread crumbs
* 1 tablespoon extra virgin olive oil

Directions

1. Roast the eggplant. Preheat the oven to 450 degrees. Wash the eggplant(s) and cut off the stem and any leaves as well as the tough bit at the very bottom. Cut in half length-wise and score each half down the middle with the tip of a sharp knife, taking care not to pierce the skin. Lay a sheet of tin foil on a baking sheet and brush it with olive oil. Place the eggplant halves on the tin foil flesh-side down and roast for 20-25 minutes until the skin begins to wrinkle and the flesh browns but before the entire half collapses (smaller eggplants will require a shorter roasting time of roughly 15 minutes). Remove from the oven, peel away from foil with a spatula (don't worry if you lose some of the browned flesh in the process) and transfer the halves to a colander or rack to drain/cool for 15-30 minutes.

2. Meanwhile, to make the tomato sauce, heat the olive oil in a large, heavy skillet over medium heat, and add the onion. Stir until tender, about five to eight minutes, then add the garlic. Stir until fragrant, about a minute, and add the tomatoes, salt (1/2 to 1 teaspoon), pepper, sugar and basil sprigs. Turn the heat up to medium-high. When the tomatoes are bubbling, stir well and then turn the heat back to medium. Stir often, until the tomatoes have cooked down and are beginning to stick to the pan, about 25 minutes. Remove the basil sprigs.

3. If you did not peel the tomatoes (the easiest way to remove the peels is to blanch the tomatoes in boiling water for a few minutes until the skins break and then transfer them to a bowl of cool water where you should be able to slip the skins right off with ease), put the sauce through the fine blade of a food mill. If the tomatoes were peeled, pulse the sauce with an immersion blender or in a food processor until coarsely pureed. Taste, and adjust the seasoning.

4. Preheat the oven to 400 degrees. Set aside 1/4 cup of the Parmesan and mix with the bread crumbs. Oil the inside of a two-quart gratin or baking dish with olive oil. Spread 1/2 cup tomato sauce over the bottom of the dish. Slice the roasted eggplant about 1/4 inch thick, and set an even layer of slices over the tomato sauce. Season with salt and pepper. Spoon a layer of sauce over the eggplant, and sprinkle with basil, Parmesan and mozzarella. Repeat the layers one or two more times, depending on the shape of your dish and the size of your eggplant slices, ending with a layer of sauce topped with mozzarella. Place in the oven and bake for 30 to 35 minutes, until bubbling and browned on the top and edges. Remove from the heat and allow to sit for at least 10 minutes before serving. Serve hot, warm or room temperature, over pasta (angel hair, spaghetti or linguine are nice for this).

A few other recipes you might like:

Like this recipe? Click here to browse through more Eatwell Recipes.
The Eatwell Project: a year of seasonal recipes -- logo by Eve Fox

Zucchini Bread (Eatwell Recipe 27)

Monday, August 17, 2009

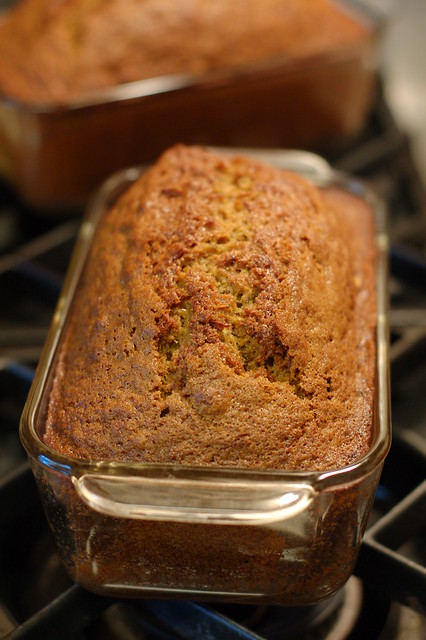
Zucchini breads just out of the oven

I've heard that the only time people in rural areas ever bother to lock their cars is in late summer, otherwise they run the risk of returning to find their cars stuffed with unwanted squash...

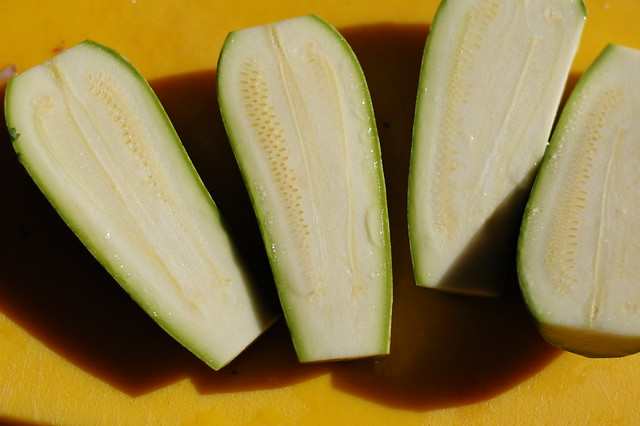
Zucchini

I think we're getting to that point around here. Fortunately, zucchini bread is a delicious solution to the "squash problem." And easy to make, too. A little grating and a little mixing, then into the oven and you're good to go.

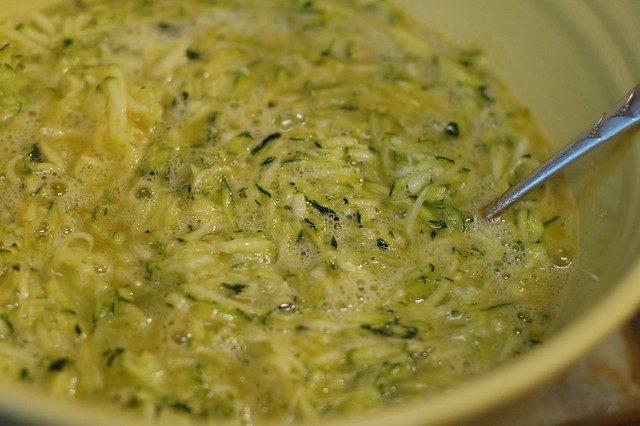
Zucchini bread batter (aka green goop)

Slices of this bread are good on their own or toasted with some cream cheese or butter or eaten with a slice of sharp cheddar cheese.


Zucchini bread just out of the oven


Although it's not very original, this recipe from The Silver Palate has never failed me so I see no need to reinvent the wheel. The Silver Palate was one of the very first cookbooks I received as an adult - a friend gave it to me as a gift for my 22nd birthday - and it's still one of my favorites (be sure to check out the Chicken Marbella recipe.)


The recipe below is for one loaf but I recommend doubling it since it only takes a little longer to make two and I've found that while friends may not welcome any gifts of squash by this point in the summer, they will be very happy to accept a loaf of this yummy bread.

Enjoy! (and don't forget to lock your car...)

-- print recipe --
Zucchini Bread
Makes 1 loaf

Ingredients

* 1 1/2 Tbsps sweet butter (or cooking spray)
* 3 eggs (use organic, pasture-raised if possible)
* 3/4 cup oil (canola or vegetable is best)
* 1 1/2 cups sugar
* 1 tsp vanilla extract
* 2 cups grated washed, unpeeled, raw zucchini
* 2 1/2 cups unbleached all-purpose flour
* 2 tsps baking soda
* 1 tsp baking powder
* 1 tsp salt
* 1 tsp ground cinnamon
* 1 tsp ground cloves
* 1 cup shelled walnuts, chopped (optional)

Directions

1. Preheat the oven to 350 degrees. Butter a 9x5-inch loaf pan (you can also use a cooking spray if you want to avoid using any dairy.)

2. Beat the eggs, oil, sugar and vanilla until light and thick. Fold the grated zucchini into the oil mixture.

3. Sift the dry ingredients together. Stir into zucchini mixture until just blended. Fold in the walnuts.

4. Pour the batter into the buttered loaf pan and bake on the middle rack of the oven for 1 hour and 15 minutes or until a knife or skewer inserted into the middle of the loaf comes out clean.

5. Let cool slightly then remove from the pan and cool completely on a rack.

Eatwell Recipe 26: Tomato, Sweet Corn & Basil Salad

Friday, August 14, 2009

This dish is a trifecta of tastiness. It melds three of the very best flavors of summer--juicy tomatoes, crunchy, sweet corn, and fragrant basil. There's not a whole lot more to it than that but the combination is sheer magic.
Close up of sweet corn by Eve Fox, Garden of Eating blog
Credit for this salad goes to my mom-in-law, Liz. This is a great side dish to go with grilled meat or fish. It would also taste great tossed with some fresh pasta, grated parmesan cheese and a little arugala to add some peppery bite.
Tomato, sweet corn and basil salad by Eve Fox, Garden of Eating blog
Tomato, Sweet Corn & Basil Salad
Serves 4-6

Ingredients

* 3 ears of sweet corn
* 2 large, ripe tomatoes (I recommend using an heirloom variety because they have the best flavor)
* 1 shallot or very small onion
* A large handful of fresh basil
* 3 Tbsps olive oil
* 2 Tbsps sherry vinegar
* Sea salt
* Freshly ground black pepper

Directions

1. Bring a pot of water to boil while you shuck the ears of corn. Drop the ears in the boiling water and cook for 8-10 minutes then remove and run under cold water to stop the cooking process.

2. Wash and chop the tomatoes into 1/2-inch cubes. Peel the shallot and mince it finely. Wash and dry the basil and chop it coarsely. Once the corn has cooled down enough to handle comfortably, cut the kernels off each cob and tease them apart by your fingers then place them in a small to medium-sized bowl, along with the tomatoes.

3. Mix the olive oil, sherry vinegar, shallot, basil, and some salt and pepper to taste then pour it over the tomatoes and corn. Stir gently to make sure everything is well coated with the dressing before serving.

A few other recipes you might like:

Like this recipe? Click here to browse through more Eatwell Recipes.
The Eatwell Project: a year of seasonal recipes -- logo by Eve Fox

Monday, August 31, 2009

Eatwell Recipe 29: Cool as a Cucumber -- Refrigerator Pickles

The summer after my freshman year of college, I planted my first garden at my parents' place in upstate NY. I also started a compost heap in a crude structure I'd created using some old wooden pallets my dad had lying around. I was so excited about the composting process that I actually looked forward to taking the food scraps out to the heap and would do so several times a day (quite a switch from the way I'd regarded this chore when I was a child...) and turned the pile religiously. I was so proactive that by the time I left for school in the fall, there were actually a few inches of rich, new, friable dirt at the bottom of the heap. It was pretty thrilling.

compost bin made of old pallets, courtesy of google imagesAlthough I suffered some heartbreaking losses in the garden that summer (namely, almost all of my tomatoes), I also had some triumphs including two small eggplants, okra, and lots of gorgeous lettuces. But my favorite plants were the cucumbers. I had never grown them before and was completely awed by their cleverness. The vines climb by sending out straight, thin, green tendrils which reach in all directions until they find something (in my case, the deer fence my dad had built around my little raised bed garden) to grab onto.

Image courtesy of WhiteOakArt (http://www.flickr.com/photos/whiteoakart)and is protected by a Creative Commons licenseThen the tendril wraps itself around that thing and coils the rest of itself into a little green spring, pulling the rest of the plant up as it coils. Then it begins the process all over again. This struck me as nothing short of spectacular.
Image courtesy of WhiteOakArt (http://www.flickr.com/photos/whiteoakart)and is protected by a Creative Commons licenseBy climbing the fence, the plant keeps the cucumbers off the ground where they can grow in relative safety -- free from the unwanted advances of slugs and mold, etc. And grow they did. There may not be anything quite as satisfying as biting into a crunchy cucumber fresh off the vine from your own garden.But even if you don't have a garden, there are tons of delicious cukes out there right now for the taking at farmers markets and farm stands.

Pickling cukes

And while there are lots of yummy ways to eat cucumbers, including
tzatziki, raita, and chopped salad, I want to talk about pickles.

Cucumber by Eve Fox, Garden of Eating blog

Although you can make delicious pickles to see you through the winter if you want to bust out your canning equipment, there is an easy way to make equally tasty pickles with a minimum of time and effort and without having to turn on your stove.
While refrigerator pickles don't have the shelf life of canned pickles they're so good that they probably won't last long enough for that to be a problem.

Refrigerator Pickles

Refrigerator Pickles
Makes a 1-Quart Jar

Ingredients

* 2-3 small pickling cucumbers, washed and sliced lengthwise
* 1 cup vinegar (apple cider or white will work best)
* 1 cup water
* 2 garlic cloves, smashed
* Small handful of black peppercorns, crushed*
* 2-3 sprigs of fresh dill, washed
* 1/8 tsp red pepper flakes*
* 1/4 tsp dill seed, lightly crushed*
* 1/4 tsp mustard seed, lightly crushed*
* 1 Tbsp sea salt
* 1 wide-mouthed quart mason or ball jar

(* These spices are just suggestions -- you can skip any or all of them without any real problem, or substitute other spices you think might work well)

Directions

1. Place the garlic cloves in the bottom of the jar, then pack it with the cucumber spears and dill sprigs.

2. Combine the other ingredients and pour the liquid over the cucumbers until they're fully covered. Close the jar and refrigerate. It may take up to a day for them to begin to taste pickled. They should last in the fridge for a few weeks though they'll begin to lose their crunchiness at some point.

A few other recipes you might like:

Like this recipe? Click here to browse through more Eatwell Recipes.
The Eatwell Project: a year of seasonal recipes -- logo by Eve Fox

Saturday, August 29, 2009

Late Summer Bounty in Berkeley

Just wanted to share a few photos I took of the late summer bounty at the downtown Berkeley farmers' market this morning. It was hot but that did not stop tons of people from turning out.

Enjoy this slide show of some gorgeous vegetables and fruits.

Sunday, August 23, 2009

Roasted Eggplant & Tomato Gratin (Eatwell Recipe 28)

Fresh eggplant and tomatoes by Eve Fox, Garden of Eating blog

Last fall, I printed out this delicious recipe by Martha Rose Shulman who writes the excellent Recipes for Health series for the NY Times. Recipes for Health is a great place to find tasty recipes that showcase fresh ingredients with a heavy focus on vegetables and they have a very handy recipe index that allows you to search by ingredient. Be sure to check it out!

This is basically a delicious, low-fat version of eggplant Parmesan. Instead of breaded, fried eggplant, the eggplant is roasted and sliced, layered with a rich tomato sauce and freshly grated Parmesan, and baked in a hot oven until bubbly.

Roasted Eggplant and Tomato Gratin

Since I sometimes find the Recipes for Health a tad too healthy for my taste, I've made a few small modifications, namely adding mozzarella cheese and pumping up the breadcrumbs.

Not only is this dish mighty tasty, it is also much easier to make than traditional eggplant parm. Personally, I find the process of slicing and salting all that eggplant and then dealing with the mess of egging, breading and frying kind of tedious. And I always feel guilty about using (and then throwing away) so much oil, too.

Shady Lady and Yellow Cherry Tomatoes by Eve Fox, Garden of Eating blog

But this lighter version lets you simply cut the eggplant in half, brush it with olive oil and roast it for a short while, then let it cool and slice it before layering it with the other ingredients. So simple. And so good!

Fresh tomato sauce

It does take some time to make tomato sauce from scratch but the taste makes it worthwhile (though you could certainly use a jar of store-bought sauce, too.) I enjoyed it because it gave me an excuse to take my brand new food mill for its maiden voyage. The food mill worked perfectly, removing both the tomato skins and the seeds from the cooked sauce. It was also a great use for the many delicious heirloom tomatoes we received in our box this week.
-- print recipe --

Roasted Eggplant & Tomato Gratin
Serves 6

Ingredients

For the tomato sauce:
* 1 tablespoon extra virgin olive oil
* 1 small or 1/2 medium onion, chopped
* 2 to 4 garlic cloves (to taste)
* 2 pounds fresh tomatoes, quartered if you have a food mill or else peeled and chopped; or 1 1/2 * (28-ounce) cans chopped tomatoes, with juice
* Salt and freshly ground pepper to taste
* 1 teaspoon sugar
* 2 sprigs fresh basil

For the gratin:
* 2 pounds eggplant, roasted
* Salt and freshly ground pepper
* 2 tablespoons slivered fresh basil leaves
* 2/3 cup freshly grated Parmesan
* 8 oz fresh mozzarella cheese, grated or sliced
* 1/2 cup bread crumbs
* 1 tablespoon extra virgin olive oil

Directions

1. Roast the eggplant. Preheat the oven to 450 degrees. Wash the eggplant(s) and cut off the stem and any leaves as well as the tough bit at the very bottom. Cut in half length-wise and score each half down the middle with the tip of a sharp knife, taking care not to pierce the skin. Lay a sheet of tin foil on a baking sheet and brush it with olive oil. Place the eggplant halves on the tin foil flesh-side down and roast for 20-25 minutes until the skin begins to wrinkle and the flesh browns but before the entire half collapses (smaller eggplants will require a shorter roasting time of roughly 15 minutes). Remove from the oven, peel away from foil with a spatula (don't worry if you lose some of the browned flesh in the process) and transfer the halves to a colander or rack to drain/cool for 15-30 minutes.

2. Meanwhile, to make the tomato sauce, heat the olive oil in a large, heavy skillet over medium heat, and add the onion. Stir until tender, about five to eight minutes, then add the garlic. Stir until fragrant, about a minute, and add the tomatoes, salt (1/2 to 1 teaspoon), pepper, sugar and basil sprigs. Turn the heat up to medium-high. When the tomatoes are bubbling, stir well and then turn the heat back to medium. Stir often, until the tomatoes have cooked down and are beginning to stick to the pan, about 25 minutes. Remove the basil sprigs.

3. If you did not peel the tomatoes (the easiest way to remove the peels is to blanch the tomatoes in boiling water for a few minutes until the skins break and then transfer them to a bowl of cool water where you should be able to slip the skins right off with ease), put the sauce through the fine blade of a food mill. If the tomatoes were peeled, pulse the sauce with an immersion blender or in a food processor until coarsely pureed. Taste, and adjust the seasoning.

4. Preheat the oven to 400 degrees. Set aside 1/4 cup of the Parmesan and mix with the bread crumbs. Oil the inside of a two-quart gratin or baking dish with olive oil. Spread 1/2 cup tomato sauce over the bottom of the dish. Slice the roasted eggplant about 1/4 inch thick, and set an even layer of slices over the tomato sauce. Season with salt and pepper. Spoon a layer of sauce over the eggplant, and sprinkle with basil, Parmesan and mozzarella. Repeat the layers one or two more times, depending on the shape of your dish and the size of your eggplant slices, ending with a layer of sauce topped with mozzarella. Place in the oven and bake for 30 to 35 minutes, until bubbling and browned on the top and edges. Remove from the heat and allow to sit for at least 10 minutes before serving. Serve hot, warm or room temperature, over pasta (angel hair, spaghetti or linguine are nice for this).

A few other recipes you might like:

Like this recipe? Click here to browse through more Eatwell Recipes.
The Eatwell Project: a year of seasonal recipes -- logo by Eve Fox

Monday, August 17, 2009

Zucchini Bread (Eatwell Recipe 27)

Zucchini breads just out of the oven

I've heard that the only time people in rural areas ever bother to lock their cars is in late summer, otherwise they run the risk of returning to find their cars stuffed with unwanted squash...

Zucchini

I think we're getting to that point around here. Fortunately, zucchini bread is a delicious solution to the "squash problem." And easy to make, too. A little grating and a little mixing, then into the oven and you're good to go.

Zucchini bread batter (aka green goop)

Slices of this bread are good on their own or toasted with some cream cheese or butter or eaten with a slice of sharp cheddar cheese.


Zucchini bread just out of the oven


Although it's not very original, this recipe from The Silver Palate has never failed me so I see no need to reinvent the wheel. The Silver Palate was one of the very first cookbooks I received as an adult - a friend gave it to me as a gift for my 22nd birthday - and it's still one of my favorites (be sure to check out the Chicken Marbella recipe.)


The recipe below is for one loaf but I recommend doubling it since it only takes a little longer to make two and I've found that while friends may not welcome any gifts of squash by this point in the summer, they will be very happy to accept a loaf of this yummy bread.

Enjoy! (and don't forget to lock your car...)

-- print recipe --
Zucchini Bread
Makes 1 loaf

Ingredients

* 1 1/2 Tbsps sweet butter (or cooking spray)
* 3 eggs (use organic, pasture-raised if possible)
* 3/4 cup oil (canola or vegetable is best)
* 1 1/2 cups sugar
* 1 tsp vanilla extract
* 2 cups grated washed, unpeeled, raw zucchini
* 2 1/2 cups unbleached all-purpose flour
* 2 tsps baking soda
* 1 tsp baking powder
* 1 tsp salt
* 1 tsp ground cinnamon
* 1 tsp ground cloves
* 1 cup shelled walnuts, chopped (optional)

Directions

1. Preheat the oven to 350 degrees. Butter a 9x5-inch loaf pan (you can also use a cooking spray if you want to avoid using any dairy.)

2. Beat the eggs, oil, sugar and vanilla until light and thick. Fold the grated zucchini into the oil mixture.

3. Sift the dry ingredients together. Stir into zucchini mixture until just blended. Fold in the walnuts.

4. Pour the batter into the buttered loaf pan and bake on the middle rack of the oven for 1 hour and 15 minutes or until a knife or skewer inserted into the middle of the loaf comes out clean.

5. Let cool slightly then remove from the pan and cool completely on a rack.

Friday, August 14, 2009

Eatwell Recipe 26: Tomato, Sweet Corn & Basil Salad

This dish is a trifecta of tastiness. It melds three of the very best flavors of summer--juicy tomatoes, crunchy, sweet corn, and fragrant basil. There's not a whole lot more to it than that but the combination is sheer magic.
Close up of sweet corn by Eve Fox, Garden of Eating blog
Credit for this salad goes to my mom-in-law, Liz. This is a great side dish to go with grilled meat or fish. It would also taste great tossed with some fresh pasta, grated parmesan cheese and a little arugala to add some peppery bite.
Tomato, sweet corn and basil salad by Eve Fox, Garden of Eating blog
Tomato, Sweet Corn & Basil Salad
Serves 4-6

Ingredients

* 3 ears of sweet corn
* 2 large, ripe tomatoes (I recommend using an heirloom variety because they have the best flavor)
* 1 shallot or very small onion
* A large handful of fresh basil
* 3 Tbsps olive oil
* 2 Tbsps sherry vinegar
* Sea salt
* Freshly ground black pepper

Directions

1. Bring a pot of water to boil while you shuck the ears of corn. Drop the ears in the boiling water and cook for 8-10 minutes then remove and run under cold water to stop the cooking process.

2. Wash and chop the tomatoes into 1/2-inch cubes. Peel the shallot and mince it finely. Wash and dry the basil and chop it coarsely. Once the corn has cooled down enough to handle comfortably, cut the kernels off each cob and tease them apart by your fingers then place them in a small to medium-sized bowl, along with the tomatoes.

3. Mix the olive oil, sherry vinegar, shallot, basil, and some salt and pepper to taste then pour it over the tomatoes and corn. Stir gently to make sure everything is well coated with the dressing before serving.

A few other recipes you might like:

Like this recipe? Click here to browse through more Eatwell Recipes.
The Eatwell Project: a year of seasonal recipes -- logo by Eve Fox