Easy Apple Cheddar Tart With Caramelized Onions & Pine Nuts

Saturday, September 29, 2012

Oh, hallo there, Fall. You bittersweet time of year with your clear blue skies, brisk breezes, dancing sunshine, leaves of crimson, amber, and gold. So beautiful, crisp and cozy and so undeniably the last gasp before Winter sets in... Have I mentioned that I do not care for the cold?

But you do bring the most delectable apples, and my feelings about them, at least, are entirely positive.

Apples on our neighbors' tree

Here's a super simple, easy way of enjoying the season's apples that is a sure crowd pleaser and picky-eater teaser and looks really fancy and involved.

Apple Cheddar Tart With Caramelized Onions & Pinenuts by Eve Fox, Garden of Eating blog, copyright 2012

The secret is to use frozen puff pastry dough. Of course, you can make your own pastry dough if you've got time to kill and two hands free at the same time (not so here these days)and it's possible that it might taste even better but I can't offer you any guarantees on that.

Dufour's puff pastry dough by Eve Fox, Garden of Eating blog, copyright 2012

I've had great results with DuFour's puff pastry. And apparently, it's some of the best money can buy... but I think it'd be tasty with any puff pastry -- there's a lot of butter in puff pastry so it is inherently yummy, no matter what brand you use. Just don't forget to leave time for it to defrost (a mistake I've definitely made...)

Dufour's puff pastry dough by Eve Fox, Garden of Eating blog, copyright 2012

Use a crisp, sweet-tart apple - Macoun, Mutsu, Cortland, Northern Spy, Granny Smith - there are a million good varieties available at this time of year, at least there are here in New York, the apple bin of the country.

Oregano, apples, caramelized onions, cheddar cheese & pine nuts by Eve Fox, Garden of Eating blog, copyright 2012

Do not skimp on the onions as they provide such delicious sweet flavor. And I am always amazed by the degree to which they reduce during the caramelization... Lotsa fresh herbs give it a pleasant hint of freshness amidst all that wonderfully melty cheese and buttery pastry.

Apple cheddar tart with caramelized onions and pine nuts headed into the oven by Eve Fox, Garden of Eating blog, copyright 2012

Pine nuts provide some hearty crunch and a lovely toasted flavor while you chew. And salt and pepper do their part by bringing the whole flavor combo up yet another notch.

Apple cheddar tart with caramelized onions and pine nuts by Eve Fox, Garden of Eating blog, copyright 2012

Enjoy!

Easy Apple Cheddar Tart With Caramelized Onions & Pine Nuts
Makes one tart

Ingredients

* 1 sheet puff pastry, defrosted
* 2 medium or 1 large apple, cored and sliced (not too thick - you want to avoid too much weight or liquid as it will make the pastry soggy)
* 2-3 branches fresh thyme, chopped
* Handful of fresh basil and/or oregano, chopped
* 1 cup grated cheddar cheese (you could also use goat or gruyère cheese)
* 1 large onion, sliced
* Extra-virgin olive oil
* Freshly ground black pepper
* Sea salt
* Handful of pine nuts

Directions

1. Preheat the oven to 375 degrees F. While you're waiting for the pastry to defrost, sautée the onions in a frying pan in olive oil until translucent.

2. Lay the sheet of puff pastry out on a parchment paper-lined baking sheet. Prick the dough inside the border all over with the tines of a fork to prevent it from puffing up too much during baking.

3. Spread a layer of cheddar (or whichever cheese you choose) on the pastry. Top with the onions, then arrange the apple slices on the pastry in a single layer (crowding or overlapping them could make the puff pastry soggy). Scatter the fresh herbs and pine nuts over the apples. Drizzle the tart with some olive oil and season with salt and pepper. If using gruyère, reserve a little cheese to sprinkle over the top.

4. Bake the tart until the pastry is crisp and deeply browned on the bottom and around the edges, 30-40 minutes. 

Serves 4-6 as an appetizer or 2-3 as a main course.

You might also like:
Want even more recipes, photos, giveaways, and food-related inspiration? "Like" the Garden of Eating on Facebook, or follow me on Twitter or Pinterest.

Tomato Sauce with Onion & Butter from Marcella Hazan

Saturday, September 22, 2012

I finally jumped on the foodie bandwagon and made this tomato sauce everyone has been raving about for the past couple years. First Deb, then Jaden, then Francis, then Elise -- I figured there had to be something to it...

Tomato Sauce With Butter & Onion by Eve Fox, Garden of Eating blog, copyright 2012

Our new addition does not make cooking easy but this recipe looked just simple enough to attempt between dealing with the two kids in the fuzzy haze of sleep deprivation.

All the ingredients for the tomato sauce by Eve Fox, Garden of Eating blog, copyright 2012

The only change I made was to substitute the last tomatoes from our garden and the ones we received in our CSA pick-up this week for the canned San Marzano's that Marcella's recipe calls for. Fresh is almost always a million times tastier than canned or bottled.

End of season tomatoes by Eve Fox, Garden of Eating blog, copyright 2012

Since I was using fresh tomatoes, I blanched them, cooled them in ice water and peeled them. However, if I am in a hurry, I sometimes skip this step - what's a few tomato skins among friends, right?

Cooling the blanched tomatoes by Eve Fox, Garden of Eating blog, copyright 2012

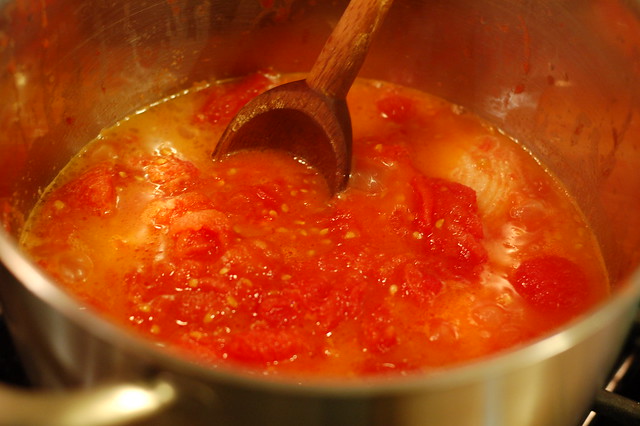
Then peeled and halved the onion, sliced the butter and combined it all in the pot. Simmered for 45 minutes, stirring regularly and crushing the tomatoes against the side of the pot.

Simmering the tomato sauce with butter and onion by Eve Fox, Garden of Eating blog, copyright 2012

Removed the onion, gave it a few licks with the old immersion blender and salted it to taste.

I admit it went against the grain to use butter instead of olive oil but it makes the sauce so rich and smooth and well, buttery, that I have no regrets at all. And I also questioned the removal of the onion but decided just to follow the recipe and was pleased with the end result - a delicate, rich, fresh tasting sauce.

Tomato Sauce With Butter & Onion by Eve Fox, Garden of Eating blog, copyright 2012

Simple, delicious, comfort food. And a perfect way to use up some end-of-the-season tomatoes, too. Directions below are for the canned tomatoes - but just blanch and peel if you're using fresh ones.

Tomato Sauce With Butter & Onion by Eve Fox, Garden of Eating blog, copyright 2012

-- print recipe --
Tomato Sauce With Onion & Butter
Adapted from Marcella Hazan's Essentials of Classic Italian Cooking
Serves 4 as a main course

Ingredients

* 28 ounces (800 grams) whole peeled tomatoes
* 5 Tbsps (70 grams) unsalted butter
* 1 medium yellow onion, peeled and halved
* Sea salt to taste

Directions

1. Place all the ingredients in a heavy saucepan over medium heat. Bring the sauce to a simmer then lower the heat to keep the sauce at a slow, steady simmer for about 45 minutes. Stir occasionally, crushing the tomatoes against the side of the pot with a wooden spoon.

2. Remove from heat, discard the onion, blend to desire consistency (or not at all if you like your sauce really chunky), and salt to taste.

3. Serve warm over good pasta with grated Parmesan.

You might also like:
For more delicious recipes, gardening ideas, foraging tips, and food-related inspiration "like" the Garden of Eating on Facebook, or follow me on Twitter and Pinterest.

Red Pepper Jam (It's Amazingly Good)

Saturday, September 15, 2012

I was introduced to this crack-like substance by my husband's Aunt Maggie who gave us a half-pint jar she'd made from her own small stash during our Thanksgiving canned goods swap last fall. It collided with a log of fresh goat cheese and some herb-covered crackers and lasted all of half an hour.

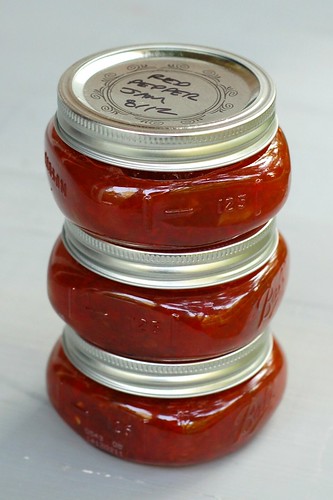
Red pepper jam by Eve Fox, Garden of Eating blog, copyright 2012

This stuff is seriously delicious. It's amazingly tasty with cream cheese and lox on a bagel, as a spread on a salami sandwich, with goat cheese and crackers, or lots of other ways.

The good news is that it is not very hard to make (whether or not you end up canning it.) But you really need to make it now before sweet pepper season ends. You do not have to use red peppers though the color of the jam will be prettier if you do. So go buy a boatload of sweet peppers (or harvest your own if you've got 'em). Then get jamming.

Red peppers by Eve Fox, Garden of Eating blog, copyright 2011

The steps are pretty simple - you blend or cuisinart (yes, I use that as a verb) the peppers, then salt and let drain for a few hours.

Draining the salted pepper mixture by Eve Fox, Garden of Eating blog, copyright 2012

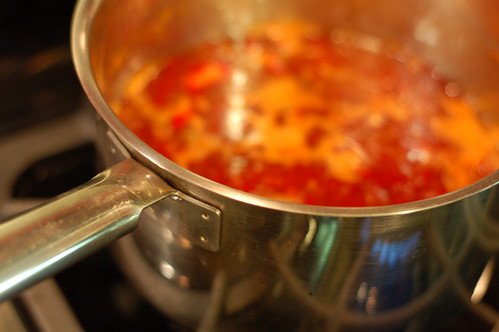
Then add sugar and vinegar and simmer down to a thick, jammy consistency.

Simmering the red pepper jam by Eve Fox, Garden of Eating blog, copyright 2012

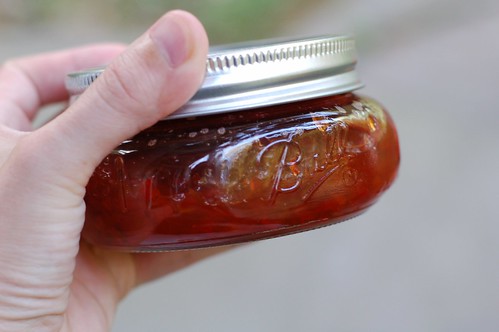
Then can it (or if you prefer to make a really small batch, just store it in an airtight container once it's cooled down.) But I suggest you make enough to can at least a few jars - once you've tasted this stuff, you're going to want them. They also make great gifts.

Red pepper jam by Eve Fox, Garden of Eating blog, copyright 2012

Red Pepper Jam
Makes roughly 2 pints (or 4 half-pints)

Ingredients

* 12-15 large, sweet red peppers, rinsed and with the stems, ribs and seeds removed
* 2 cups apple cider or white vinegar (I used apple cider)
* 3 cups sugar
* 2 Tbsps salt

Directions

1. Chop or blend the peppers in a Cuisinart or blender. Remove to a bowl, sprinkle the chopped peppers with the salt and let stand for 3 to 4 hours then drain.

2. Place the peppers in a pot, add the sugar and vinegar and simmer gently until thick and jammy, about 40 minutes to one hour.

3. If you plan to can any of this delicious stuff, use this time while the jam is simmering to sterilize your canning jars and lids and get your canner pot ready to go. If you don't want to preserve any, just kick back.

4. Once the jam has reached the desired consistency (it should thicken a little when it cools, mind you), if you're canning, ladle the jam into the sterilized jars, wipe the rims clean of any drips, apply the sterilized lids and bands and process in a boiling water bath for 15 minutes. Let cool in a draft-free place then test the seals. If good, you can store for up to a year. Any that have not sealed properly should go into the fridge and get used within a week or two. If you're not canning it, let it cool a bit, then pour it into an airtight container and store in the fridge for up to two weeks.

Not feeling totally confident about canning yet? Check out my page of canning directions and resources with links to my favorite recipes, cookbooks and canning and preserving web sites.

You might also like:
Want even more recipes, photos, giveaways, and food-related inspiration? "Like" the Garden of Eating on Facebook, or follow me on Twitter or Pinterest.
What I've Been Cooking For The Past 9 Months

Saturday, September 8, 2012

I'm so pleased to announce the entry into the world of our wonderful new little boy, James. He was born on September 6th after 9 long months in the maternal oven. Now we've got a set of two terrific boys.

And he already loves to eat!


I probably won't be posting quite so often for a time but I have lined up a few yummy things for you all that I prepared before sweet baby James arrived.

Whole Peeled Tomatoes In Jars - The Basis For So Many Things...

Thursday, September 6, 2012

One of the hardest things for me about winter is the lack of good tomatoes. Despite the insanely globalized, fossil-fuel-driven world we live in, it is just not possible to get good-tasting tomatoes in the winter time (nor should it be.) As a result, I've come to view home-canned tomatoes, preserved at the height of their flavor and freshness, as jars of liquid gold.

Tomatoes, dry farmed

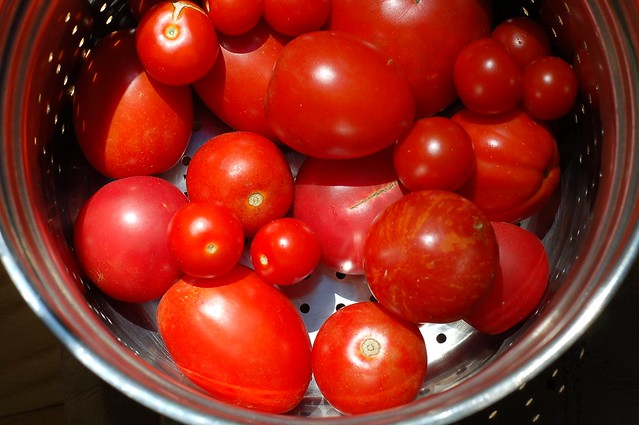
So I reached out to Ben, the head of our CSA, Hearty Roots Community Farm, to ask if we could buy some tomatoes in bulk. He was amenable so, last week, we picked up 20 lbs of lovelies along with our regular CSA share. This turned out to be both cheaper and easier than buying them from a farm stand although that would be a good alternative.

20 lbs of tomatoes by Eve Fox, Garden of Eating blog, copyright 2012

Had I not been 39 weeks pregnant at the time, I'd have bought significantly more tomatoes but my husband had witnessed the unfortunate physical spectacle that results from me standing at a counter or sink for any length of time in some other recent canning endeavors and he very wisely insisted on shrinking the size of my order (I'd been planning to do at least 50-75 lbs but there's always next year. Or the year after...)

Tomatoes by Eve Fox, Garden of Eating blog, copyright 2012

Given the limitations on my energy/endurance at this point, we ended up going with these simpler whole, peeled tomatoes both because they're such a wonderful basic ingredient from which to build and also because, perhaps more importantly, they do not require cooking, blending or chopping.

Tomatoes are cored and scored with an "X" by Eve Fox, Garden of Eating blog, copyright 2012

Yes, you do have to remove the cores and cut an "X" in the bottom.

Pile of tomato cores by Eve Fox, Garden of Eating blog, copyright 2012

And you do have to blanch and peel them but that is all relatively easy.

Peeled tomatoes by Eve Fox, Garden of Eating blog, copyright 2012

Plus, I found the skins floating in the sink surprisingly beautiful.

Tomato skins in the sink - very pretty by Eve Fox, Garden of Eating blog, copyright 2012

Then you just stuff them into the sterilized jars along with some lemon juice to make them acidic enough not to let any botulin spores flourish in the jars while you're getting around to using them.

Wiping the jar rims by Eve Fox, Garden of Eating blog, copyright 2012

Then process, remove, let cool and store!

Packed jars of tomatoes by Eve Fox, Garden of Eating blog, copyright 2012

Here's a shot of one of our pantry shelves -- from left to right we have: canned tomatoes, tomato jam, and salsa. And there are several bags of roasted tomatoes chilling in the chest freezer, too. Woot!

Canned tomatoes, tomato jam, and salsa line the pantry shelves by Eve Fox, Garden of Eating blog, copyright 2012

Whole Peeled Tomatoes
Makes 4 Quarts

Ingredients

* 10 lbs tomatoes, (ideally, use Roma or paste tomatoes as these varities are higher on flesh and lower on liquid and seeds, making them an ideal canning tomato - but you can use any kind, of course)
* 1/2 cup bottled lemon juice (divided)

Directions

1. Prepare a boiling water bath and 4 wide or regular mouth (I like the wide ones) 1 quart jars (or 8 pint jars). Place the lids in a small saucepan, cover with water and simmer over low heat.

2. Bring a large pot of water to a boil. While it heats, core the tomatoes and score the bottom of each one with a wide X. Once you've prepped all the tomatoes and your water is boiling, prepare a large ice water bath either in your sink or in a large pot or bowl (you'll need this cold water to stop the cooking after you blanch the tomatoes.)

3. Working in batches, add the tomatoes to the boiling water and cook for 1-2 minutes then transfer to the ice water to cool. Once they've cooled, remove them from the cold water bath and repeat with the remaining tomatoes, making sure to let the boiling water return to a boil and replenishing the ice water with more ice to keep it really cold in between batches, otherwise, you'll end up having a whole lot more trouble peeling the skins off the tomatoes.

4. Once the blanched tomatoes are cool enough to touch, peel the skins off them with your fingers - it should slip right off.

5. Bring a kettle of water to a boil - this will be used if you end up needing to add more liquid to any of the jars (which you may not.)

6. Remove your sterilized jars from the canning pot and line them up on the counter where you plan to pack your jars. Add 2 Tbsps of lemon juice to the bottom of each jar. Then pack the tomatoes into the jars - if they don't release enough liquid during this process to cover them, add some of the boiling water to cover them. You want to leave 1/2 inch of headspace in each jar.

7. Gently tap the jars on the counter and then use a knife or bamboo skewer or chopstick to remove any air bubbles you see in the jars. Check your headspace and add more boiling water if needed.

8. Wipe the rims, apply the lids and bands and process in a boiling water canning bath for 45 minutes. Remove the jars from the canner, let cool, then test the seals. Any that are properly sealed should keep in a cool, dark place for up to a year. Any that have not sealed properly should go into the fridge and get used within a week or so.

Not feeling totally confident about canning yet? Check out my page of canning directions and resources with links to my favorite recipes, cookbooks and canning and preserving web sites.

You might also like:
Want even more recipes, photos, giveaways, and food-related inspiration? "Like" the Garden of Eating on Facebook, or follow me on Twitter or Pinterest.

Saturday, September 29, 2012

Easy Apple Cheddar Tart With Caramelized Onions & Pine Nuts

Oh, hallo there, Fall. You bittersweet time of year with your clear blue skies, brisk breezes, dancing sunshine, leaves of crimson, amber, and gold. So beautiful, crisp and cozy and so undeniably the last gasp before Winter sets in... Have I mentioned that I do not care for the cold?

But you do bring the most delectable apples, and my feelings about them, at least, are entirely positive.

Apples on our neighbors' tree

Here's a super simple, easy way of enjoying the season's apples that is a sure crowd pleaser and picky-eater teaser and looks really fancy and involved.

Apple Cheddar Tart With Caramelized Onions & Pinenuts by Eve Fox, Garden of Eating blog, copyright 2012

The secret is to use frozen puff pastry dough. Of course, you can make your own pastry dough if you've got time to kill and two hands free at the same time (not so here these days)and it's possible that it might taste even better but I can't offer you any guarantees on that.

Dufour's puff pastry dough by Eve Fox, Garden of Eating blog, copyright 2012

I've had great results with DuFour's puff pastry. And apparently, it's some of the best money can buy... but I think it'd be tasty with any puff pastry -- there's a lot of butter in puff pastry so it is inherently yummy, no matter what brand you use. Just don't forget to leave time for it to defrost (a mistake I've definitely made...)

Dufour's puff pastry dough by Eve Fox, Garden of Eating blog, copyright 2012

Use a crisp, sweet-tart apple - Macoun, Mutsu, Cortland, Northern Spy, Granny Smith - there are a million good varieties available at this time of year, at least there are here in New York, the apple bin of the country.

Oregano, apples, caramelized onions, cheddar cheese & pine nuts by Eve Fox, Garden of Eating blog, copyright 2012

Do not skimp on the onions as they provide such delicious sweet flavor. And I am always amazed by the degree to which they reduce during the caramelization... Lotsa fresh herbs give it a pleasant hint of freshness amidst all that wonderfully melty cheese and buttery pastry.

Apple cheddar tart with caramelized onions and pine nuts headed into the oven by Eve Fox, Garden of Eating blog, copyright 2012

Pine nuts provide some hearty crunch and a lovely toasted flavor while you chew. And salt and pepper do their part by bringing the whole flavor combo up yet another notch.

Apple cheddar tart with caramelized onions and pine nuts by Eve Fox, Garden of Eating blog, copyright 2012

Enjoy!

Easy Apple Cheddar Tart With Caramelized Onions & Pine Nuts
Makes one tart

Ingredients

* 1 sheet puff pastry, defrosted
* 2 medium or 1 large apple, cored and sliced (not too thick - you want to avoid too much weight or liquid as it will make the pastry soggy)
* 2-3 branches fresh thyme, chopped
* Handful of fresh basil and/or oregano, chopped
* 1 cup grated cheddar cheese (you could also use goat or gruyère cheese)
* 1 large onion, sliced
* Extra-virgin olive oil
* Freshly ground black pepper
* Sea salt
* Handful of pine nuts

Directions

1. Preheat the oven to 375 degrees F. While you're waiting for the pastry to defrost, sautée the onions in a frying pan in olive oil until translucent.

2. Lay the sheet of puff pastry out on a parchment paper-lined baking sheet. Prick the dough inside the border all over with the tines of a fork to prevent it from puffing up too much during baking.

3. Spread a layer of cheddar (or whichever cheese you choose) on the pastry. Top with the onions, then arrange the apple slices on the pastry in a single layer (crowding or overlapping them could make the puff pastry soggy). Scatter the fresh herbs and pine nuts over the apples. Drizzle the tart with some olive oil and season with salt and pepper. If using gruyère, reserve a little cheese to sprinkle over the top.

4. Bake the tart until the pastry is crisp and deeply browned on the bottom and around the edges, 30-40 minutes. 

Serves 4-6 as an appetizer or 2-3 as a main course.

You might also like:
Want even more recipes, photos, giveaways, and food-related inspiration? "Like" the Garden of Eating on Facebook, or follow me on Twitter or Pinterest.
Saturday, September 22, 2012

Tomato Sauce with Onion & Butter from Marcella Hazan

I finally jumped on the foodie bandwagon and made this tomato sauce everyone has been raving about for the past couple years. First Deb, then Jaden, then Francis, then Elise -- I figured there had to be something to it...

Tomato Sauce With Butter & Onion by Eve Fox, Garden of Eating blog, copyright 2012

Our new addition does not make cooking easy but this recipe looked just simple enough to attempt between dealing with the two kids in the fuzzy haze of sleep deprivation.

All the ingredients for the tomato sauce by Eve Fox, Garden of Eating blog, copyright 2012

The only change I made was to substitute the last tomatoes from our garden and the ones we received in our CSA pick-up this week for the canned San Marzano's that Marcella's recipe calls for. Fresh is almost always a million times tastier than canned or bottled.

End of season tomatoes by Eve Fox, Garden of Eating blog, copyright 2012

Since I was using fresh tomatoes, I blanched them, cooled them in ice water and peeled them. However, if I am in a hurry, I sometimes skip this step - what's a few tomato skins among friends, right?

Cooling the blanched tomatoes by Eve Fox, Garden of Eating blog, copyright 2012

Then peeled and halved the onion, sliced the butter and combined it all in the pot. Simmered for 45 minutes, stirring regularly and crushing the tomatoes against the side of the pot.

Simmering the tomato sauce with butter and onion by Eve Fox, Garden of Eating blog, copyright 2012

Removed the onion, gave it a few licks with the old immersion blender and salted it to taste.

I admit it went against the grain to use butter instead of olive oil but it makes the sauce so rich and smooth and well, buttery, that I have no regrets at all. And I also questioned the removal of the onion but decided just to follow the recipe and was pleased with the end result - a delicate, rich, fresh tasting sauce.

Tomato Sauce With Butter & Onion by Eve Fox, Garden of Eating blog, copyright 2012

Simple, delicious, comfort food. And a perfect way to use up some end-of-the-season tomatoes, too. Directions below are for the canned tomatoes - but just blanch and peel if you're using fresh ones.

Tomato Sauce With Butter & Onion by Eve Fox, Garden of Eating blog, copyright 2012

-- print recipe --
Tomato Sauce With Onion & Butter
Adapted from Marcella Hazan's Essentials of Classic Italian Cooking
Serves 4 as a main course

Ingredients

* 28 ounces (800 grams) whole peeled tomatoes
* 5 Tbsps (70 grams) unsalted butter
* 1 medium yellow onion, peeled and halved
* Sea salt to taste

Directions

1. Place all the ingredients in a heavy saucepan over medium heat. Bring the sauce to a simmer then lower the heat to keep the sauce at a slow, steady simmer for about 45 minutes. Stir occasionally, crushing the tomatoes against the side of the pot with a wooden spoon.

2. Remove from heat, discard the onion, blend to desire consistency (or not at all if you like your sauce really chunky), and salt to taste.

3. Serve warm over good pasta with grated Parmesan.

You might also like:
For more delicious recipes, gardening ideas, foraging tips, and food-related inspiration "like" the Garden of Eating on Facebook, or follow me on Twitter and Pinterest.

Saturday, September 15, 2012

Red Pepper Jam (It's Amazingly Good)

I was introduced to this crack-like substance by my husband's Aunt Maggie who gave us a half-pint jar she'd made from her own small stash during our Thanksgiving canned goods swap last fall. It collided with a log of fresh goat cheese and some herb-covered crackers and lasted all of half an hour.

Red pepper jam by Eve Fox, Garden of Eating blog, copyright 2012

This stuff is seriously delicious. It's amazingly tasty with cream cheese and lox on a bagel, as a spread on a salami sandwich, with goat cheese and crackers, or lots of other ways.

The good news is that it is not very hard to make (whether or not you end up canning it.) But you really need to make it now before sweet pepper season ends. You do not have to use red peppers though the color of the jam will be prettier if you do. So go buy a boatload of sweet peppers (or harvest your own if you've got 'em). Then get jamming.

Red peppers by Eve Fox, Garden of Eating blog, copyright 2011

The steps are pretty simple - you blend or cuisinart (yes, I use that as a verb) the peppers, then salt and let drain for a few hours.

Draining the salted pepper mixture by Eve Fox, Garden of Eating blog, copyright 2012

Then add sugar and vinegar and simmer down to a thick, jammy consistency.

Simmering the red pepper jam by Eve Fox, Garden of Eating blog, copyright 2012

Then can it (or if you prefer to make a really small batch, just store it in an airtight container once it's cooled down.) But I suggest you make enough to can at least a few jars - once you've tasted this stuff, you're going to want them. They also make great gifts.

Red pepper jam by Eve Fox, Garden of Eating blog, copyright 2012

Red Pepper Jam
Makes roughly 2 pints (or 4 half-pints)

Ingredients

* 12-15 large, sweet red peppers, rinsed and with the stems, ribs and seeds removed
* 2 cups apple cider or white vinegar (I used apple cider)
* 3 cups sugar
* 2 Tbsps salt

Directions

1. Chop or blend the peppers in a Cuisinart or blender. Remove to a bowl, sprinkle the chopped peppers with the salt and let stand for 3 to 4 hours then drain.

2. Place the peppers in a pot, add the sugar and vinegar and simmer gently until thick and jammy, about 40 minutes to one hour.

3. If you plan to can any of this delicious stuff, use this time while the jam is simmering to sterilize your canning jars and lids and get your canner pot ready to go. If you don't want to preserve any, just kick back.

4. Once the jam has reached the desired consistency (it should thicken a little when it cools, mind you), if you're canning, ladle the jam into the sterilized jars, wipe the rims clean of any drips, apply the sterilized lids and bands and process in a boiling water bath for 15 minutes. Let cool in a draft-free place then test the seals. If good, you can store for up to a year. Any that have not sealed properly should go into the fridge and get used within a week or two. If you're not canning it, let it cool a bit, then pour it into an airtight container and store in the fridge for up to two weeks.

Not feeling totally confident about canning yet? Check out my page of canning directions and resources with links to my favorite recipes, cookbooks and canning and preserving web sites.

You might also like:
Want even more recipes, photos, giveaways, and food-related inspiration? "Like" the Garden of Eating on Facebook, or follow me on Twitter or Pinterest.
Saturday, September 8, 2012

What I've Been Cooking For The Past 9 Months

I'm so pleased to announce the entry into the world of our wonderful new little boy, James. He was born on September 6th after 9 long months in the maternal oven. Now we've got a set of two terrific boys.

And he already loves to eat!


I probably won't be posting quite so often for a time but I have lined up a few yummy things for you all that I prepared before sweet baby James arrived.

Thursday, September 6, 2012

Whole Peeled Tomatoes In Jars - The Basis For So Many Things...

One of the hardest things for me about winter is the lack of good tomatoes. Despite the insanely globalized, fossil-fuel-driven world we live in, it is just not possible to get good-tasting tomatoes in the winter time (nor should it be.) As a result, I've come to view home-canned tomatoes, preserved at the height of their flavor and freshness, as jars of liquid gold.

Tomatoes, dry farmed

So I reached out to Ben, the head of our CSA, Hearty Roots Community Farm, to ask if we could buy some tomatoes in bulk. He was amenable so, last week, we picked up 20 lbs of lovelies along with our regular CSA share. This turned out to be both cheaper and easier than buying them from a farm stand although that would be a good alternative.

20 lbs of tomatoes by Eve Fox, Garden of Eating blog, copyright 2012

Had I not been 39 weeks pregnant at the time, I'd have bought significantly more tomatoes but my husband had witnessed the unfortunate physical spectacle that results from me standing at a counter or sink for any length of time in some other recent canning endeavors and he very wisely insisted on shrinking the size of my order (I'd been planning to do at least 50-75 lbs but there's always next year. Or the year after...)

Tomatoes by Eve Fox, Garden of Eating blog, copyright 2012

Given the limitations on my energy/endurance at this point, we ended up going with these simpler whole, peeled tomatoes both because they're such a wonderful basic ingredient from which to build and also because, perhaps more importantly, they do not require cooking, blending or chopping.

Tomatoes are cored and scored with an "X" by Eve Fox, Garden of Eating blog, copyright 2012

Yes, you do have to remove the cores and cut an "X" in the bottom.

Pile of tomato cores by Eve Fox, Garden of Eating blog, copyright 2012

And you do have to blanch and peel them but that is all relatively easy.

Peeled tomatoes by Eve Fox, Garden of Eating blog, copyright 2012

Plus, I found the skins floating in the sink surprisingly beautiful.

Tomato skins in the sink - very pretty by Eve Fox, Garden of Eating blog, copyright 2012

Then you just stuff them into the sterilized jars along with some lemon juice to make them acidic enough not to let any botulin spores flourish in the jars while you're getting around to using them.

Wiping the jar rims by Eve Fox, Garden of Eating blog, copyright 2012

Then process, remove, let cool and store!

Packed jars of tomatoes by Eve Fox, Garden of Eating blog, copyright 2012

Here's a shot of one of our pantry shelves -- from left to right we have: canned tomatoes, tomato jam, and salsa. And there are several bags of roasted tomatoes chilling in the chest freezer, too. Woot!

Canned tomatoes, tomato jam, and salsa line the pantry shelves by Eve Fox, Garden of Eating blog, copyright 2012

Whole Peeled Tomatoes
Makes 4 Quarts

Ingredients

* 10 lbs tomatoes, (ideally, use Roma or paste tomatoes as these varities are higher on flesh and lower on liquid and seeds, making them an ideal canning tomato - but you can use any kind, of course)
* 1/2 cup bottled lemon juice (divided)

Directions

1. Prepare a boiling water bath and 4 wide or regular mouth (I like the wide ones) 1 quart jars (or 8 pint jars). Place the lids in a small saucepan, cover with water and simmer over low heat.

2. Bring a large pot of water to a boil. While it heats, core the tomatoes and score the bottom of each one with a wide X. Once you've prepped all the tomatoes and your water is boiling, prepare a large ice water bath either in your sink or in a large pot or bowl (you'll need this cold water to stop the cooking after you blanch the tomatoes.)

3. Working in batches, add the tomatoes to the boiling water and cook for 1-2 minutes then transfer to the ice water to cool. Once they've cooled, remove them from the cold water bath and repeat with the remaining tomatoes, making sure to let the boiling water return to a boil and replenishing the ice water with more ice to keep it really cold in between batches, otherwise, you'll end up having a whole lot more trouble peeling the skins off the tomatoes.

4. Once the blanched tomatoes are cool enough to touch, peel the skins off them with your fingers - it should slip right off.

5. Bring a kettle of water to a boil - this will be used if you end up needing to add more liquid to any of the jars (which you may not.)

6. Remove your sterilized jars from the canning pot and line them up on the counter where you plan to pack your jars. Add 2 Tbsps of lemon juice to the bottom of each jar. Then pack the tomatoes into the jars - if they don't release enough liquid during this process to cover them, add some of the boiling water to cover them. You want to leave 1/2 inch of headspace in each jar.

7. Gently tap the jars on the counter and then use a knife or bamboo skewer or chopstick to remove any air bubbles you see in the jars. Check your headspace and add more boiling water if needed.

8. Wipe the rims, apply the lids and bands and process in a boiling water canning bath for 45 minutes. Remove the jars from the canner, let cool, then test the seals. Any that are properly sealed should keep in a cool, dark place for up to a year. Any that have not sealed properly should go into the fridge and get used within a week or so.

Not feeling totally confident about canning yet? Check out my page of canning directions and resources with links to my favorite recipes, cookbooks and canning and preserving web sites.

You might also like:
Want even more recipes, photos, giveaways, and food-related inspiration? "Like" the Garden of Eating on Facebook, or follow me on Twitter or Pinterest.