Candied Butternut Squash: Eatwell Recipe 7

Friday, February 27, 2009

Our most recent produce box contained two butternut squashes. I hate to admit it, but my initial reaction was far from joyful. Although I love butternut squash, I've been feeling a little overwhelmed by all the squash we've been receiving and I had already used up all the recipe ideas I was really excited about.

Butternut squash half by Eve Fox, The Garden of Eating, copyright 2014

But then, inspiration struck! Why not candy them? You know, like the candied yams or sweet potatoes at a Thanksgiving dinner? This was appealing to me both because the flavor would be different from the way I'd been preparing them (in ravioli, in soup, etc.) and also because it did not sound like a lot of work to make (because I can be rather lazy.)

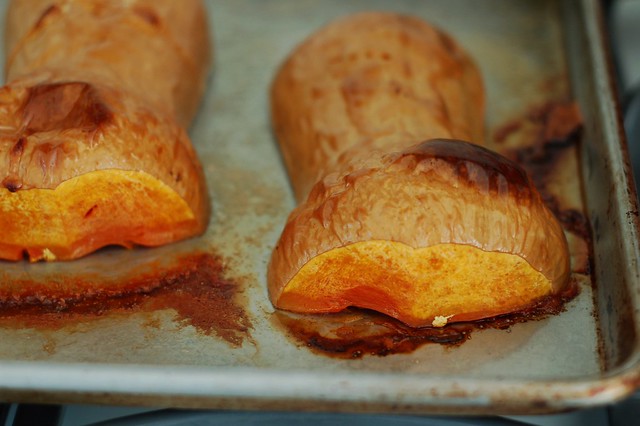
So I cut them up, brushed them with olive oil, and roasted them until soft.

Roasted butternut squash halves by Eve Fox, The Garden of Eating, copyright 2014

Just a note that handling raw butternut squash can cause a harmless kind of contact dermatitis - you may notice that your skin feels tight and dry afterwards (and your knife may have a whitish film on it that is a little hard to clean.) But it will go away in not too long.

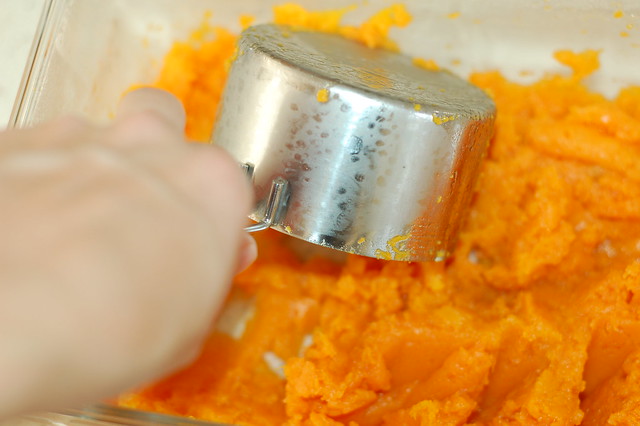
Once they'd roasted, I scooped out the flesh (now a soft, brilliant orange) and mixed it with all sorts of yummy things--butter, maple syrup, a little brown sugar, cinnamon and some cloves.

Scooping roasted butternut squash puree by Eve Fox, The Garden of Eating, copyright 2014

Although it looked a little yucky, it tasted delicious! I served it as part of a simple-sounding yet delicious meal of braised kale and herbed short grain brown rice that cooked in some chicken stock for extra flavor.

Candied Butternut Squash

Here's the basic recipe -- I have not included amounts below since they'll depend on how sweet or buttery you want the squash to be and also how much squash you end up using. Just taste and adjust as needed.

This would go nicely topped with some candied pecans.

-- print recipe --Candied Butternut Squash

Ingredients
* Butternut squash
* Butter (could substitute coconut oil if you're trying to avoid dairy, I suspect it would work well)
* Brown sugar and/or maple syrup
* Ground cinammon, cloves, nutmeg, mace (I'd go heaviest on the cinammon)
* Dash of heavy cream (optional)

Directions
1. Preheat the oven to 400 degrees. Cut the squash in half length-wise, scoop out the seeds and strings and brush the flesh lightly with olive oil. Lay the halves flesh-side down on a well-insulated cookie sheet and bake until softened, about 40-50 minutes, depending on the size of the squashes.

2. Remove from oven. When cool enough to touch, use a spoon to sscoop the flesh from the skin. Place in a bowl and mash well.

3. Mix in the butter (or coconut oil), brown sugar and/or maple syrup, and spices. If you have heavy cream on hand and are not opposed to dairy, throw a dash of that in, as well - it will make it richer and tastier. Combine well and taste. Adjust spices, sweetening, etc., to taste.

4. Dust with ground cinammon and serve plain or topped with candied pecans. You can easily make this ahead of time and reheat it.

You might also like:

The Eatwell Project: a year of seasonal recipes -- logo by Eve Fox

For more delicious recipes, gardening ideas, foraging tips, and food-related inspiration "like" the Garden of Eating on Facebook, or follow me on Twitter and Pinterest.

Grandma Fran's Apple Bundt Cake

Friday, February 20, 2009

Although my preference is always for chocolate desserts, lately I have been fantasizing about an apple bundt cake. I'd had this cake once when my husband and I were visiting his grandparents, Fran and Joe, in their spotless apartment on Manhattan's Upper East Side many years ago. I liked it so much that I'd asked his Grandma Fran for the recipe which I then jotted down in a little spiral-bound notebook I keep for just such occasions.

Grandma Fran's Apple Bundt Cake

Fran's cooking reminded me a lot of my own Grandma Mary's repertoire -- simple, nourishing and delicious. Perhaps this holds true for all Jewish women who were raised in Brooklyn during the Depression era? Regardless, you could tell that both of these ladies had been cooking for a long time -- I never experienced a single culinary failure in either of their small, immaculate kitchens.

Basket of apples bound for the press by Eve Fox, Garden of Eating blog, copyright 2010


Below is the simple recipe. I left out both the walnuts (my husband dislikes them) and the raisins (we both dislike them in baked goods) but feel free to add them in or not as you see fit. This is a very easy dessert--the most time-consuming piece is preparing the apples and even that is not bad at all. It also happens to be a completely dairy-free dessert if you are lactose-challenged.


Grandma Fran's Apple Bundt Cake

Fran's Apple Bundt Cake

Ingredients

* 2 cups flour plus a little more for the cake release
* 2 tsps baking soda
* 2 tsps baking powder
* 1/2 tsp cinnamon
* 1/2 tsp allspice
* 1/2 tsp nutmeg
* 1 1/2 cups sugar
* 4 free range, organic eggs
* 1 cup vegetable oil
* 3 large organic apples, peeled and cut into small pieces (1/2 inch or so)
* 1 tsp lemon zest (try to use an organic lemon)
* 1 tsp vanilla extract
* 1 cup walnuts, chopped (optional)
* handful of raisins or currants (optional)
* Little butter for greasing the bundt pan (you can use a cooking spray if you're trying to avoid lactose)

Directions

1. Preheat oven to 370. Sift dry ingredients together in a small bowl.

2. In a medium-sized mixing bowl, beat the eggs, and then add the oil, sugar, vanilla, apples, lemon zest, walnuts and raisins (if you're using raisins and nuts.) Mix well and then add the dry ingredients and blend thoroughly.

3. Butter the bundt pan thoroughly and evenly then pour in a few teaspoons of flour and roll the pan around over the sink to coat the surface evenly with the flour. Once it's well-coated with flour, turn the pan upside-down over the sink and rap the pan with your knuckles to remove any excess flour--this is called a "cake release" and will help prevent the cake from sticking to the pan once it's cooked.

4. Pour the batter into the pan and bake for 45-60 minutes or until tested done. To test for doneness, stick either a clean sharp knife or a bamboo skewer, etc., in--if it comes out clean, the cake is done, if any batter clings to it, it needs more time.

5. Let cool then remove from pan by turning upside down on a plate or platter and rapping it with your knuckles, hopefully it should slide right out onto the plate. Then dust the cake with either confectioners sugar or cinnamon sugar and serve. Goes nicely with some ice cream or whipped cream.


You might also like:

Butternut Squash Ravioli With Sage & Pinenuts

Saturday, February 14, 2009

Since we are in the thick of winter squash season I was not very surprised to see this beautiful butternut squash nestled in our most recent CSA box. But I was pleased.

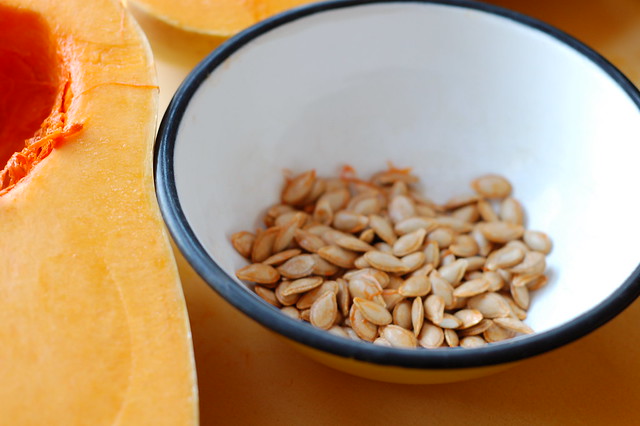
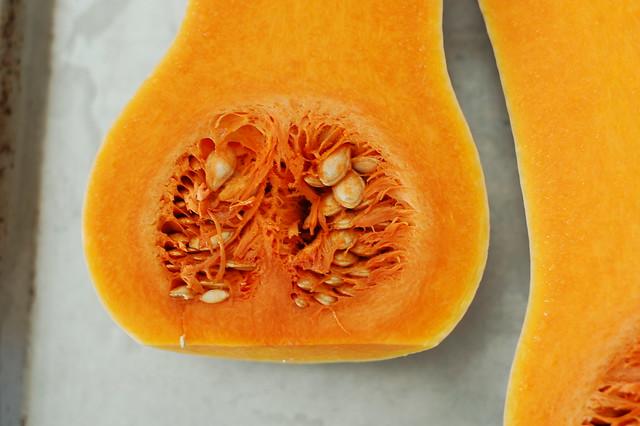
Butternut squash seeds by Eve Fox, Garden of Eating blog, copyright 2013

Butternut squash has a delicious-sounding name that is definitely earned by the sweet, slightly nutty flavor of its abundant bright yellow-orange flesh. Its thick skin makes it hearty enough to last quite a while - weeks or even months - after being picked. Since I knew I had some time before it would go bad, I pondered a few different recipe possibilities (soup, stuffed squash, roasted squash, etc.) for a while before I hit on my favorite idea -- ravioli!

I had made ravioli from scratch only once before after taking an excellent pasta-making class with my friend, Naushon, at Ramekins cooking school in Sonoma. Luckily for me, Naushon was eager to test out her skills since pasta-making is way more fun with two or more people. Best of all, she was also willing to host the pasta-making party at her place --the big, sunny, wooden farm table in her apartment is perfect for projects like this.

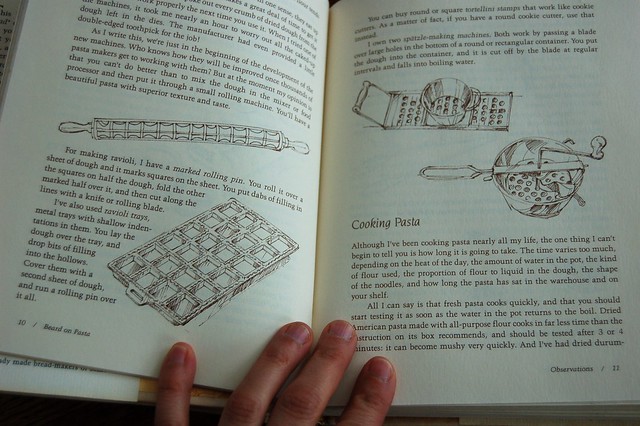
Reading from James Beard's wonderfully detailed and lovingly written Beard on Pasta cookbook by Eve Fox, the Garden of Eating, copyright 2015

Naushon and I sweated (literally) and laughed our way through the process of making the Basic Egg Pasta recipe from the wonderfully detailed, lovingly written and illustrated copy of Beard On Pasta my mom gave me a few years back. Several hours later, we feasted our eyes on the fruits of our labor--a double batch of homemade butternut squash ravioli.

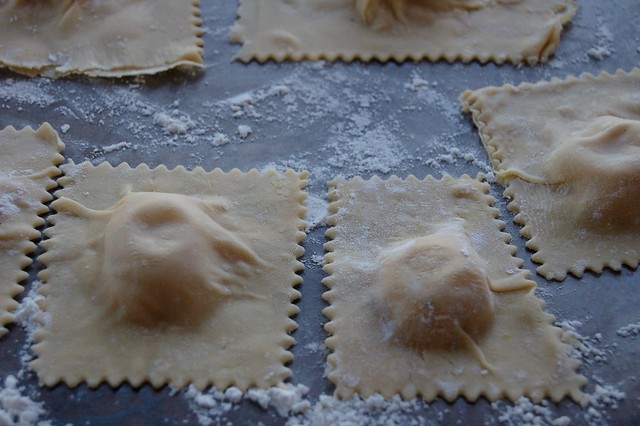
Butternut squash ravioli

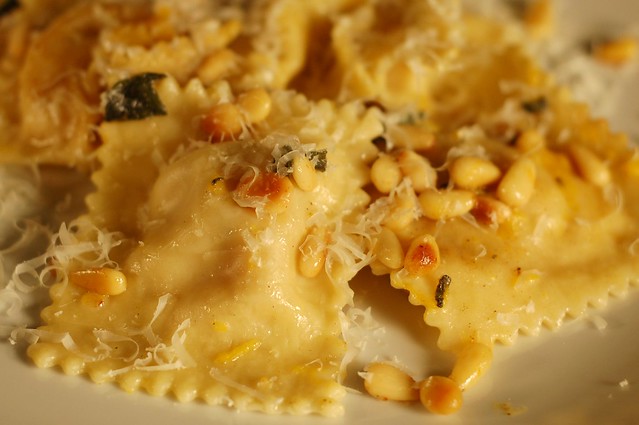
I chose a simple preparation for them -- a browned butter sauce with fresh sage, pine nuts and Parmesan.

Homemade Butternut Squash Ravioli With Browned Butter, Sage, and Pinenuts

While waiting for the pasta water to boil, I browned a handful of fresh sage leaves and pinenuts in butter and added sea salt and a few grinds of fresh black pepper. I cooked the ravioli in the boiling water for just a few minutes (fresh pasta takes only 4-10 minutes to cook at the very most) then tossed them in the browned butter, sage and pinenut sauce and served with freshly ground parmesan cheese. The result was deliziosa, squisita, magnifica!!! Definitely worth the work (thank you again, Naushon!)

In case you'd like to try, here is a little pictorial tutorial of the process. Following the pictorial are recipes for the filling and the pasta that include exact amounts for each ingredient and a list of the equipment you'll need. Buon appetito!

Making the Filling

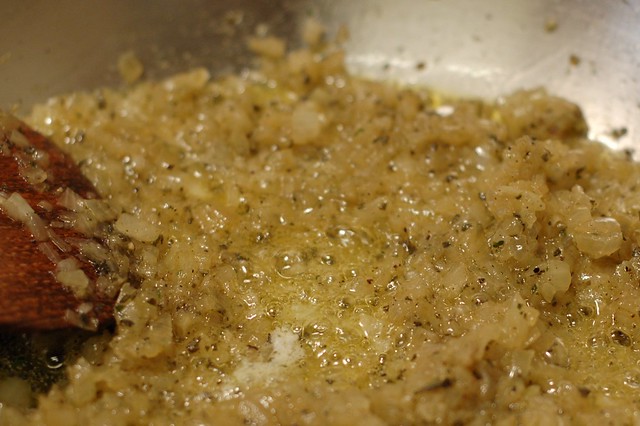
Preheat the oven to 375. Cut the squash in half length-wise and scoop out all the seeds and stringy bits. Rub the flesh with olive oil and place cut side down on a heavy cookie sheet. Roast for 30-40 minutes, until fully soft. While the squash is roasting, cut up the onion or shallot and sautee in olive oil or butter until translucent, stir in the crushed dried sage.

Shallots and sage sauteed in butter for the filling

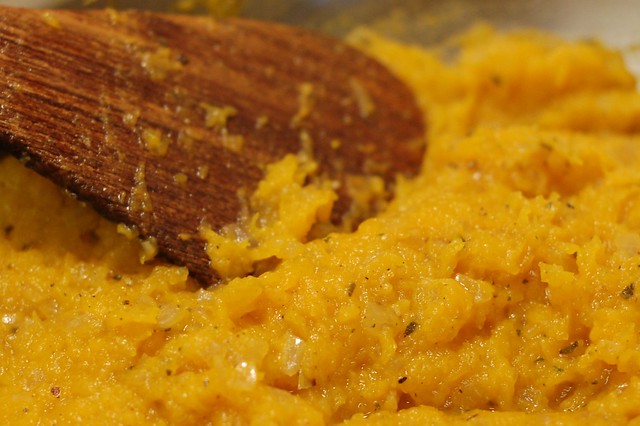
Once the squash is done and has cooled down enough to handle, scoop the flesh out of the skin and place in a bowl. Add the sauteed shallot or onion mixture, 1/2 cup of grated parmesan cheese (you could skip this if you want to make the ravioli dairy-free), and 1/2 tsp of nutmeg, stir well to combine, then season to taste with sea salt and black pepper.

After adding the roasted butternut squash to the filling mixture

I recommend doing this step one or more days in advance, just leave the filling well-covered in the fridge until you're ready to fill those little pasta pillows.

Making the Dough

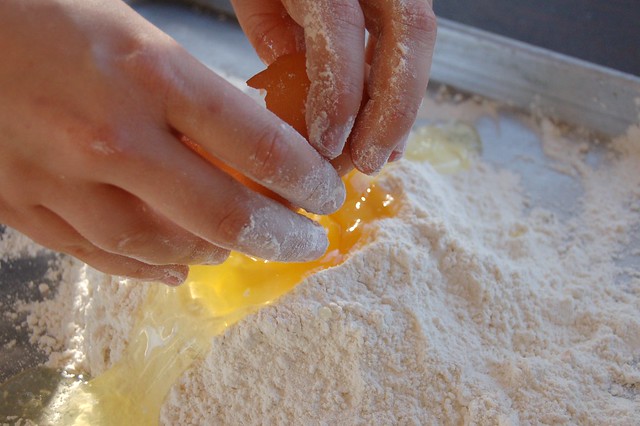
I like to mix the dough on cookie sheets as I have limited counter space and it's also much easier to clean a cookie sheet than it is to get egg and flour out of tile grout or wood. Start by pouring the flour onto the tray, gathering it into a pile, adding the salt, and forming a well in the middle of the flour. Crack the eggs into the well.

Breaking the last egg into the well

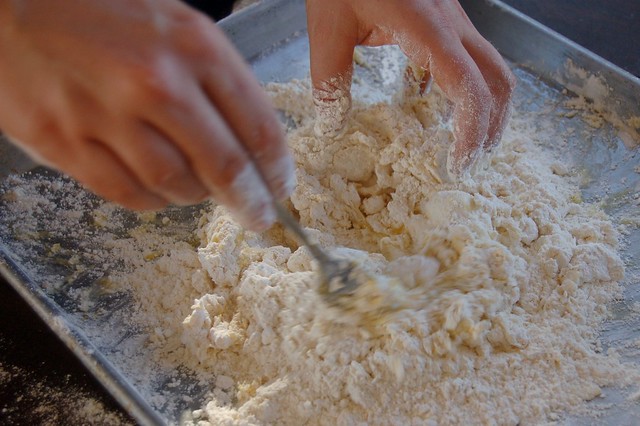
Incorporate the egg into the flour with a fork. Once the fork tines get clogged, clean them off and begin using your fingers to do the same thing until it's all mixed together, roughly. If you're having a lot of trouble with it (though remember that it should be stiff), you can add a little bit of either olive oil or water to help it stick together.

Mixing the dough together

Kneading the Dough

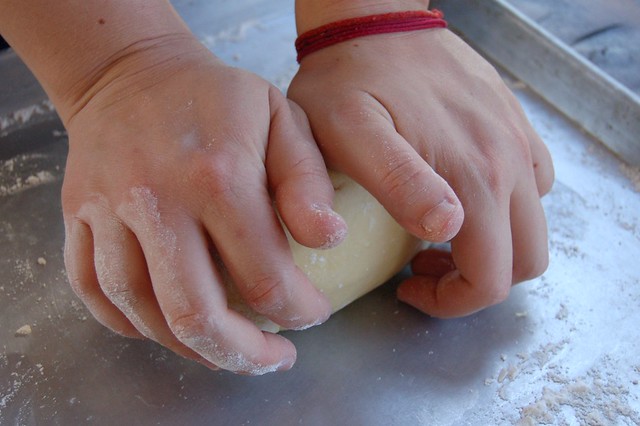
Once the dough begins to stick together, form it into a ball (it will seem to be composed of flakes of dough - that is normal). Now it is time to knead. Use the heel of your hand to push the dough away from you, then fold the flap back towards you and give it a quarter turn. Press down on another section of the dough and do the same thing. The dough will be stiff-textured (much more so than bread dough) and hard to work with. Knead it for 10 minutes (this is where the sweating comes in) or until the dough is smooth.

Kneading the dough

Letting the Dough Rest

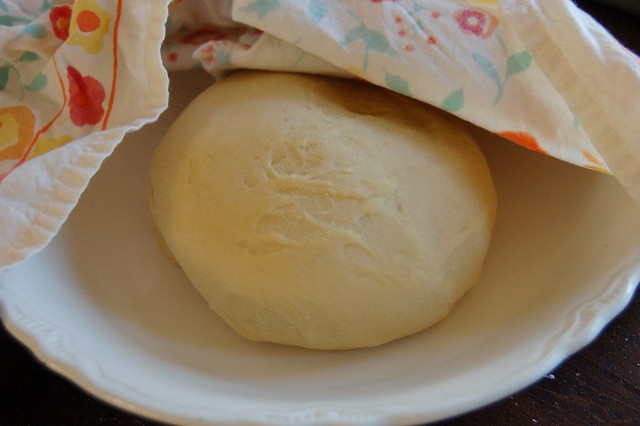
Then pat the dough into a neat ball, cover it with a dish towel or sheet of plastic wrap and let it rest for at least 30 minutes (1-2 hours is even better.) It may not sound important but you must not skip this step -- it's crucial! By this point, YOU will also probably need a little rest, as well as a chance to clean up a bit to get ready for the next step.

Pasta dough resting (a very important step)

Rolling Out the Dough

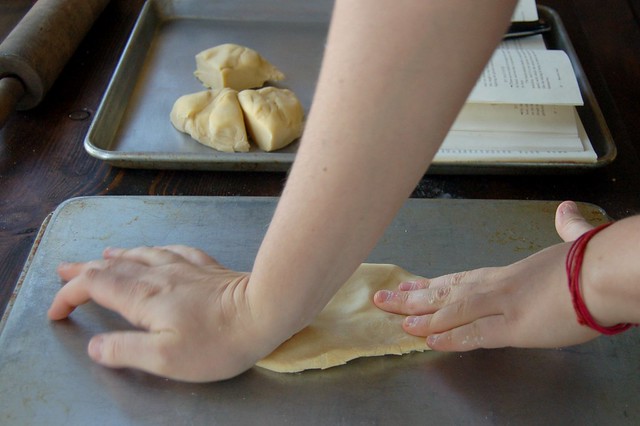
After the dough has rested long enough (it should be more pliant and easier to work with after its little nap), cut the ball of dough into four pieces. Put three back under the towel or plastic wrap so they don't dry out and flatten the fourth one with your palm or a rolling pin.

Flattening the dough enough to feed it into the pasta roller

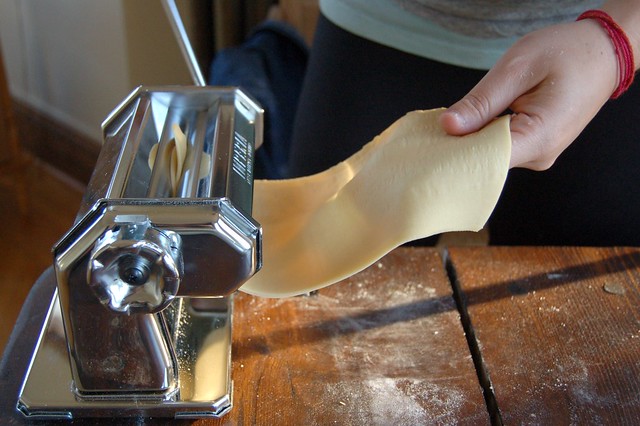
We used my beautiful, little Imperia pasta roller (a gift from my brother a couple of years ago) for the first time! Clamp the pasta rollerto the edge of a table and set the machine so that its rollers are at their widest setting. Feed the flattened ball of dough through the rollers a few times, folding it over each time before you push it through. This will help further knead and smooth the dough.

Cranking the dough through the rollers

Then begin to feed the dough through on successively narrower settings until you've reached your desired thickness (for ravioli, this will probably be the machine's smallest setting since you don't want the pasta to be too thick.)

The dough will get quite long and ribbonlike during this process. You may find that you need an extra set of hands to either "catch" the dough or to turn the crank while you catch it (though you can also do this by yourself, it's just a bit trickier.)
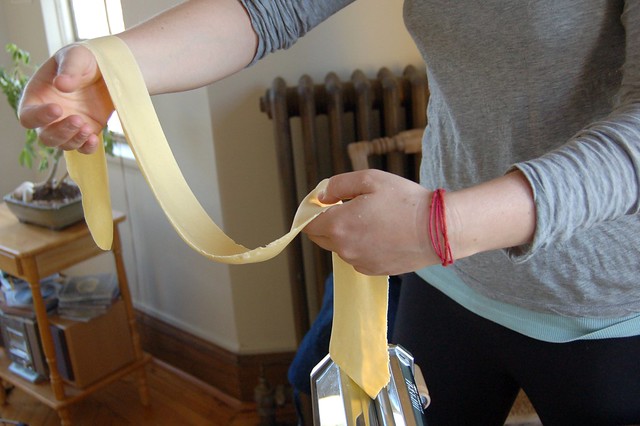
Putting the dough through a final time to flatten even more>

Don't freak out if the edges are rough or torn or if the dough is not perfect (it probably won't be). You can patch it or fold it over and put it through again to even it out. You will also end up trimming the edges once you're ready to cut the ravioli out so the edges need not be perfect.

Letting the Dough Rest, Again (Briefly)

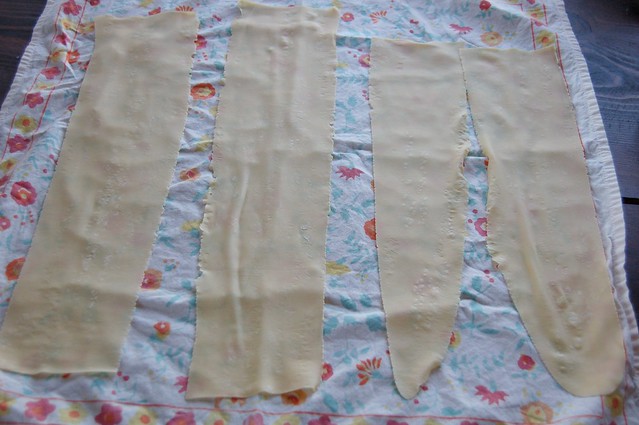
Lay the rolled out ribbon of dough on kitchen towels or on a floured (or semolina-ed) cookie sheet to rest for 5 minutes. Do not let it get too dry, though. You may also need to cut it into two or more pieces in order to fit it on a cookie sheet or towel at this point -- just make sure to match them up in size when you're making those cuts since you will very shortly be using one as the top of your ravioli and one as the bottom.

Flattened sheets of dough "resting"

Filling the Ravioli

Place your bowl of filling at a convenient spot and make sure you have a small spoon handy. Position your cookie sheet (which should be lightly covered with either flour or semolina to prevent the dough from sticking to it) in front of you and get to work. Lay two roughly equal-sized ribbons of rolled pasta dough on the sheet length-wise. If one is larger, make that one the bottom sheet.

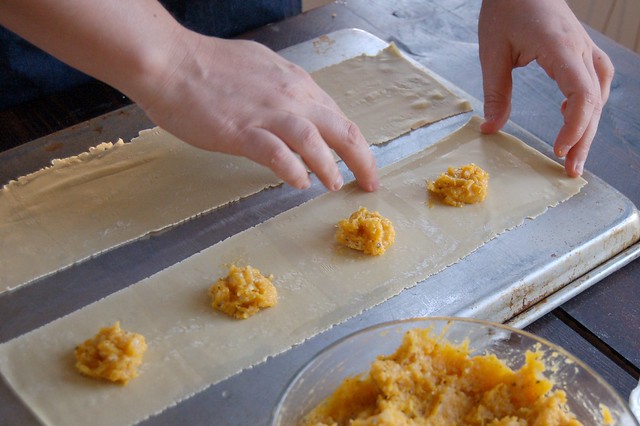
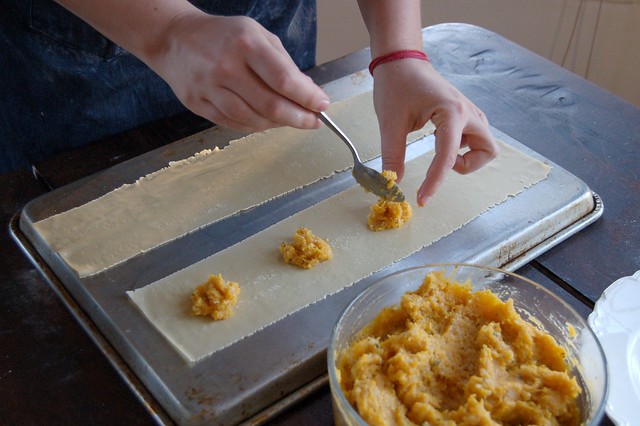
Dropping the filling

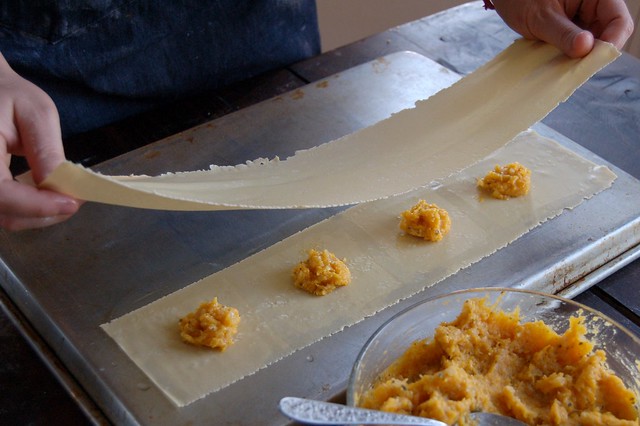
Using the spoon, place a dollop of filling at equally-spaced intervals along the bottom ribbon of dough. If the ribbon is tall enough, you should be able to fit two rows of filling on it, if not, just go for one. Be careful not to add too much filling or to place the dollops too close to each other or too close to the edge of the ribbon of dough since you will need adequate space to seal each one and then cut it apart from the others.

Sealing the Ravioli

Once your drops of filling are in place, dip either your finger or a pastry brush (I used my finger) into the bowl of water and wet a grid pattern around each dollop of filling. It is essential to wet the dough thoroughly (though you don't want puddles of water or to make it soggy) around each drop of filling as this is what will make the seal between the bottom and top pieces of dough. An incomplete seal will make a ravioli that is much more likely to explode in the pot while cooking.

Wetting the bottom sheet of dough with water

Once you've finished moistening the bottom ribbon of dough, lift the top piece of dough and position it over the bottom, taking care to match them up as well as you can.

Laying down the top sheet of pasta dough

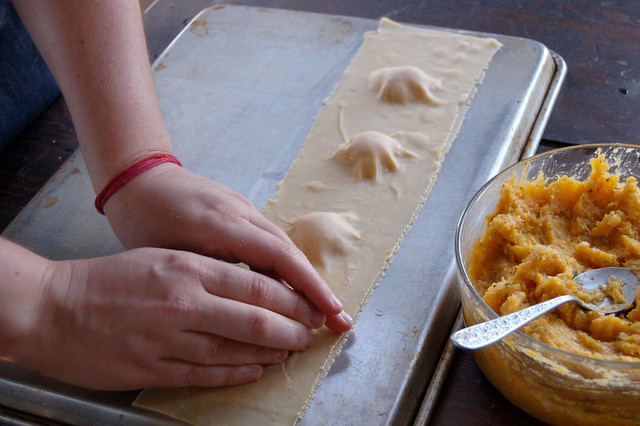
Lay the top ribbon of dough carefully over the bottom one, gently pressing each mound of filling with your fingers to push the air out of each pillow before pressing the top strip of dough to the wetted area of the bottom strip to make the seal. Air in the pocket will also cause the ravioli to explode while cooking so you want to avoid that as much as possible (though some casualties are inevitable.)

Removing air and sticking dough together around filling

Cutting the Ravioli

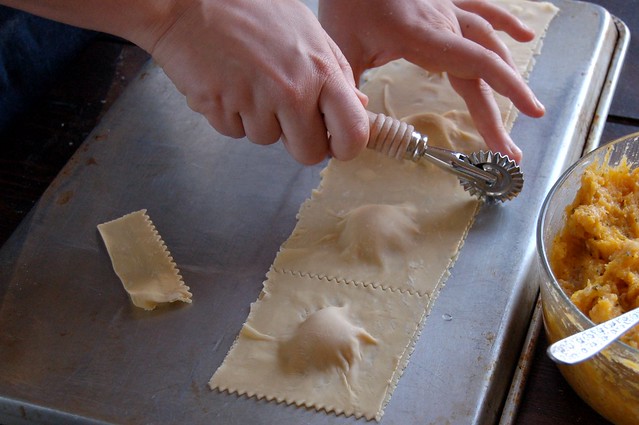
I think this part is the most fun of all! Using your ravioli cutter (you can also use a regular paring knife, the only difference is that the cutter will make those trademark fluted ravioli edges), cut carefully down the middle of each row in both directions to separate them. Be sure to leave equal room on each side and avoid cutting too close to the filling.

Cutting the raviolis

Storing the Ravioli

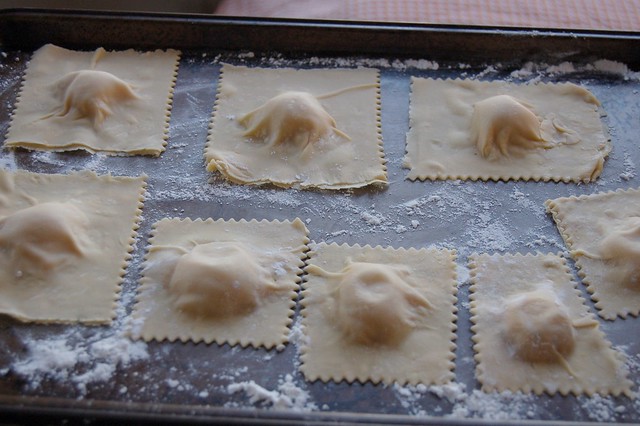
Place the cut ravioli on another cookie tray that is lightly dusted with semolina so that they do not stick. You can also stack them in layers on pieces of lightly floured parchment paper if you have too many to lay out on the cookie sheets.

Butternut squash ravioli

Ravioli freeze well so I strongly suggest making enough to freeze as this is a pretty time-consuming process and it's nice to have something more than one meal's worth of food to show for it at the end. Just lay the ravioli flat on cookie sheets and place them in the freezer for a few hours, then scoop them up and store them in ziplock bags in the freezer until you're ready to use them.

Butternut Squash Filling

Ingredients

* 1 small to medium butternut squash
* 1 tsp olive oil for roasting the squash
* 2 Tbsps butter
* 2 large shallots or one small onion, chopped
* 1/2 cup grated parmesan
* 1/4 tsp nutmeg
* 1/2 tsp crushed or crumbled dried sage
* Sea salt & freshly ground black pepper to taste

Basic Egg Pasta

Ingredients

* 2 cups flour
* 2 extra large eggs or 3 small to medium-sized eggs
* 1/2 tsp salt
* 1-2 tsps olive oil or water, as needed

Equipment

You will need the following:
* Several large cookie sheets
* A rolling pin
* Ravioli cutter or a sharp kitchen knife
* An apron (all the flour makes this messy!)
* A pasta rolling machine (mine is a hand-cranked Imperia pasta machine) but if you get really into it and want to skip the elbow grease, KitchenAid sells lots of great, motorized attachments.
* Semolina or regular flour to keep things from sticking

You might also like:
Want even more recipes, photos, giveaways, and food-related inspiration? "Like" the Garden of Eating on Facebook, or follow me on Twitter or Pinterest.

The Eatwell Project: a year of seasonal recipes -- logo by Eve Fox

The EatWell Project: A Year of Seasonal Cooking

Thursday, February 12, 2009

My 2009 New Year's Resolution was to eat more locally and seasonally. Even though that's a much easier and more pleasurable thing to do here in Berkeley than it is in most of the country, it still takes some extra thought and effort.

To help us stay "on the farm wagon," so to speak, my husband and I signed up for
EatWell Farm's CSA program through which we receive a large box of fresh, locally-grown, organic produce every two weeks. I will post a new recipe using one or more ingredients from our produce box each week in the hopes that this will help others cook more seasonally and locally. Enjoy!

The Eatwell Project: a year of seasonal recipes -- logo by Eve Fox
January
Eatwell Recipe 1:
Spinach & Onion Quesadillas
Eatwell Recipe 2:
Butter Braised New Turnips
Eatwell Recipe 3:
Pickled Watermelon Radish
Eatwell Recipe 4:
Arugula Parsley & Ricotta Pesto

February
Eatwell Recipe 5:
Curried Chicken With Kabocha Squash & Mustard Greens
Eatwell Recipe 6:
Butternut Squash Ravioli With Sage & Pinenuts
Eatwell Recipe 7:
Candied Butternut Squash

March
Eatwell Recipe 8:
Cauliflower Curry With Spinach & Ginger
Eatwell Recipe 9: Risotto With Roasted Butternut Squash & Thyme

Eatwell Recipe 10: Stir-Fried Winter Greens With Garlic Shrimp & Rice
Eatwell Recipe 11: Spinach, Onion, Cheese & Thyme Quiche


April
Eatwell Recipe 12: Frisée, Apple & Celeriac Salad With Citrus-Shallot Dressing & Goat Cheese
Eatwell Recipe 13: Gingered Winter Squash
Eatwell Recipe 14: Apple Pie
Eatwell Recipe 15: Cream of Sunchoke & Sweet Potato Soup

May
Eatwell Recipe 16: Sweet Potato Biscuits
Eatwell Recipe 17: Tarragon Pickled Onions
(Sorry May's offerings are a little slim, I had a baby at the beginning of the month and he naturally took precedence over cooking)

June
Eatwell Recipe 18: Roasted New Potatoes With Rosemary & Sea Salt
Eatwell Recipe 19: Curried Potato Salad
Eatwell Recipe 20: Grilled Summer Squash

July
Eatwell Recipe 21: Fresh Peach Cobbler With Biscuit Topping
Eatwell Recipe 22: Frittata With Chevre, New Potatoes & Fresh Herbs
Eatwell Recipe 23: Niçoise salad
Eatwell Recipe 24: Provençal Vegetable Tian
Eatwell Recipe 25: Quick Coconut Vegetable Curry


August
Eatwell Recipe 26: Sweet Corn, Tomato & Basil Salad
Eatwell Recipe 27: Zucchini Bread
Eatwell Recipe 28: Roasted Eggplant & Tomato Gratin
Eatwell Recipe 29: Refrigerator Pickles

September
Eatwell Recipe 30: Sweet Corn and Zucchini Gratin with Fresh Basil
Eatwell Recipe 31: Late Summer Frittata With Sweet Pepper, Tomato, Onion, Basil & Sausage
Eatwell Recipe 32: Heirloom Tomato Sauce With Basil & Italian Sausage
Eatwell Recipe 33: Tomato Corn Pie With Butter-Brushed Biscuit Crust

October
Eatwell Recipe 34: Zucchini Fritters
Eatwell Recipe 35: Grilled Eggplant Stacks With Tomato, Feta & Basil
Eatwell Recipe 36: Pasta Autunnale
Eatwell Recipe 37: Ratatouille & Sausage Potpie With Cornmeal Biscuit Topping
Eatwell Recipe 38: Creamy Beet Salad

November
Eatwell Recipe 39: Curried Butternut Squash Soup
Eatwell Recipe 40:
Red Pepper & Sausage-Stuffed Butternut Squash
Eatwell Recipe 41: Sweet & Savory Stuffed Acorn Squash
Eatwell Recipe 42: Sage and Nut-Stuffed Delicata Squash
Eatwell Recipe 43: Sweet Potatoes With Winter Greens
Eatwell Recipe 44: Maple Roasted Yams With Bacon & Beer

December
Eatwell Recipe 45: Creamed Spinach
(December was kind of a bust, cooking-wise, due to some travel on my part and the fact that Eatwell Farm took a little vacation which meant no box for us, so I've extended the year into January to make up for it :))

January
Eatwell Recipe 46: Simple Sautéed Spinach With Garlic


February
Eatwell Recipe 47: Spinach & Cheese Strata

Curried Chicken With Kabocha Squash & Mustard Greens (Eatwell Recipe 5)

Tuesday, February 10, 2009

One of the things I like about belonging to a CSA is being forced to try new foods. For example, the mysterious bunch of greens that arrived in our last produce box. After consulting the newsletter that comes with each box, I learned that they were mustard greens. I think calling these striking plants mustard greens is actually a little misleading since the top of each leaf is a strikingly beautiful shade of purple.

Eatwell box 2 - mustard greens

I was at a loss as to what to do with them until my friend, Naushon, who is a huge fan of mustard greens, suggested this simple recipe to me -- it's one she and her mom recently made up. According to Naushon, mustard greens have a spicy flavor that mellows when cooked in soups, stews or stir-fries.

I was intrigued by the combination of dense, sweet kabocha squash (which I discovered last year and LOVE!), spicy mustard greens, rich coconut milk, and curry powder. Served over rice, I knew this would make a hearty and exotic meal.

Curried Chicken with Kabocha Squash & Mustard Greens

A few quick notes:
You can cook kabocha squash with the skin on - just give it a good washing first. It's quite a hard squash so don't be surprised if you end up needing a cleaver to hack it to pieces. If you can't find kabocha, you could also substitute delicata or butternut squash or even yams or sweet potatoes in its place.

Kabocha squash

I was feeling lazy so I opted to use boneless skinless chicken breast in place of bigger pieces with bones and skin even though the dish would be a little more flavorful with those elements -- it's totally up to you. The only change this would entail is that you'd begin by browning the chicken pieces in oil and remove them from the pot, then jump in where the recipe below begins.

In terms of curry powder, feel free to use whatever you like best. I used primarily garam masala as that is what I had on hand. Or if you're feeling more ambitious, you could toast your own mix of curry spices in a small cast iron skillet and them grind them up yourself (the flavor would definitely be richer that way.)

-- print recipe --
Curried Chicken with Kabocha Squash & Mustard Greens
Serves 4

Ingredients

* 2 large boneless skinless chicken breasts (I strongly suggest using organic, free range meat), cut into pieces
* 1 large bunch mustard greens, washed, dried and cut into 1-inch strips length-wise
* 1 large onion, sliced or minced
* 1 small kabocha squash, washed with seeds and stem removed and cut into 1-inch cubes
* 1 can coconut milk
* 1 tsp minced ginger
* 3 tsps chopped fresh cilantro
* 1-2 Tbsps olive, safflower or coconut oil for sauteing
* Chili flakes (this is optional and you can use as much or as little as you like, depending on how spicy you like your food)
* 2-3 tsps curry powder (madras curry powder, garam masala, etc.)
* Sea salt
* Freshly ground black pepper
* 2 cups chicken stock (can add more if you prefer more liquid or if it's not enough to cover)

Directions

1. Saute the onion in the oil in a dutch oven until translucent, add the minced ginger and chili flakes and sautee a minute or two longer.

2. Add the stock and the kabocha, bring to a simmer and cook for 15-20 minutes.

3. Add the chicken and cook another 5 minutes. Add the ribbons of mustard green, the coconut milk, and the curry powder.

4. Cook until the mustard greens are tender and the chicken is white throughout then add the cilantro and season to taste with salt and pepper. Adjust the seasoning as needed (you may wish to add more curry powder, etc.)

5. Serve over rice - either basmati or short grain brown rice would both be good choices.

You might also like:


The Eatwell Project: a year of seasonal recipes -- logo by Eve Fox

Want more recipes, photos, and food-related inspiration? "Like" the Garden of Eating on Facebook, or follow me on Twitter or Pinterest.

On the Hunt for Wild Greens - Miner's Lettuce

Sunday, February 8, 2009

Northern California's winter feels a lot more like spring to me. The wet, chilly weather reminds me of late March and early April where I grew up in Woodstock, New York. And the fact that the grass turns green, daffodils bloom, and apple, cherry and magnolia trees all begin to blossom in mid-January just heightens my sense of seasonal confusion.

This winter has been particularly spring-like, with stretches of chilly rain followed by weeks of warm, sunny days. It's a funny contrast -- enjoying such beautiful weather while knowing that it also means the drought of the last few years will be even more severe this summer.
But drought aside, it has made being outside a real joy. My husband and I went for a hike along a sunny ridge trail on Saturday -- views of the quickly greening Sacramento River basin lie off to the left, and to the right, the San Francisco Bay stretches out in all her sparkling glory.

Despite these spectacular panoramic views, we spent most of our time looking DOWN.
Why? We were looking for miner's lettuce, a delicious native plant that grows wild in the area in the winter and early spring that our sister-in-law had introduced us to the year before. I had noticed some very young plants when I did this same hike about a month earlier and had been waiting for them to grow large enough to "harvest." Now the sides of the trail were blanketed by patches of its soft, round, green leaves.
A patch of Miner's lettuce growing next to trail
The plant is also known as winter purslane, spring beauty or Indian lettuce but is most commonly called miner's lettuce after the California gold rush miners who ate it to prevent scurvy. It's native to the western mountain and coastal regions of North America but is most common in California in the Sacramento and northern San Joaquin valleys.
Miner's lettuce
You can eat miner's lettuce raw in salads or cook it like spinach which it resembles a bit in taste and texture (though I think spinach has a stronger taste.) My husband and I picked a plastic bagful of the greens (somewhat stealthily, as I imagine the regional park rangers would not encourage this activity) and headed home where we washed and dried the leaves (they bruise easily, just like spinach) and prepared a fresh salad for lunch.
Miner's lettuce salad
We combined the miner's lettuce with some baby arugula we picked from our front yard where it had reseeded itself from last year (guess it pays not to clean up from your previous gardening efforts after all!), grated carrot, goat cheese, sunflower seeds, dried cranberries, and croutons, then covered it all with a homemade balsamic vinegar dressing. Yum! You could taste spring in each mouthful.

If you live in this part of the country, I encourage you to hunt down some miner's lettuce for your own salad bowl or soup pot (just make sure you've got the right plant before digging in, okay?) It's a tasty seasonal treat and you will enjoy both the picking and the eating of it.


My apologies to all those reading this who live in areas with real winter - hang in there - spring will arrive in just a few months.

You might also like:

Friday, February 27, 2009

Candied Butternut Squash: Eatwell Recipe 7

Our most recent produce box contained two butternut squashes. I hate to admit it, but my initial reaction was far from joyful. Although I love butternut squash, I've been feeling a little overwhelmed by all the squash we've been receiving and I had already used up all the recipe ideas I was really excited about.

Butternut squash half by Eve Fox, The Garden of Eating, copyright 2014

But then, inspiration struck! Why not candy them? You know, like the candied yams or sweet potatoes at a Thanksgiving dinner? This was appealing to me both because the flavor would be different from the way I'd been preparing them (in ravioli, in soup, etc.) and also because it did not sound like a lot of work to make (because I can be rather lazy.)

So I cut them up, brushed them with olive oil, and roasted them until soft.

Roasted butternut squash halves by Eve Fox, The Garden of Eating, copyright 2014

Just a note that handling raw butternut squash can cause a harmless kind of contact dermatitis - you may notice that your skin feels tight and dry afterwards (and your knife may have a whitish film on it that is a little hard to clean.) But it will go away in not too long.

Once they'd roasted, I scooped out the flesh (now a soft, brilliant orange) and mixed it with all sorts of yummy things--butter, maple syrup, a little brown sugar, cinnamon and some cloves.

Scooping roasted butternut squash puree by Eve Fox, The Garden of Eating, copyright 2014

Although it looked a little yucky, it tasted delicious! I served it as part of a simple-sounding yet delicious meal of braised kale and herbed short grain brown rice that cooked in some chicken stock for extra flavor.

Candied Butternut Squash

Here's the basic recipe -- I have not included amounts below since they'll depend on how sweet or buttery you want the squash to be and also how much squash you end up using. Just taste and adjust as needed.

This would go nicely topped with some candied pecans.

-- print recipe --Candied Butternut Squash

Ingredients
* Butternut squash
* Butter (could substitute coconut oil if you're trying to avoid dairy, I suspect it would work well)
* Brown sugar and/or maple syrup
* Ground cinammon, cloves, nutmeg, mace (I'd go heaviest on the cinammon)
* Dash of heavy cream (optional)

Directions
1. Preheat the oven to 400 degrees. Cut the squash in half length-wise, scoop out the seeds and strings and brush the flesh lightly with olive oil. Lay the halves flesh-side down on a well-insulated cookie sheet and bake until softened, about 40-50 minutes, depending on the size of the squashes.

2. Remove from oven. When cool enough to touch, use a spoon to sscoop the flesh from the skin. Place in a bowl and mash well.

3. Mix in the butter (or coconut oil), brown sugar and/or maple syrup, and spices. If you have heavy cream on hand and are not opposed to dairy, throw a dash of that in, as well - it will make it richer and tastier. Combine well and taste. Adjust spices, sweetening, etc., to taste.

4. Dust with ground cinammon and serve plain or topped with candied pecans. You can easily make this ahead of time and reheat it.

You might also like:

The Eatwell Project: a year of seasonal recipes -- logo by Eve Fox

For more delicious recipes, gardening ideas, foraging tips, and food-related inspiration "like" the Garden of Eating on Facebook, or follow me on Twitter and Pinterest.

Friday, February 20, 2009

Grandma Fran's Apple Bundt Cake

Although my preference is always for chocolate desserts, lately I have been fantasizing about an apple bundt cake. I'd had this cake once when my husband and I were visiting his grandparents, Fran and Joe, in their spotless apartment on Manhattan's Upper East Side many years ago. I liked it so much that I'd asked his Grandma Fran for the recipe which I then jotted down in a little spiral-bound notebook I keep for just such occasions.

Grandma Fran's Apple Bundt Cake

Fran's cooking reminded me a lot of my own Grandma Mary's repertoire -- simple, nourishing and delicious. Perhaps this holds true for all Jewish women who were raised in Brooklyn during the Depression era? Regardless, you could tell that both of these ladies had been cooking for a long time -- I never experienced a single culinary failure in either of their small, immaculate kitchens.

Basket of apples bound for the press by Eve Fox, Garden of Eating blog, copyright 2010


Below is the simple recipe. I left out both the walnuts (my husband dislikes them) and the raisins (we both dislike them in baked goods) but feel free to add them in or not as you see fit. This is a very easy dessert--the most time-consuming piece is preparing the apples and even that is not bad at all. It also happens to be a completely dairy-free dessert if you are lactose-challenged.


Grandma Fran's Apple Bundt Cake

Fran's Apple Bundt Cake

Ingredients

* 2 cups flour plus a little more for the cake release
* 2 tsps baking soda
* 2 tsps baking powder
* 1/2 tsp cinnamon
* 1/2 tsp allspice
* 1/2 tsp nutmeg
* 1 1/2 cups sugar
* 4 free range, organic eggs
* 1 cup vegetable oil
* 3 large organic apples, peeled and cut into small pieces (1/2 inch or so)
* 1 tsp lemon zest (try to use an organic lemon)
* 1 tsp vanilla extract
* 1 cup walnuts, chopped (optional)
* handful of raisins or currants (optional)
* Little butter for greasing the bundt pan (you can use a cooking spray if you're trying to avoid lactose)

Directions

1. Preheat oven to 370. Sift dry ingredients together in a small bowl.

2. In a medium-sized mixing bowl, beat the eggs, and then add the oil, sugar, vanilla, apples, lemon zest, walnuts and raisins (if you're using raisins and nuts.) Mix well and then add the dry ingredients and blend thoroughly.

3. Butter the bundt pan thoroughly and evenly then pour in a few teaspoons of flour and roll the pan around over the sink to coat the surface evenly with the flour. Once it's well-coated with flour, turn the pan upside-down over the sink and rap the pan with your knuckles to remove any excess flour--this is called a "cake release" and will help prevent the cake from sticking to the pan once it's cooked.

4. Pour the batter into the pan and bake for 45-60 minutes or until tested done. To test for doneness, stick either a clean sharp knife or a bamboo skewer, etc., in--if it comes out clean, the cake is done, if any batter clings to it, it needs more time.

5. Let cool then remove from pan by turning upside down on a plate or platter and rapping it with your knuckles, hopefully it should slide right out onto the plate. Then dust the cake with either confectioners sugar or cinnamon sugar and serve. Goes nicely with some ice cream or whipped cream.


You might also like:

Saturday, February 14, 2009

Butternut Squash Ravioli With Sage & Pinenuts

Since we are in the thick of winter squash season I was not very surprised to see this beautiful butternut squash nestled in our most recent CSA box. But I was pleased.

Butternut squash seeds by Eve Fox, Garden of Eating blog, copyright 2013

Butternut squash has a delicious-sounding name that is definitely earned by the sweet, slightly nutty flavor of its abundant bright yellow-orange flesh. Its thick skin makes it hearty enough to last quite a while - weeks or even months - after being picked. Since I knew I had some time before it would go bad, I pondered a few different recipe possibilities (soup, stuffed squash, roasted squash, etc.) for a while before I hit on my favorite idea -- ravioli!

I had made ravioli from scratch only once before after taking an excellent pasta-making class with my friend, Naushon, at Ramekins cooking school in Sonoma. Luckily for me, Naushon was eager to test out her skills since pasta-making is way more fun with two or more people. Best of all, she was also willing to host the pasta-making party at her place --the big, sunny, wooden farm table in her apartment is perfect for projects like this.

Reading from James Beard's wonderfully detailed and lovingly written Beard on Pasta cookbook by Eve Fox, the Garden of Eating, copyright 2015

Naushon and I sweated (literally) and laughed our way through the process of making the Basic Egg Pasta recipe from the wonderfully detailed, lovingly written and illustrated copy of Beard On Pasta my mom gave me a few years back. Several hours later, we feasted our eyes on the fruits of our labor--a double batch of homemade butternut squash ravioli.

Butternut squash ravioli

I chose a simple preparation for them -- a browned butter sauce with fresh sage, pine nuts and Parmesan.

Homemade Butternut Squash Ravioli With Browned Butter, Sage, and Pinenuts

While waiting for the pasta water to boil, I browned a handful of fresh sage leaves and pinenuts in butter and added sea salt and a few grinds of fresh black pepper. I cooked the ravioli in the boiling water for just a few minutes (fresh pasta takes only 4-10 minutes to cook at the very most) then tossed them in the browned butter, sage and pinenut sauce and served with freshly ground parmesan cheese. The result was deliziosa, squisita, magnifica!!! Definitely worth the work (thank you again, Naushon!)

In case you'd like to try, here is a little pictorial tutorial of the process. Following the pictorial are recipes for the filling and the pasta that include exact amounts for each ingredient and a list of the equipment you'll need. Buon appetito!

Making the Filling

Preheat the oven to 375. Cut the squash in half length-wise and scoop out all the seeds and stringy bits. Rub the flesh with olive oil and place cut side down on a heavy cookie sheet. Roast for 30-40 minutes, until fully soft. While the squash is roasting, cut up the onion or shallot and sautee in olive oil or butter until translucent, stir in the crushed dried sage.

Shallots and sage sauteed in butter for the filling

Once the squash is done and has cooled down enough to handle, scoop the flesh out of the skin and place in a bowl. Add the sauteed shallot or onion mixture, 1/2 cup of grated parmesan cheese (you could skip this if you want to make the ravioli dairy-free), and 1/2 tsp of nutmeg, stir well to combine, then season to taste with sea salt and black pepper.

After adding the roasted butternut squash to the filling mixture

I recommend doing this step one or more days in advance, just leave the filling well-covered in the fridge until you're ready to fill those little pasta pillows.

Making the Dough

I like to mix the dough on cookie sheets as I have limited counter space and it's also much easier to clean a cookie sheet than it is to get egg and flour out of tile grout or wood. Start by pouring the flour onto the tray, gathering it into a pile, adding the salt, and forming a well in the middle of the flour. Crack the eggs into the well.

Breaking the last egg into the well

Incorporate the egg into the flour with a fork. Once the fork tines get clogged, clean them off and begin using your fingers to do the same thing until it's all mixed together, roughly. If you're having a lot of trouble with it (though remember that it should be stiff), you can add a little bit of either olive oil or water to help it stick together.

Mixing the dough together

Kneading the Dough

Once the dough begins to stick together, form it into a ball (it will seem to be composed of flakes of dough - that is normal). Now it is time to knead. Use the heel of your hand to push the dough away from you, then fold the flap back towards you and give it a quarter turn. Press down on another section of the dough and do the same thing. The dough will be stiff-textured (much more so than bread dough) and hard to work with. Knead it for 10 minutes (this is where the sweating comes in) or until the dough is smooth.

Kneading the dough

Letting the Dough Rest

Then pat the dough into a neat ball, cover it with a dish towel or sheet of plastic wrap and let it rest for at least 30 minutes (1-2 hours is even better.) It may not sound important but you must not skip this step -- it's crucial! By this point, YOU will also probably need a little rest, as well as a chance to clean up a bit to get ready for the next step.

Pasta dough resting (a very important step)

Rolling Out the Dough

After the dough has rested long enough (it should be more pliant and easier to work with after its little nap), cut the ball of dough into four pieces. Put three back under the towel or plastic wrap so they don't dry out and flatten the fourth one with your palm or a rolling pin.

Flattening the dough enough to feed it into the pasta roller

We used my beautiful, little Imperia pasta roller (a gift from my brother a couple of years ago) for the first time! Clamp the pasta rollerto the edge of a table and set the machine so that its rollers are at their widest setting. Feed the flattened ball of dough through the rollers a few times, folding it over each time before you push it through. This will help further knead and smooth the dough.

Cranking the dough through the rollers

Then begin to feed the dough through on successively narrower settings until you've reached your desired thickness (for ravioli, this will probably be the machine's smallest setting since you don't want the pasta to be too thick.)

The dough will get quite long and ribbonlike during this process. You may find that you need an extra set of hands to either "catch" the dough or to turn the crank while you catch it (though you can also do this by yourself, it's just a bit trickier.)

Putting the dough through a final time to flatten even more>

Don't freak out if the edges are rough or torn or if the dough is not perfect (it probably won't be). You can patch it or fold it over and put it through again to even it out. You will also end up trimming the edges once you're ready to cut the ravioli out so the edges need not be perfect.

Letting the Dough Rest, Again (Briefly)

Lay the rolled out ribbon of dough on kitchen towels or on a floured (or semolina-ed) cookie sheet to rest for 5 minutes. Do not let it get too dry, though. You may also need to cut it into two or more pieces in order to fit it on a cookie sheet or towel at this point -- just make sure to match them up in size when you're making those cuts since you will very shortly be using one as the top of your ravioli and one as the bottom.

Flattened sheets of dough "resting"

Filling the Ravioli

Place your bowl of filling at a convenient spot and make sure you have a small spoon handy. Position your cookie sheet (which should be lightly covered with either flour or semolina to prevent the dough from sticking to it) in front of you and get to work. Lay two roughly equal-sized ribbons of rolled pasta dough on the sheet length-wise. If one is larger, make that one the bottom sheet.

Dropping the filling

Using the spoon, place a dollop of filling at equally-spaced intervals along the bottom ribbon of dough. If the ribbon is tall enough, you should be able to fit two rows of filling on it, if not, just go for one. Be careful not to add too much filling or to place the dollops too close to each other or too close to the edge of the ribbon of dough since you will need adequate space to seal each one and then cut it apart from the others.

Sealing the Ravioli

Once your drops of filling are in place, dip either your finger or a pastry brush (I used my finger) into the bowl of water and wet a grid pattern around each dollop of filling. It is essential to wet the dough thoroughly (though you don't want puddles of water or to make it soggy) around each drop of filling as this is what will make the seal between the bottom and top pieces of dough. An incomplete seal will make a ravioli that is much more likely to explode in the pot while cooking.

Wetting the bottom sheet of dough with water

Once you've finished moistening the bottom ribbon of dough, lift the top piece of dough and position it over the bottom, taking care to match them up as well as you can.

Laying down the top sheet of pasta dough

Lay the top ribbon of dough carefully over the bottom one, gently pressing each mound of filling with your fingers to push the air out of each pillow before pressing the top strip of dough to the wetted area of the bottom strip to make the seal. Air in the pocket will also cause the ravioli to explode while cooking so you want to avoid that as much as possible (though some casualties are inevitable.)

Removing air and sticking dough together around filling

Cutting the Ravioli

I think this part is the most fun of all! Using your ravioli cutter (you can also use a regular paring knife, the only difference is that the cutter will make those trademark fluted ravioli edges), cut carefully down the middle of each row in both directions to separate them. Be sure to leave equal room on each side and avoid cutting too close to the filling.

Cutting the raviolis

Storing the Ravioli

Place the cut ravioli on another cookie tray that is lightly dusted with semolina so that they do not stick. You can also stack them in layers on pieces of lightly floured parchment paper if you have too many to lay out on the cookie sheets.

Butternut squash ravioli

Ravioli freeze well so I strongly suggest making enough to freeze as this is a pretty time-consuming process and it's nice to have something more than one meal's worth of food to show for it at the end. Just lay the ravioli flat on cookie sheets and place them in the freezer for a few hours, then scoop them up and store them in ziplock bags in the freezer until you're ready to use them.

Butternut Squash Filling

Ingredients

* 1 small to medium butternut squash
* 1 tsp olive oil for roasting the squash
* 2 Tbsps butter
* 2 large shallots or one small onion, chopped
* 1/2 cup grated parmesan
* 1/4 tsp nutmeg
* 1/2 tsp crushed or crumbled dried sage
* Sea salt & freshly ground black pepper to taste

Basic Egg Pasta

Ingredients

* 2 cups flour
* 2 extra large eggs or 3 small to medium-sized eggs
* 1/2 tsp salt
* 1-2 tsps olive oil or water, as needed

Equipment

You will need the following:
* Several large cookie sheets
* A rolling pin
* Ravioli cutter or a sharp kitchen knife
* An apron (all the flour makes this messy!)
* A pasta rolling machine (mine is a hand-cranked Imperia pasta machine) but if you get really into it and want to skip the elbow grease, KitchenAid sells lots of great, motorized attachments.
* Semolina or regular flour to keep things from sticking

You might also like:
Want even more recipes, photos, giveaways, and food-related inspiration? "Like" the Garden of Eating on Facebook, or follow me on Twitter or Pinterest.

The Eatwell Project: a year of seasonal recipes -- logo by Eve Fox

Thursday, February 12, 2009

The EatWell Project: A Year of Seasonal Cooking

My 2009 New Year's Resolution was to eat more locally and seasonally. Even though that's a much easier and more pleasurable thing to do here in Berkeley than it is in most of the country, it still takes some extra thought and effort.

To help us stay "on the farm wagon," so to speak, my husband and I signed up for
EatWell Farm's CSA program through which we receive a large box of fresh, locally-grown, organic produce every two weeks. I will post a new recipe using one or more ingredients from our produce box each week in the hopes that this will help others cook more seasonally and locally. Enjoy!

The Eatwell Project: a year of seasonal recipes -- logo by Eve Fox
January
Eatwell Recipe 1:
Spinach & Onion Quesadillas
Eatwell Recipe 2:
Butter Braised New Turnips
Eatwell Recipe 3:
Pickled Watermelon Radish
Eatwell Recipe 4:
Arugula Parsley & Ricotta Pesto

February
Eatwell Recipe 5:
Curried Chicken With Kabocha Squash & Mustard Greens
Eatwell Recipe 6:
Butternut Squash Ravioli With Sage & Pinenuts
Eatwell Recipe 7:
Candied Butternut Squash

March
Eatwell Recipe 8:
Cauliflower Curry With Spinach & Ginger
Eatwell Recipe 9: Risotto With Roasted Butternut Squash & Thyme

Eatwell Recipe 10: Stir-Fried Winter Greens With Garlic Shrimp & Rice
Eatwell Recipe 11: Spinach, Onion, Cheese & Thyme Quiche


April
Eatwell Recipe 12: Frisée, Apple & Celeriac Salad With Citrus-Shallot Dressing & Goat Cheese
Eatwell Recipe 13: Gingered Winter Squash
Eatwell Recipe 14: Apple Pie
Eatwell Recipe 15: Cream of Sunchoke & Sweet Potato Soup

May
Eatwell Recipe 16: Sweet Potato Biscuits
Eatwell Recipe 17: Tarragon Pickled Onions
(Sorry May's offerings are a little slim, I had a baby at the beginning of the month and he naturally took precedence over cooking)

June
Eatwell Recipe 18: Roasted New Potatoes With Rosemary & Sea Salt
Eatwell Recipe 19: Curried Potato Salad
Eatwell Recipe 20: Grilled Summer Squash

July
Eatwell Recipe 21: Fresh Peach Cobbler With Biscuit Topping
Eatwell Recipe 22: Frittata With Chevre, New Potatoes & Fresh Herbs
Eatwell Recipe 23: Niçoise salad
Eatwell Recipe 24: Provençal Vegetable Tian
Eatwell Recipe 25: Quick Coconut Vegetable Curry


August
Eatwell Recipe 26: Sweet Corn, Tomato & Basil Salad
Eatwell Recipe 27: Zucchini Bread
Eatwell Recipe 28: Roasted Eggplant & Tomato Gratin
Eatwell Recipe 29: Refrigerator Pickles

September
Eatwell Recipe 30: Sweet Corn and Zucchini Gratin with Fresh Basil
Eatwell Recipe 31: Late Summer Frittata With Sweet Pepper, Tomato, Onion, Basil & Sausage
Eatwell Recipe 32: Heirloom Tomato Sauce With Basil & Italian Sausage
Eatwell Recipe 33: Tomato Corn Pie With Butter-Brushed Biscuit Crust

October
Eatwell Recipe 34: Zucchini Fritters
Eatwell Recipe 35: Grilled Eggplant Stacks With Tomato, Feta & Basil
Eatwell Recipe 36: Pasta Autunnale
Eatwell Recipe 37: Ratatouille & Sausage Potpie With Cornmeal Biscuit Topping
Eatwell Recipe 38: Creamy Beet Salad

November
Eatwell Recipe 39: Curried Butternut Squash Soup
Eatwell Recipe 40:
Red Pepper & Sausage-Stuffed Butternut Squash
Eatwell Recipe 41: Sweet & Savory Stuffed Acorn Squash
Eatwell Recipe 42: Sage and Nut-Stuffed Delicata Squash
Eatwell Recipe 43: Sweet Potatoes With Winter Greens
Eatwell Recipe 44: Maple Roasted Yams With Bacon & Beer

December
Eatwell Recipe 45: Creamed Spinach
(December was kind of a bust, cooking-wise, due to some travel on my part and the fact that Eatwell Farm took a little vacation which meant no box for us, so I've extended the year into January to make up for it :))

January
Eatwell Recipe 46: Simple Sautéed Spinach With Garlic


February
Eatwell Recipe 47: Spinach & Cheese Strata

Tuesday, February 10, 2009

Curried Chicken With Kabocha Squash & Mustard Greens (Eatwell Recipe 5)

One of the things I like about belonging to a CSA is being forced to try new foods. For example, the mysterious bunch of greens that arrived in our last produce box. After consulting the newsletter that comes with each box, I learned that they were mustard greens. I think calling these striking plants mustard greens is actually a little misleading since the top of each leaf is a strikingly beautiful shade of purple.

Eatwell box 2 - mustard greens

I was at a loss as to what to do with them until my friend, Naushon, who is a huge fan of mustard greens, suggested this simple recipe to me -- it's one she and her mom recently made up. According to Naushon, mustard greens have a spicy flavor that mellows when cooked in soups, stews or stir-fries.

I was intrigued by the combination of dense, sweet kabocha squash (which I discovered last year and LOVE!), spicy mustard greens, rich coconut milk, and curry powder. Served over rice, I knew this would make a hearty and exotic meal.

Curried Chicken with Kabocha Squash & Mustard Greens

A few quick notes:
You can cook kabocha squash with the skin on - just give it a good washing first. It's quite a hard squash so don't be surprised if you end up needing a cleaver to hack it to pieces. If you can't find kabocha, you could also substitute delicata or butternut squash or even yams or sweet potatoes in its place.

Kabocha squash

I was feeling lazy so I opted to use boneless skinless chicken breast in place of bigger pieces with bones and skin even though the dish would be a little more flavorful with those elements -- it's totally up to you. The only change this would entail is that you'd begin by browning the chicken pieces in oil and remove them from the pot, then jump in where the recipe below begins.

In terms of curry powder, feel free to use whatever you like best. I used primarily garam masala as that is what I had on hand. Or if you're feeling more ambitious, you could toast your own mix of curry spices in a small cast iron skillet and them grind them up yourself (the flavor would definitely be richer that way.)

-- print recipe --
Curried Chicken with Kabocha Squash & Mustard Greens
Serves 4

Ingredients

* 2 large boneless skinless chicken breasts (I strongly suggest using organic, free range meat), cut into pieces
* 1 large bunch mustard greens, washed, dried and cut into 1-inch strips length-wise
* 1 large onion, sliced or minced
* 1 small kabocha squash, washed with seeds and stem removed and cut into 1-inch cubes
* 1 can coconut milk
* 1 tsp minced ginger
* 3 tsps chopped fresh cilantro
* 1-2 Tbsps olive, safflower or coconut oil for sauteing
* Chili flakes (this is optional and you can use as much or as little as you like, depending on how spicy you like your food)
* 2-3 tsps curry powder (madras curry powder, garam masala, etc.)
* Sea salt
* Freshly ground black pepper
* 2 cups chicken stock (can add more if you prefer more liquid or if it's not enough to cover)

Directions

1. Saute the onion in the oil in a dutch oven until translucent, add the minced ginger and chili flakes and sautee a minute or two longer.

2. Add the stock and the kabocha, bring to a simmer and cook for 15-20 minutes.

3. Add the chicken and cook another 5 minutes. Add the ribbons of mustard green, the coconut milk, and the curry powder.

4. Cook until the mustard greens are tender and the chicken is white throughout then add the cilantro and season to taste with salt and pepper. Adjust the seasoning as needed (you may wish to add more curry powder, etc.)

5. Serve over rice - either basmati or short grain brown rice would both be good choices.

You might also like:

The Eatwell Project: a year of seasonal recipes -- logo by Eve Fox

Want more recipes, photos, and food-related inspiration? "Like" the Garden of Eating on Facebook, or follow me on Twitter or Pinterest.

Sunday, February 8, 2009

On the Hunt for Wild Greens - Miner's Lettuce

Northern California's winter feels a lot more like spring to me. The wet, chilly weather reminds me of late March and early April where I grew up in Woodstock, New York. And the fact that the grass turns green, daffodils bloom, and apple, cherry and magnolia trees all begin to blossom in mid-January just heightens my sense of seasonal confusion.

This winter has been particularly spring-like, with stretches of chilly rain followed by weeks of warm, sunny days. It's a funny contrast -- enjoying such beautiful weather while knowing that it also means the drought of the last few years will be even more severe this summer.
But drought aside, it has made being outside a real joy. My husband and I went for a hike along a sunny ridge trail on Saturday -- views of the quickly greening Sacramento River basin lie off to the left, and to the right, the San Francisco Bay stretches out in all her sparkling glory.

Despite these spectacular panoramic views, we spent most of our time looking DOWN.
Why? We were looking for miner's lettuce, a delicious native plant that grows wild in the area in the winter and early spring that our sister-in-law had introduced us to the year before. I had noticed some very young plants when I did this same hike about a month earlier and had been waiting for them to grow large enough to "harvest." Now the sides of the trail were blanketed by patches of its soft, round, green leaves.
A patch of Miner's lettuce growing next to trail
The plant is also known as winter purslane, spring beauty or Indian lettuce but is most commonly called miner's lettuce after the California gold rush miners who ate it to prevent scurvy. It's native to the western mountain and coastal regions of North America but is most common in California in the Sacramento and northern San Joaquin valleys.
Miner's lettuce
You can eat miner's lettuce raw in salads or cook it like spinach which it resembles a bit in taste and texture (though I think spinach has a stronger taste.) My husband and I picked a plastic bagful of the greens (somewhat stealthily, as I imagine the regional park rangers would not encourage this activity) and headed home where we washed and dried the leaves (they bruise easily, just like spinach) and prepared a fresh salad for lunch.
Miner's lettuce salad
We combined the miner's lettuce with some baby arugula we picked from our front yard where it had reseeded itself from last year (guess it pays not to clean up from your previous gardening efforts after all!), grated carrot, goat cheese, sunflower seeds, dried cranberries, and croutons, then covered it all with a homemade balsamic vinegar dressing. Yum! You could taste spring in each mouthful.

If you live in this part of the country, I encourage you to hunt down some miner's lettuce for your own salad bowl or soup pot (just make sure you've got the right plant before digging in, okay?) It's a tasty seasonal treat and you will enjoy both the picking and the eating of it.


My apologies to all those reading this who live in areas with real winter - hang in there - spring will arrive in just a few months.

You might also like: