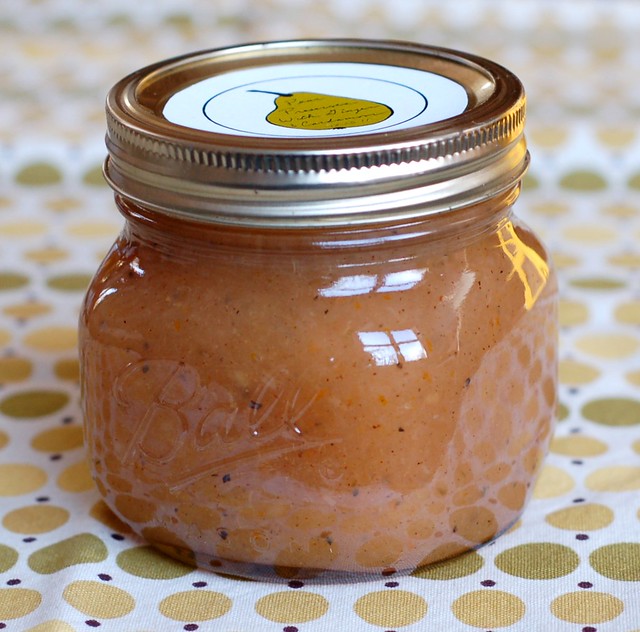
Pear Preserves With Cardamom & Ginger

Saturday, December 31, 2011

Spiced Pear Preserves by Eve Fox, the Garden of Eating blog, copyright 2012

Ours was a strange, rather subdued holiday this year, colored by the loss of a family member a few days before Christmas. But there were some much-needed bright spots in seeing family and friends and watching our two-and-a-half-year-old son gleefully unwrap (with significant parental assistance) what was probably far too many new toys.

After the frenzy subsided on Christmas morning and we'd put Will down for his nap, I found myself at loose ends. The week had been draining and very sad. I needed a break from thinking about how fragile, precious and fleeting life is for us all. My in-laws had been kind enough to share some of these gorgeous pears they'd received a few days earlier with us and I thought that I might find some solace in preserving them.

Bowl of pears by Eve Fox, Garden of Eating blog, copyright 2011

After a quick search of my three favorite preserving blogs (What Julia Ate, Tigress In a Jam, and Food In Jars, in case you were wondering) for inspiration, I settled on a modified version of Julia's Ginger Pear Preserves - lured by the exotic sound of the ginger and the beautiful color of the jam. I consulted the Ball Complete Book of Home Preserving I bought this summer -- such a great reference - it includes just about everything you could ever hope to can, bottle or freeze -- and came up with the following lovely recipe.

I put on an episode of Downton Abbey which is almost as good as Pride & Prejudice when I need soothing (season 2 begins January 8th - hurray!) Then I spent a few moments admiring the simple beauty of the pears -- I love their shape, their coloring, and their smell -- and got to work coring, peeling and chopping until I had a big bowl of pears awaiting further orders.

by Eve Fox, Garden of Eating blog, copyright 2011

Then I zested and juiced this neat little row of citrus fruits that had been slowly desiccating on our counter. I was glad to find a good use for them before they passed the point of no return...

Row of limes and tangerines for zest and juice by Eve Fox, Garden of Eating blog, copyright 2011

And ground up a bunch of cardamom seeds with the mortar and pestle. I love the strong, aromatic smell of cardamom - it's so unique - a hint of eucalyptus and citrus and cloves and something else that defies description. They may be little but these seeds are mighty potent -- if you don't store them carefully, your whole spice drawer will end up smelling like them.

Cardamom seeds by Eve Fox, Garden of Eating blog, copyright 2011

Then I grated some ginger with my handy-dandy Microplane zester.

Grating ginger by Eve Fox, Garden of Eating blog, copyright 2011

Measured out sugar and vanilla extract, added the citrus zest and juice, sprinkled in some cinnamon and put it all up to simmer on the stove.

Starting to cook the pear preserves by Eve Fox, Garden of Eating blog, copyright 2011

Once the pears had all softened, I used the immersion blender to get rid of any lumps, leaving a smooth, sweet, spiced mixture behind.

Pear preserves simmering by Eve Fox, Garden of Eating blog, copyright 2011

While I waited for the mixture to reduce enough to pass the sheet test, I put my canning pot on to boil and sterilized a bunch of pint and half-pint jars, lids and bands. I ladled the hot jam into the sterilized jars, applied the lids and screwed on the bands, boiled them for 10 minutes, and then set the jars out to cool overnight.

Simmering the pear preserves, sterilizing the jars by Eve Fox, Garden of Eating blog, copyright 2011

It's been a few years since I've created a label for any of my canned concoctions but I found time to whip up this little design during one of Will's naps last week. I knew I wanted to keep it simple so I drew the outline of a pear and wrote out the name of the preserve, then scanned both things and played around with them in Photoshop until they seemed to fit together.

Hand-drawn Pear Preserves Label by Eve Fox, The Garden of Eating blog, copyright 2011
Wishing you and yours a happy new year. May your 2012 be as sweet and as spicy as these pear preserves. And don't forget to hug the people you love as often as you can. Life is fleeting. I promise you won't regret it.

Spiced Pear Preserves by Eve Fox, the Garden of Eating blog, copyright 2012


-- print recipe --Pear Preserves With Cardamom & Ginger
Yields between 5-7 half-pint jars

Ingredients
* 5 1/2 cups diced, peeled, cored pears (about 8 pears)
* Grated zest and juice of 3 limes or tangerines
* 2 1/3 cups sugar
* 1 Tbsp grated ginger
* 1 tsp ground cardamom seeds
* 1 tsp ground cinnamon
* 1/2 tsp pure vanilla extract

Directions

1. Sterilize jars and lids in boiling water canner.

2. Combine all the ingredients in a large saucepan and bring to a boil over medium heat, stirring to dissolve the sugar. Boil, stirring frequently, until the mixture thickens, about 15 minutes. Remove from heat and test to see if it has reached the gel stage. If the preserves fall from the spoon in a single sheet, it is at the gel stage. If your mixture has not reached the gel stage, return the pan to medium heat and cook, stirring constantly, for an additional 5 minutes. Repeat gel stage test and cooking as needed.

3. Ladle the hot preserves into hot jars leaving 1/4 inch headspace. Remove any air bubbles. Wipe the rims. Center the lids on the jars. Apply bands until the fit is fingertip tight.

4. Process the jars in a boiling water bath canner for 10 minutes, adjusting for altitude. Turn off the heat and let the jars sit for 5 minutes then remove the jars and let cool in a draft-free spot overnight. Check the lids for seal after 24 hours - they should not flex up and down when the center is pressed. Store in a cool, dark place for up to one year.

Alternatively, if you don't want to mess with the canning, you can skip the whole jar sterilizing and boiling water bath process and just store in clean, air-tight jars in the refrigerator for up to a month.

You might also like:
For more delicious recipes, gardening ideas, foraging tips, and food-related inspiration "like" the Garden of Eating on Facebook, or follow me on Twitter and Pinterest.

Kale & Brussels Sprout Salad With Toasted Almonds & Parmesan

Tuesday, December 27, 2011

Kale & Brussels Sprout Salad With Toasted Almonds & Pecorino by Eve Fox, Garden of Eating blog, copyright 2011

This salad is my new love. We met through our mutual friend, Polly, who brought it to a holiday party my family and I attended recently. I have to admit that it was not love at first sight. My initial impression was "Whoa! That's a lotta roughage" but before the first bite had even made it all the way to my tummy, we were as thick as thieves.

Polly's husband, Wayne, affectionately refers to this salad as "nature's barbed wire" and while I can't deny that you'll fulfill your daily fiber requirements within about three mouthfuls, I assure you that you'll be going back for seconds. And probably thirds. If there's any left at that point, that is.

Happy in the hoop house by Eve Fox, Garden of Eating blog, copyright 2011

The kale I picked from our mini hoop house (above) was not Tuscan but it tasted good, nonetheless. Maybe this salad is even better with the Tuscan variety - feel free to experiment and let me know what you find.

Washing the kale by Eve Fox, Garden of Eating blog, copyright 2011

The first step is to make the dressing. You want to give it a chance to let the flavors meld and develop a bit -- probably best to make it half or even a full day in advance if you can.

Ingredients for the dressing by Eve Fox, Garden of Eating blog, copyright 2011

With that in mind, I made a double batch of dressing because I know I'll want to eat this salad again very soon...) I like to make dressing in one of these glass jam jars and LOVE that you can buy these cute, little, red Luminarc lids to make it easy to store things in them.

Extra dressing by Eve Fox, Garden of Eating blog, copyright 2011

Once, the dressing is ready, you can get down to business with the rest of the ingredients. I used my handy dandy little Kyocera mandolin to shave the Brussels sprouts up nice and thin - as usual, it worked like a charm.

Finely shaved Brussels sprouts by Eve Fox, Garden of Eating blog, copyright 2011

Don't skimp on the nuts, cheese or dressing. They provide important rich, nutty, crunchy complements to all the hearty greens and the acidity and bite of the dressing.

Toasted slivered almonds by Eve Fox, Garden of Eating blog, copyright 2011

This hearty winter salad that eats almost like a meal. The recipe is lightly adapted from the Bon Appetit original.

Kale & Brussels Sprout Salad With Toasted Almonds & Pecorino by Eve Fox, Garden of Eating blog, copyright 2011

-- print recipe --
Brussels Sprouts & Kale Salad With Toasted Almonds & Parmesan
Serves 6-8

Ingredients

* 1/4 cup fresh lemon juice
* 2 Tbsp Dijon mustard
* 1 Tbsp minced shallot
* 1 small clove garlic, finely grated
* Sea salt and pepper
* 1/2 cup olive oil
* 1 bunch Tuscan kale, center stem discarded, leaves sliced thinly
* 12 oz. Brussels sprouts, trimmed and shredded
* 1/3 cup almonds with skins, toasted and coarsely chopped
* 1/ cup grated Pecorino, Parmesan or Romano cheese

Directions

1. Combine lemon juice, Dijon mustard, shallot, garlic, 1/2 tsp. salt, and a pinch of pepper in a small bowl. Stir to blend; set aside to let flavors meld. Mix the thinly sliced kale and shredded Brussels sprouts in a large bowl.

2. Slowly whisk remaining olive oil in cup into lemon-juice mixture. Season dressing to taste with salt and pepper. Add the dressing, cheese and almonds to the Brussels sprouts and kale mixture and toss to coat. Season lightly with salt and pepper and serve.

You might also like:
Want even more recipes, photos, giveaways, and food-related inspiration? "Like" the Garden of Eating on Facebook or follow me on Twitter.

Spiced Roasted Chickpeas

Monday, December 19, 2011

Spiced Roasted Chickpeas by Eve Fox, Garden of Eating blog, copyright 2011

As much as I enjoy them, I could probably count the number of hors d'oeuvres I've made on one hand. But we were invited to a party featuring finger foods this weekend (we've all got toddlers so this was a very practical move, as well as a yummy one) and it seemed like a good time to try making the roasted chickpeas I've been seeing recipes for all year (on The Kitchn, Kalyn's Kitchen, Mark Bittman's blog, and more.)

These are addictive so it pays to make a big batch - one can won't get you very far. I used three cans of organic garbanzo beans (I strongly suggest that you use Eden Organics as they are the only company I know of that does not use the toxic chemical BPA in the linings of their cans.) If you have time to soak and cook dried garbanzo beans, by all means, do it! You can also make more than you need and then freeze the cooked beans so you'll have them ready to go next time you need garbanzos.

Organic garbanzo beans in a BPA-free can from Eden by Eve Fox, Garden of Eating blog, copyright 2011

I made three different spice mixes -- garam masala, curry powder, and ras el hanout, a  Moroccan spice blend that typically includes cardamom, cloves, cinnamon, ground chili peppers, coriander, cumin, nutmeg, peppercorns, and turmeric. All three were tasty.

Three spice mixes by Eve Fox, Garden of Eating blog, copyright 2011

Don't skip the step of drying the beans with a towel - you want to start out with as little extra moisture as possible since you're trying to dry them out.

Drying the chickpeas by Eve Fox, Garden of Eating blog, copyright 2011

One of the recipes I read said that it's important to slip off any loose skins. I don't know if it's really true but it's easy enough to do so I did it anyway.

Slipping some loose skins off by Eve Fox, Garden of Eating blog, copyright 2011

I suspect you'll find that people end up popping these like savory candy and hailing you as a conquering hero.

Roasted chickpeas by Eve Fox, Garden of Eating blog, copyright 2011

Happy Holidays.

-- print recipe --
Spiced Roasted Chickpeas
Makes a medium-sized bowl

* 3 cans chickpeas (garbanzo beans)
* 3 Tbsp olive oil
* 1-2 large cloves of garlic, pressed (optional)
* 1 - 1 1/2 tsp ground spice (any of these would be good: garam masala, curry powder, chili powder, ground cumin, ground coriander, smoked paprika)
* Sea salt to taste
* Lime juice (optional)

Directions

1. Preheat oven to 350 F. Rinse the chickpeas well with cold water, removing any loose skins, and drain in a colander for 5 minutes. Pat them dry with a dish towel.

2. Pour them out onto a thick cookie sheet, toss with the olive oil (and garlic, if you're using that) to coat and then make sure they're in a single layer, you want them all to get equal cooking time/heat. Put them in the oven.

3. Roast, shaking the pan to ensure even cooking, one or two times, for roughly 40 minutes (they may need a little more or less time - just check!), until they begin to look lightly browned and split apart.

4. Remove from the oven and toss the hot beans with the spice mix and salt. Taste them and see if you want to adjust the seasonings at all. Serve warm or cold. You can try squirting a little lime juice on them before serving if that goes well with your spice mix.

You might also like:
For more delicious recipes, gardening ideas, foraging tips, and food-related inspiration "like" the Garden of Eating on Facebook, or follow me on Twitter and Pinterest.

Saturday, December 31, 2011

Pear Preserves With Cardamom & Ginger

Spiced Pear Preserves by Eve Fox, the Garden of Eating blog, copyright 2012

Ours was a strange, rather subdued holiday this year, colored by the loss of a family member a few days before Christmas. But there were some much-needed bright spots in seeing family and friends and watching our two-and-a-half-year-old son gleefully unwrap (with significant parental assistance) what was probably far too many new toys.

After the frenzy subsided on Christmas morning and we'd put Will down for his nap, I found myself at loose ends. The week had been draining and very sad. I needed a break from thinking about how fragile, precious and fleeting life is for us all. My in-laws had been kind enough to share some of these gorgeous pears they'd received a few days earlier with us and I thought that I might find some solace in preserving them.

Bowl of pears by Eve Fox, Garden of Eating blog, copyright 2011

After a quick search of my three favorite preserving blogs (What Julia Ate, Tigress In a Jam, and Food In Jars, in case you were wondering) for inspiration, I settled on a modified version of Julia's Ginger Pear Preserves - lured by the exotic sound of the ginger and the beautiful color of the jam. I consulted the Ball Complete Book of Home Preserving I bought this summer -- such a great reference - it includes just about everything you could ever hope to can, bottle or freeze -- and came up with the following lovely recipe.

I put on an episode of Downton Abbey which is almost as good as Pride & Prejudice when I need soothing (season 2 begins January 8th - hurray!) Then I spent a few moments admiring the simple beauty of the pears -- I love their shape, their coloring, and their smell -- and got to work coring, peeling and chopping until I had a big bowl of pears awaiting further orders.

by Eve Fox, Garden of Eating blog, copyright 2011

Then I zested and juiced this neat little row of citrus fruits that had been slowly desiccating on our counter. I was glad to find a good use for them before they passed the point of no return...

Row of limes and tangerines for zest and juice by Eve Fox, Garden of Eating blog, copyright 2011

And ground up a bunch of cardamom seeds with the mortar and pestle. I love the strong, aromatic smell of cardamom - it's so unique - a hint of eucalyptus and citrus and cloves and something else that defies description. They may be little but these seeds are mighty potent -- if you don't store them carefully, your whole spice drawer will end up smelling like them.

Cardamom seeds by Eve Fox, Garden of Eating blog, copyright 2011

Then I grated some ginger with my handy-dandy Microplane zester.

Grating ginger by Eve Fox, Garden of Eating blog, copyright 2011

Measured out sugar and vanilla extract, added the citrus zest and juice, sprinkled in some cinnamon and put it all up to simmer on the stove.

Starting to cook the pear preserves by Eve Fox, Garden of Eating blog, copyright 2011

Once the pears had all softened, I used the immersion blender to get rid of any lumps, leaving a smooth, sweet, spiced mixture behind.

Pear preserves simmering by Eve Fox, Garden of Eating blog, copyright 2011

While I waited for the mixture to reduce enough to pass the sheet test, I put my canning pot on to boil and sterilized a bunch of pint and half-pint jars, lids and bands. I ladled the hot jam into the sterilized jars, applied the lids and screwed on the bands, boiled them for 10 minutes, and then set the jars out to cool overnight.

Simmering the pear preserves, sterilizing the jars by Eve Fox, Garden of Eating blog, copyright 2011

It's been a few years since I've created a label for any of my canned concoctions but I found time to whip up this little design during one of Will's naps last week. I knew I wanted to keep it simple so I drew the outline of a pear and wrote out the name of the preserve, then scanned both things and played around with them in Photoshop until they seemed to fit together.

Hand-drawn Pear Preserves Label by Eve Fox, The Garden of Eating blog, copyright 2011
Wishing you and yours a happy new year. May your 2012 be as sweet and as spicy as these pear preserves. And don't forget to hug the people you love as often as you can. Life is fleeting. I promise you won't regret it.

Spiced Pear Preserves by Eve Fox, the Garden of Eating blog, copyright 2012


-- print recipe --Pear Preserves With Cardamom & Ginger
Yields between 5-7 half-pint jars

Ingredients
* 5 1/2 cups diced, peeled, cored pears (about 8 pears)
* Grated zest and juice of 3 limes or tangerines
* 2 1/3 cups sugar
* 1 Tbsp grated ginger
* 1 tsp ground cardamom seeds
* 1 tsp ground cinnamon
* 1/2 tsp pure vanilla extract

Directions

1. Sterilize jars and lids in boiling water canner.

2. Combine all the ingredients in a large saucepan and bring to a boil over medium heat, stirring to dissolve the sugar. Boil, stirring frequently, until the mixture thickens, about 15 minutes. Remove from heat and test to see if it has reached the gel stage. If the preserves fall from the spoon in a single sheet, it is at the gel stage. If your mixture has not reached the gel stage, return the pan to medium heat and cook, stirring constantly, for an additional 5 minutes. Repeat gel stage test and cooking as needed.

3. Ladle the hot preserves into hot jars leaving 1/4 inch headspace. Remove any air bubbles. Wipe the rims. Center the lids on the jars. Apply bands until the fit is fingertip tight.

4. Process the jars in a boiling water bath canner for 10 minutes, adjusting for altitude. Turn off the heat and let the jars sit for 5 minutes then remove the jars and let cool in a draft-free spot overnight. Check the lids for seal after 24 hours - they should not flex up and down when the center is pressed. Store in a cool, dark place for up to one year.

Alternatively, if you don't want to mess with the canning, you can skip the whole jar sterilizing and boiling water bath process and just store in clean, air-tight jars in the refrigerator for up to a month.

You might also like:
For more delicious recipes, gardening ideas, foraging tips, and food-related inspiration "like" the Garden of Eating on Facebook, or follow me on Twitter and Pinterest.

Tuesday, December 27, 2011

Kale & Brussels Sprout Salad With Toasted Almonds & Parmesan

Kale & Brussels Sprout Salad With Toasted Almonds & Pecorino by Eve Fox, Garden of Eating blog, copyright 2011

This salad is my new love. We met through our mutual friend, Polly, who brought it to a holiday party my family and I attended recently. I have to admit that it was not love at first sight. My initial impression was "Whoa! That's a lotta roughage" but before the first bite had even made it all the way to my tummy, we were as thick as thieves.

Polly's husband, Wayne, affectionately refers to this salad as "nature's barbed wire" and while I can't deny that you'll fulfill your daily fiber requirements within about three mouthfuls, I assure you that you'll be going back for seconds. And probably thirds. If there's any left at that point, that is.

Happy in the hoop house by Eve Fox, Garden of Eating blog, copyright 2011

The kale I picked from our mini hoop house (above) was not Tuscan but it tasted good, nonetheless. Maybe this salad is even better with the Tuscan variety - feel free to experiment and let me know what you find.

Washing the kale by Eve Fox, Garden of Eating blog, copyright 2011

The first step is to make the dressing. You want to give it a chance to let the flavors meld and develop a bit -- probably best to make it half or even a full day in advance if you can.

Ingredients for the dressing by Eve Fox, Garden of Eating blog, copyright 2011

With that in mind, I made a double batch of dressing because I know I'll want to eat this salad again very soon...) I like to make dressing in one of these glass jam jars and LOVE that you can buy these cute, little, red Luminarc lids to make it easy to store things in them.
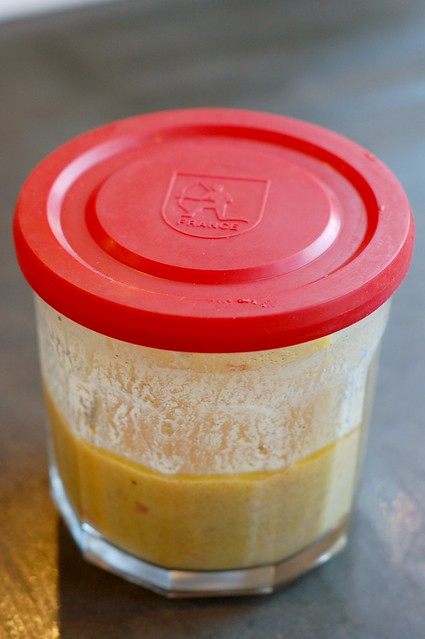
Extra dressing by Eve Fox, Garden of Eating blog, copyright 2011

Once, the dressing is ready, you can get down to business with the rest of the ingredients. I used my handy dandy little Kyocera mandolin to shave the Brussels sprouts up nice and thin - as usual, it worked like a charm.

Finely shaved Brussels sprouts by Eve Fox, Garden of Eating blog, copyright 2011

Don't skimp on the nuts, cheese or dressing. They provide important rich, nutty, crunchy complements to all the hearty greens and the acidity and bite of the dressing.

Toasted slivered almonds by Eve Fox, Garden of Eating blog, copyright 2011

This hearty winter salad that eats almost like a meal. The recipe is lightly adapted from the Bon Appetit original.

Kale & Brussels Sprout Salad With Toasted Almonds & Pecorino by Eve Fox, Garden of Eating blog, copyright 2011

-- print recipe --
Brussels Sprouts & Kale Salad With Toasted Almonds & Parmesan
Serves 6-8

Ingredients

* 1/4 cup fresh lemon juice
* 2 Tbsp Dijon mustard
* 1 Tbsp minced shallot
* 1 small clove garlic, finely grated
* Sea salt and pepper
* 1/2 cup olive oil
* 1 bunch Tuscan kale, center stem discarded, leaves sliced thinly
* 12 oz. Brussels sprouts, trimmed and shredded
* 1/3 cup almonds with skins, toasted and coarsely chopped
* 1/ cup grated Pecorino, Parmesan or Romano cheese

Directions

1. Combine lemon juice, Dijon mustard, shallot, garlic, 1/2 tsp. salt, and a pinch of pepper in a small bowl. Stir to blend; set aside to let flavors meld. Mix the thinly sliced kale and shredded Brussels sprouts in a large bowl.

2. Slowly whisk remaining olive oil in cup into lemon-juice mixture. Season dressing to taste with salt and pepper. Add the dressing, cheese and almonds to the Brussels sprouts and kale mixture and toss to coat. Season lightly with salt and pepper and serve.

You might also like:
Want even more recipes, photos, giveaways, and food-related inspiration? "Like" the Garden of Eating on Facebook or follow me on Twitter.

Monday, December 19, 2011

Spiced Roasted Chickpeas

Spiced Roasted Chickpeas by Eve Fox, Garden of Eating blog, copyright 2011

As much as I enjoy them, I could probably count the number of hors d'oeuvres I've made on one hand. But we were invited to a party featuring finger foods this weekend (we've all got toddlers so this was a very practical move, as well as a yummy one) and it seemed like a good time to try making the roasted chickpeas I've been seeing recipes for all year (on The Kitchn, Kalyn's Kitchen, Mark Bittman's blog, and more.)

These are addictive so it pays to make a big batch - one can won't get you very far. I used three cans of organic garbanzo beans (I strongly suggest that you use Eden Organics as they are the only company I know of that does not use the toxic chemical BPA in the linings of their cans.) If you have time to soak and cook dried garbanzo beans, by all means, do it! You can also make more than you need and then freeze the cooked beans so you'll have them ready to go next time you need garbanzos.

Organic garbanzo beans in a BPA-free can from Eden by Eve Fox, Garden of Eating blog, copyright 2011

I made three different spice mixes -- garam masala, curry powder, and ras el hanout, a  Moroccan spice blend that typically includes cardamom, cloves, cinnamon, ground chili peppers, coriander, cumin, nutmeg, peppercorns, and turmeric. All three were tasty.

Three spice mixes by Eve Fox, Garden of Eating blog, copyright 2011

Don't skip the step of drying the beans with a towel - you want to start out with as little extra moisture as possible since you're trying to dry them out.

Drying the chickpeas by Eve Fox, Garden of Eating blog, copyright 2011

One of the recipes I read said that it's important to slip off any loose skins. I don't know if it's really true but it's easy enough to do so I did it anyway.

Slipping some loose skins off by Eve Fox, Garden of Eating blog, copyright 2011

I suspect you'll find that people end up popping these like savory candy and hailing you as a conquering hero.

Roasted chickpeas by Eve Fox, Garden of Eating blog, copyright 2011

Happy Holidays.

-- print recipe --
Spiced Roasted Chickpeas
Makes a medium-sized bowl

* 3 cans chickpeas (garbanzo beans)
* 3 Tbsp olive oil
* 1-2 large cloves of garlic, pressed (optional)
* 1 - 1 1/2 tsp ground spice (any of these would be good: garam masala, curry powder, chili powder, ground cumin, ground coriander, smoked paprika)
* Sea salt to taste
* Lime juice (optional)

Directions

1. Preheat oven to 350 F. Rinse the chickpeas well with cold water, removing any loose skins, and drain in a colander for 5 minutes. Pat them dry with a dish towel.

2. Pour them out onto a thick cookie sheet, toss with the olive oil (and garlic, if you're using that) to coat and then make sure they're in a single layer, you want them all to get equal cooking time/heat. Put them in the oven.

3. Roast, shaking the pan to ensure even cooking, one or two times, for roughly 40 minutes (they may need a little more or less time - just check!), until they begin to look lightly browned and split apart.

4. Remove from the oven and toss the hot beans with the spice mix and salt. Taste them and see if you want to adjust the seasonings at all. Serve warm or cold. You can try squirting a little lime juice on them before serving if that goes well with your spice mix.

You might also like:
For more delicious recipes, gardening ideas, foraging tips, and food-related inspiration "like" the Garden of Eating on Facebook, or follow me on Twitter and Pinterest.