RESOURCES

Friday, May 27, 2011

Grilled Pork Chops With Balsamic-Glazed Peaches

Friday, May 27, 2011

The sun has finally decided to grace us with her presence after literally weeks of rain and generally unrelieved gray gloom. I have not yet found it in my heart to completely forgive the golden orb for her horrendous desertion -- perhaps I'll rise to the occasion in another few days -- if they are sunny ones...

Despite the lingering mistrust in my heart, my mood lifted as soon as I felt the first ray of sunshine on my face. And, perhaps more importantly, my focus has shifted from comfort food to more seasonally appropriate delights, including grilling and EATING OUTSIDE!

Grilled Pork Chops & Balsamic-Glazed Peaches by Eve Fox, Garden of Eating blog, copyright 2011

I am also on a quest to put a dent in the piles of meat in our chest freezer so I decided to kill two birds with one stone by marinating some chops from a piggy that was raised on a friend's farm across the river in Rhinebeck to toss on the grill.

I decided to accompany them with some decidedly non-local but surprisingly delicious peaches that were given to me by my mom-in-law a few days ago as she headed out of town. The peaches hail from Florida but now that they're here, I don't think it would be fair to hold that against them.

The Peaches by Eve Fox, Garden of Eating blog, copyright 2011

I've wanted to try grilling peaches for years - they always look so good in the magazines, ya know? I was primarily held back by my lack of bbq grill - we only got a real one two years ago.  And by "real", I mean gas-powered -- my hat's off to those of you who like to cook with charcoal but I am lazy and almost never used our little charcoal Weber when we had it. But now we're cooking with gasoline, so to speak.

Chops & Peaches on the Grill by Eve Fox, Garden of Eating blog, copyright 2011

Unfortunately, this addition to our culinary equipage coincided neatly with the arrival of another, much more time-consuming addition, our son, Will. Needless to say, our adventures in grilling have taken a backseat to the raising of our child. But he's a big boy of two now -- walks, talks, runs, and even uses the potty sometimes -- and it's high time I grilled some f*@#ing peaches, for Christ's sake!

Grilled Pork Chops & Balsamic-Glazed Peaches by Eve Fox, Garden of Eating blog, copyright 2011

They say good things come to those who wait. And after eating these peaches (and the chops, too, of course), I am inclined to agree. I served the grilled chops and peaches with a side of quinoa and a salad of greens fresh from the garden - it was all good.

Grilled Pork Chops & Balsamic-Glazed Peaches by Eve Fox, Garden of Eating blog, copyright 2011

Hope you all enjoy the long weekend.

Grilled Marinated Pork Chops With Balsamic-Glazed Peaches
Serves 4

Ingredients

Pork Chops
* 4 good-sized, bone-in pork chops (get something you can feel good about eating - in addition to allowing you a clearer conscience, the meat will taste better, too)
* 1/2 cup olive oil
* 3/4 cup apple cider vinegar
* 1/4 cup honey or maple syrup
* 2 garlic cloves, pressed or minced
* 1 tsp kosher salt
* Few grinds black pepper
* Pinch of red pepper flakes

Peaches
* 6-8 ripe peaches
* 1 cup balsamic vinegar
* 1/4 cup molasses
* Few grinds black pepper

Directions

1. In a medium bowl, combine olive oil, vinegar, honey, garlic, salt, black pepper and pepper flakes. Whisk well to combine.

2. Add the pork chops, being sure to coat each one in marinade. Cover and put into the refrigerator and marinate for at least half an hour and up to 6 hours (turn the chops a few times to ensure that all the meat is getting equal access to your yummy marinade.)

3. While you're letting the chops marinate, rinse the peaches and cut them in half, taking care to remove any stems. Now it's time to make the glaze -- in a small saucepan over medium-high heat, bring the balsamic vinegar to a boil; reduce the heat to low and simmer until it is reduced by half, roughly 20-25 minutes. Stir in the molasses and the freshly ground black pepper. Remove from the heat and set aside.

4. Heat grill to medium high heat. Remove the pork chops from the marinade and place on the grill. Grill each pork chop for 3 minutes on each side, or until the internal temperature reaches 160 degrees. Don't be shy about checking for doneness.

5. Just before the chops are fully cooked, brush the peaches with the glaze and place the peaches on the grill cut-side down. Brush the top side of the peaches with the glaze and grill until they are lightly browned, approximately 2 minutes. Turn them over, brush the cut side with the balsamic glaze again and continue to cook for another 2 minutes.

You might also like:

Sunday, May 22, 2011

Slow-Cooked Pinto Beans With Pork Belly & Skillet Corn Bread

Sunday, May 22, 2011

Happy Day After The Rapture to y'all. The good news is that we dodged a bullet on the apocalypse, the bad news is that we're in for a looooong slog of continued wet and shitty weather.

Last week's swiss chard & barley gratin was a good start but a glance at the 10-day weather forecast for Woodstock, NY (picture 10 rainy icons with little lightning bolts on 'em) tells me it's time to get serious about the comfort food. So I'm kicking my game up a notch with this pair of recipes for slow-cooked pinto beans with pork belly and skillet corn bread.

Adding shredded pork to the beans by Eve Fox, Garden of Eating blog, copyright 2011

The inspiration for this meal comes from my mom-in-law, Liz, who is a serious devotee of the slow-cooker and also happens to be married to a native of west Texas where this sort of fare hails from. She made this wonderful meal for us a few times this winter and it was a welcome bright spot of satisfying, hearty deliciousness in those cold, dark and snowy months.

Dried pinto beans by Eve Fox, Garden of Eating blog, copyright 2011

There is something magical about the way a bunch of hard, dried beans and some pieces of fatty pork turn into a rich, savory treat with the simple additions of stock, vegetables and time.

Washing the pinto beans by Eve Fox, Garden of Eating blog, copyright 2011

I don't have a slow-cooker but I'm happy to report that these beans are equally delicious when made in a dutch oven. I did not have the forethought to soak the pinto beans overnight the day before I made this so I used the quick method (outlined below in the directions) to prepare them for cooking, instead. Turned out great!

Quick cooking the pinto beans by Eve Fox, Garden of Eating blog

Once the beans were ready, I added a very roughly chopped mirepoix of carrots, celery and onions, threw in the pork belly (which I cut into a few large chunks to ensure that the beans would get more even exposure to its delightful fatty porkiness), and a big handful of thyme sprigs from our plant. Then I covered it all with a mixture of chicken stock and water and let it stew for a good long while (we're talking many hours!)

Pork belly, pinto beans, carrots, celery, onion, garlic and herbs await stock by Eve Fox, Garden of Eating blog, copyright 2011

Once the beans were truly soft and the pork belly was falling apart, I took the chunks of pork belly out, removed the meat from the fat, threw away the hunks of fat and returned the meat to the pot of now-delicious beans for a little more cooking.

Adding shredded pork to the beans by Eve Fox, Garden of Eating blog, copyright 2011

Meanwhile, it was time to make the cornbread. It's a simple but scrumptious bread that makes a perfect foil for a soupy, savory pot of beans. The recipe is adapted from Mark Bittman's.

Pouring cornmeal by Eve Fox, Garden of Eating blog, copyright 2011

While I was mixing the batter, I placed the skillet in the oven to let it and the bacon drippings in it heat up. This is the trick to getting a nice crusty bottom on the cornbread. When the batter was ready, I removed the skillet and poured the batter in. The cold, wet batter made the most satisfying sizzle as it met the skillet's hot, fat-covered iron. Then back into the oven it went to bake.

Skillet corn bread by Eve Fox, Garden of Eating blog, copyright 2011

A mere 30 minutes later, it emerged from the oven, nicely browned and with the aforementioned crispy bottom.

Skillet corn bread by Eve Fox, Garden of Eating blog, copyright 2011

I regret that this final picture does neither the deliciousness nor the aesthetic pleasure of the meal justice. By the time we got around to eating it, we were all starving, it was dark out (my indoor lighting situation is far from ideal and I have yet to find time to remedy it) and our son was cranky, hence the less than stellar photo below. But let me assure you that the end result was truly mouth-watering.

Pinto beans with pork belly & skillet corn bread by Eve Fox, The Garden of Eating blog, copyright 2011

Try this recipe out when you can do the bulk of the cooking the day before you plan to serve it as it requires time to develop its flavors and get the pork to that tender, falling apart place.

-- print recipe --
Slow-Cooked Pinto Beans With Pork Belly
Serves 6-8

Ingredients

* 1 lb dried pinto or great northern beans
* 1 pork belly (you can also use a large ham hock)
* 1 large onion, diced
* 3 large carrots, diced
* 3 large ribs celery, diced
* 4 cloves garlic, minced or pressed
* 1 3/4 quarts sodium-free chicken broth or stock
* Handful of fresh thyme
* 1 tsp hot sauce
* 3 Tbsps molasses (pomegranate or blackstrap), honey, or sugar
* Sea salt and freshly ground black pepper to taste

Directions 

1. Prepare the beans for cooking. Sort the beans, removing any small stones, dark or oddly-shaped beans, then rinse with cool water. Place the beans in a large pot or bowl, cover with water by 2 inches, and soak for 8-12 hours or overnight. At the end of that time, discard the soaking water and rinse the beans. This last step improves cooking time and may reduce gas-causing compounds.

If you don't have all day, you can also use the "quick" prep method for the beans: sort and rinse the beans, then place them in a pot and add water to cover the beans by 3 inches. Bring to a boil,  remove from heat and allow the beans to sit for one hour, covered. Drain, rinse and cook.

2. Put the prepared beans, pork belly, carrots, onion, celery, garlic, thyme, hot sauce, molasses or honey in a large dutch oven and add the chicken broth. If the liquid does not cover the ingredients, add more stock or water to bring it up a bit more. Please note that you should not add salt until much later in the process when the beans are finished cooking as salt will prevent the beans from getting tender.

3. Cook, partially covered, on medium to low heat (you want this barely simmering) for 4-8 hours until the beans are creamy and tender and the meat from the pork belly is falling to pieces. Remove the pork belly and separate the meat from the fat, returning the meat to the pot. Season with salt and pepper to taste and make any other adjustments needed -- you may find that you want to add a splash of lime juice, hot sauce or molasses to bring the flavors in line with what you're looking for.  Cook for another 10-20 minutes to meld the flavors.

4. Serve with skillet corn bread. Enjoy!

Skillet Corn Bread
Serves 6-8

Ingredients

* 11/4 cups buttermilk, milk, or yogurt (use organic)
* 2 tablespoons bacon drippings, butter or extra virgin olive oil
* 11/2 cups medium-grind cornmeal
* 1/2 cup all-purpose flour
* 11/2 teaspoons baking powder
* 1 teaspoon salt
* 1-2 tablespoons molasses or honey (you can use more if you like sweet corn bread)
* 1 egg (use organic, pasture-raised)

Directions 

1. Preheat the oven to 375°F.

2. Place the skillet in the oven while you mix the ingredients to allow time for the bacon drippings (or butter or oil) to heat up.

3. Combine the dry ingredients in a bowl. Mix the egg into the buttermilk. Stir the liquid into the dry ingredients (just enough to combine); if it seems too dry, add another tablespoon or two of buttermilk. Pour the batter into the prepared skillet or pan, smooth out the top if necessary, and put in the oven.

4. Bake about 30 minutes, until the top is lightly browned and the sides have pulled away from the pan; a toothpick inserted into the center will come out clean. Serve hot or warm.

You might also like:
Or check out these delicious-looking bean recipes from some of my favorite blogs:
For more delicious recipes, gardening ideas, foraging tips, and food-related inspiration "like" the Garden of Eating on Facebook, or follow me on Twitter and Pinterest.

Tuesday, May 17, 2011

Swiss Chard & Barley Gratin

Tuesday, May 17, 2011

Swiss Chard & Barley Gratin by Eve Fox, Garden of Eating blog, copyright 2011

After a few, all-too-brief days of glorious blue skies, sunshine and warm breezes, it has been raining for the past five days straight. And, if we are to believe the weather forecast (even though that's often a foolish thing to do), we're in for more of the same for the foreseeable future. Blech.

Unfortunately, I am not blessed with the "sunniest" of dispositions and when it is gray out for days on end (or, to be honest, even just a few hours), I begin to feel tired, cranky and a tad despairing. One way I've found to beat the rainy day week blues is to cook something really delicious and cozy. So when Sunday dawned just as gray, wet and depressing as the previous few days had been, I decided to try out a variation on this delicious, hearty barley and greens gratin that I'd spotted in the New York Times' Recipes for Health column earlier in the week.

Eggs Hiding In The Cream by Eve Fox, Garden of Eating blog, copyright 2011

As usual, I took Martha Rose Schulman's excellent, health-conscious recipe and made it a little less healthy by substituting cream for her 2% milk (though I think my version is still pretty good for you.)

I was primarily drawn to this recipe by the barley - it sounds so filling and unpretentious. I can imagine a big, bustling family of French peasants devouring this dish with gusto after hours in the fields, n'est-ce pas?

Rinsing the Barley by Eve Fox, Garden of Eating blog, copyright 2011

I was also glad to have a chance to use some of our fresh thyme. I finally moved our plant outside last week after a long winter indoors and it seems to like this endless rain. At least one of us is happy...

Our Thyme Plant by Eve Fox, Garden of Eating blog, copyright 2011

I substituted Swiss Chard for the beet greens since I did not feel like dealing with beets and also found the thought of chard's brilliant greenery appealing.

Swiss Chard by Eve Fox, Garden of Eating blog, copyright 2011

I served this for lunch along with a green salad topped with roasted beets, a nice crumbly sheep's milk feta cheese, and sliced cucumbers. It did the trick. I am REALLY hoping that the sun comes out soon, though!

Swiss Chard & Barley Gratin by Eve Fox, Garden of Eating blog, copyright 2011

-- print recipe --
Swiss Chard & Barley Gratin
Serves 4-6

Ingredients

* 1 generous bunch Swiss chard (or beet greens or spinach or kale), washed and dried with the ribs removed (chop the ribs and set them aside)
* 2 tablespoons extra virgin olive oil
* 1 large onion, chopped
* 4 large cloves garlic, peeled and sliced or pressed
* Salt to taste
* 1 teaspoon fresh thyme leaves or 1/2 teaspoon dried thyme
* 3 eggs (use organic, free range)
* 1/2 cup half and half or whole milk (use organic, grass-fed, if you can get it)
* 2 Tbsp Worcestershire sauce
* 1 tsp Dijon mustard
* Freshly ground pepper
* 1 cup cooked barley (regular pearled or purple), brown rice or arborio rice
* 1/2 cup grated Gruyère cheese (2 ounces)
* 2 tablespoons freshly grated Parmesan

Directions

1. Preheat the oven to 375 degrees. Grease a 2-quart gratin dish with butter or olive oil. Steam the chard leaves or other greens over 1 inch of boiling water for two to five minutes until wilted and tender. Rinse with cold water, squeeze out water and chop medium-fine. Set aside.

2. Heat the oil over medium heat in a large, heavy skillet. Add the onion and cook, stirring, until tender, about five minutes. Add the garlic, the chopped chard ribs and a generous pinch of salt. Continue to cook for another minute or two until the garlic is fragrant. Stir in the cooked greens and the thyme, and toss together. Season to taste with salt and pepper. Remove from the heat.

3. In a large bowl, beat together the eggs and milk. Add the mustard, Worcestershire sauce, 1/2 teaspoon salt and freshly ground pepper to taste. Stir in the greens mixture, the barley or rice, and the cheeses. Mix together well. Scrape into the oiled baking dish.

4. Bake 35 to 40 minutes until sizzling and lightly browned on the top and sides. Remove from the heat, and allow to sit for at least 10 minutes before serving.

You might also like:
For more delicious recipes, gardening ideas, foraging tips, and food-related inspiration "like" the Garden of Eating on Facebook, or follow me on Twitter and Pinterest.

Sunday, May 15, 2011

Lemon Aioli, Roasted Beets, Asparagus & Oven Fries - An Homage To Spring

Sunday, May 15, 2011

The first time I tried to make aioli (a.k.a. garlic mayonnaise), a couple of years ago, the mixture never thickened. I was left with a big, messy bowl of soupy, garlic-flavored egg yolk and oil and a heavy feeling of failure. But that earlier defeat only heightened my sense of triumph at creating a truly delicious, perfectly balanced, lemon aioli last weekend!

Roasted beets & asparagus with lemon aioli by Eve Fox, Garden of Eating blog, copyright 2011

I had always suspected that my first attempt failed because I had not drizzled the oil in slowly enough to allow for the emulsion to form properly so this time I made sure to pour the oil into the food processor in a tiny, steady stream. Et voilà, a mere three minutes later -- a lovely bowl of golden deliciousness.

I had planned to roast some beets and potatoes to dip in this dangerously addictive sauce and decided at the last minute to steam some asparagus, too, since the local offerings have been so tasty these last few weeks - my little way of tipping my hat to spring.

Perfect oven fries by Eve Fox, Garden of Eating blog, copyright 2011

The combination of the sweet, earthy beets, crispy, salty potatoes and the fresh umami (which is Japanese for "pleasant savory taste") of the asparagus with the lemon aioli is, well, awesome.

Roasted beets & asparagus with lemon aioli by Eve Fox, Garden of Eating blog, copyright 2011

While none of these components is particularly time-consuming or challenging to assemble, there is a fair amount of slicing and dicing involved, as well as some roasting time. But you could easily just do one or two of the veggies with the aioli if you're in a rush.

Happy spring!

-- print recipe --
Lemon Aioli With Roasted Beets, Perfect Oven Fries & Steamed Asparagus
Serves 4-6

Ingredients
  • 2-3 large beets, scrubbed, tops and tails removed
  • 3 large or 4 medium potatoes, preferably russets, scrubbed
  • 1 bunch asparagus, washed and with woody ends snapped off
For the aioli:
  • 1 lemon (preferably, organic, since you'll be using the zest- also, if you have a Meyer lemon on hand, use that, it will be delicious!)
  • 1 tsp Dijon mustard
  • 1 cup good quality olive oil (use organic)
  • 2 large egg yolks (use organic, free range eggs)
  • 2 large garlic cloves, peeled and cut into rough chunks
  • Sea salt to taste (you'll probably want to use around 1/2 tsp)
  • Freshly ground white or black pepper to taste
Directions

1.  Begin by roasting the beets. Preheat the oven to 450°F. Place the scrubbed, trimmed beets in a generous pouch of tinfoil, drizzle them with olive oil and fold the foil over them to form a neat, enclosed little package. Place the package on a baking sheet (preferably one you do not care overmuch about as it may end up getting some charred beet juice baked on to it -- another reason not to skimp with the tinfoil - I actually used two layers this time around), place it on the rack and bake for 40-60 minutes, until the beets are tender when poked with a fork. When they're done, remove them from the oven and allow them to cool, then slip the skins off with your fingers or a knife and slice them into rounds (or whatever shape appeals to you.)

Scrubbing the beets before roasting by Eve Fox, Garden of Eating blog, copyright 2011

2. Once the beets are in the oven, it's time to turn your attention to the oven fries. Follow this recipe - it's from Cook's Illustrated and it never fails to produce the most perfect oven fries you could imagine.

Oven fries roasting by Eve Fox, Garden of Eating blog, copyright 2011

3. Now it's time to make the aioli. Zest the lemon and then juice it, placing both the zest and juice in the bowl of a food processor.

Lemon Zest By Eve Fox, Garden of Eating blog, copyright 2011

Toss the garlic cloves, mustard and egg yolks into the bowl of the food processor and process until smooth. With the motor running, begin to pour in the oil in a steady, thin stream -- resist the temptation to pour it in quickly -- the slow, steady addition is essential to allowing the emulsion to form. Continue to pour until all the oil has been added. You should see the mixture "gel" and become mayo-like during the process. Add white pepper and salt to taste and pulse a few times to incorporate the seasonings. Remove the aioli from the bowl, place it in a glass container with an airtight lid and put it in the fridge while you get the rest of the meal ready.

Roasted beets & asparagus with lemon aioli by Eve Fox, Garden of Eating blog, copyright 2011

* Please note that since aioli contains raw egg so you should not feed it to infants, the elderly or anyone with a compromised immune system due to the risk of salmonella. Also, you should keep it refrigerated and plan to use it up quickly.

4. Place an inch or two of water in the bottom of a steamer pot and bring to a boil. Add the asparagus (heads up) to the pot and steam for 2-3 minutes, just until bright green and slightly tender. While they're steaming, prepare a bowl of ice water that is large enough to hold all the asparagus. Once the asparagus are done, remove them from the steamer and plunge them into the bowl of ice water to stop the cooking. Then drain and gently pat dry with a kitchen towel.

Asparagus Spears Drying by Eve Fox, Garden of Eating blog, copyright 2011

5. Arrange the oven fries, beet slices and asparagus spears on a platter and serve with the lemon aioli.

You might also like:
For more delicious recipes, gardening ideas, foraging tips, and food-related inspiration "like" the Garden of Eating on Facebook, or follow me on Twitter and Pinterest.

Wednesday, May 4, 2011

Good News - More Farms Are "Hoofin' It"

Wednesday, May 4, 2011

Just saw this short piece in the New York Times about a growing trend among small farms - more and more of them are using animal power in place of tractors and other oil-powered machines.
Rich Ciotola with the team of young oxen he works with in Sheffield, Mass. Photo by Jennifer May, courtesy of The New York Times web site.
It looks like Kristin Kimball, author of The Dirty Life (a great new read - my review is here) and her husband, Mark of Essex Farm are in good company. They use draft horses to work their 100-acre organic farm in New York's northcountry.

Animal power has some distinct advantages to oil-powered machines for small-scale farming:
  • They don't require costly, environment-polluting fossil fuels;
  • They never need spare parts;
  • They are literally lighter on the land than machines are - instead of leaving deep ruts of dense-packed soil behind them, the hooves of horses and oxen actually aerate the soil and do not damage the all-important layers of fertile microbes in the dirt;
  • They also provide free fertilizer!; and
  • They're better company than a tractor.
Demand for instruction on how to train and work with draft animals is soaring as young farmers look to a 7,000-year-old practice to help make their farms as modern as possible.

Draft power is spreading! Read more on the NYTimes.com site.

Friday, May 27, 2011

Grilled Pork Chops With Balsamic-Glazed Peaches

The sun has finally decided to grace us with her presence after literally weeks of rain and generally unrelieved gray gloom. I have not yet found it in my heart to completely forgive the golden orb for her horrendous desertion -- perhaps I'll rise to the occasion in another few days -- if they are sunny ones...

Despite the lingering mistrust in my heart, my mood lifted as soon as I felt the first ray of sunshine on my face. And, perhaps more importantly, my focus has shifted from comfort food to more seasonally appropriate delights, including grilling and EATING OUTSIDE!

Grilled Pork Chops & Balsamic-Glazed Peaches by Eve Fox, Garden of Eating blog, copyright 2011

I am also on a quest to put a dent in the piles of meat in our chest freezer so I decided to kill two birds with one stone by marinating some chops from a piggy that was raised on a friend's farm across the river in Rhinebeck to toss on the grill.

I decided to accompany them with some decidedly non-local but surprisingly delicious peaches that were given to me by my mom-in-law a few days ago as she headed out of town. The peaches hail from Florida but now that they're here, I don't think it would be fair to hold that against them.

The Peaches by Eve Fox, Garden of Eating blog, copyright 2011

I've wanted to try grilling peaches for years - they always look so good in the magazines, ya know? I was primarily held back by my lack of bbq grill - we only got a real one two years ago.  And by "real", I mean gas-powered -- my hat's off to those of you who like to cook with charcoal but I am lazy and almost never used our little charcoal Weber when we had it. But now we're cooking with gasoline, so to speak.

Chops & Peaches on the Grill by Eve Fox, Garden of Eating blog, copyright 2011

Unfortunately, this addition to our culinary equipage coincided neatly with the arrival of another, much more time-consuming addition, our son, Will. Needless to say, our adventures in grilling have taken a backseat to the raising of our child. But he's a big boy of two now -- walks, talks, runs, and even uses the potty sometimes -- and it's high time I grilled some f*@#ing peaches, for Christ's sake!

Grilled Pork Chops & Balsamic-Glazed Peaches by Eve Fox, Garden of Eating blog, copyright 2011

They say good things come to those who wait. And after eating these peaches (and the chops, too, of course), I am inclined to agree. I served the grilled chops and peaches with a side of quinoa and a salad of greens fresh from the garden - it was all good.

Grilled Pork Chops & Balsamic-Glazed Peaches by Eve Fox, Garden of Eating blog, copyright 2011

Hope you all enjoy the long weekend.

Grilled Marinated Pork Chops With Balsamic-Glazed Peaches
Serves 4

Ingredients

Pork Chops
* 4 good-sized, bone-in pork chops (get something you can feel good about eating - in addition to allowing you a clearer conscience, the meat will taste better, too)
* 1/2 cup olive oil
* 3/4 cup apple cider vinegar
* 1/4 cup honey or maple syrup
* 2 garlic cloves, pressed or minced
* 1 tsp kosher salt
* Few grinds black pepper
* Pinch of red pepper flakes

Peaches
* 6-8 ripe peaches
* 1 cup balsamic vinegar
* 1/4 cup molasses
* Few grinds black pepper

Directions

1. In a medium bowl, combine olive oil, vinegar, honey, garlic, salt, black pepper and pepper flakes. Whisk well to combine.

2. Add the pork chops, being sure to coat each one in marinade. Cover and put into the refrigerator and marinate for at least half an hour and up to 6 hours (turn the chops a few times to ensure that all the meat is getting equal access to your yummy marinade.)

3. While you're letting the chops marinate, rinse the peaches and cut them in half, taking care to remove any stems. Now it's time to make the glaze -- in a small saucepan over medium-high heat, bring the balsamic vinegar to a boil; reduce the heat to low and simmer until it is reduced by half, roughly 20-25 minutes. Stir in the molasses and the freshly ground black pepper. Remove from the heat and set aside.

4. Heat grill to medium high heat. Remove the pork chops from the marinade and place on the grill. Grill each pork chop for 3 minutes on each side, or until the internal temperature reaches 160 degrees. Don't be shy about checking for doneness.

5. Just before the chops are fully cooked, brush the peaches with the glaze and place the peaches on the grill cut-side down. Brush the top side of the peaches with the glaze and grill until they are lightly browned, approximately 2 minutes. Turn them over, brush the cut side with the balsamic glaze again and continue to cook for another 2 minutes.

You might also like:
Sunday, May 22, 2011

Slow-Cooked Pinto Beans With Pork Belly & Skillet Corn Bread

Happy Day After The Rapture to y'all. The good news is that we dodged a bullet on the apocalypse, the bad news is that we're in for a looooong slog of continued wet and shitty weather.

Last week's swiss chard & barley gratin was a good start but a glance at the 10-day weather forecast for Woodstock, NY (picture 10 rainy icons with little lightning bolts on 'em) tells me it's time to get serious about the comfort food. So I'm kicking my game up a notch with this pair of recipes for slow-cooked pinto beans with pork belly and skillet corn bread.

Adding shredded pork to the beans by Eve Fox, Garden of Eating blog, copyright 2011

The inspiration for this meal comes from my mom-in-law, Liz, who is a serious devotee of the slow-cooker and also happens to be married to a native of west Texas where this sort of fare hails from. She made this wonderful meal for us a few times this winter and it was a welcome bright spot of satisfying, hearty deliciousness in those cold, dark and snowy months.

Dried pinto beans by Eve Fox, Garden of Eating blog, copyright 2011

There is something magical about the way a bunch of hard, dried beans and some pieces of fatty pork turn into a rich, savory treat with the simple additions of stock, vegetables and time.

Washing the pinto beans by Eve Fox, Garden of Eating blog, copyright 2011

I don't have a slow-cooker but I'm happy to report that these beans are equally delicious when made in a dutch oven. I did not have the forethought to soak the pinto beans overnight the day before I made this so I used the quick method (outlined below in the directions) to prepare them for cooking, instead. Turned out great!

Quick cooking the pinto beans by Eve Fox, Garden of Eating blog

Once the beans were ready, I added a very roughly chopped mirepoix of carrots, celery and onions, threw in the pork belly (which I cut into a few large chunks to ensure that the beans would get more even exposure to its delightful fatty porkiness), and a big handful of thyme sprigs from our plant. Then I covered it all with a mixture of chicken stock and water and let it stew for a good long while (we're talking many hours!)

Pork belly, pinto beans, carrots, celery, onion, garlic and herbs await stock by Eve Fox, Garden of Eating blog, copyright 2011

Once the beans were truly soft and the pork belly was falling apart, I took the chunks of pork belly out, removed the meat from the fat, threw away the hunks of fat and returned the meat to the pot of now-delicious beans for a little more cooking.

Adding shredded pork to the beans by Eve Fox, Garden of Eating blog, copyright 2011

Meanwhile, it was time to make the cornbread. It's a simple but scrumptious bread that makes a perfect foil for a soupy, savory pot of beans. The recipe is adapted from Mark Bittman's.

Pouring cornmeal by Eve Fox, Garden of Eating blog, copyright 2011

While I was mixing the batter, I placed the skillet in the oven to let it and the bacon drippings in it heat up. This is the trick to getting a nice crusty bottom on the cornbread. When the batter was ready, I removed the skillet and poured the batter in. The cold, wet batter made the most satisfying sizzle as it met the skillet's hot, fat-covered iron. Then back into the oven it went to bake.

Skillet corn bread by Eve Fox, Garden of Eating blog, copyright 2011

A mere 30 minutes later, it emerged from the oven, nicely browned and with the aforementioned crispy bottom.

Skillet corn bread by Eve Fox, Garden of Eating blog, copyright 2011

I regret that this final picture does neither the deliciousness nor the aesthetic pleasure of the meal justice. By the time we got around to eating it, we were all starving, it was dark out (my indoor lighting situation is far from ideal and I have yet to find time to remedy it) and our son was cranky, hence the less than stellar photo below. But let me assure you that the end result was truly mouth-watering.

Pinto beans with pork belly & skillet corn bread by Eve Fox, The Garden of Eating blog, copyright 2011

Try this recipe out when you can do the bulk of the cooking the day before you plan to serve it as it requires time to develop its flavors and get the pork to that tender, falling apart place.

-- print recipe --
Slow-Cooked Pinto Beans With Pork Belly
Serves 6-8

Ingredients

* 1 lb dried pinto or great northern beans
* 1 pork belly (you can also use a large ham hock)
* 1 large onion, diced
* 3 large carrots, diced
* 3 large ribs celery, diced
* 4 cloves garlic, minced or pressed
* 1 3/4 quarts sodium-free chicken broth or stock
* Handful of fresh thyme
* 1 tsp hot sauce
* 3 Tbsps molasses (pomegranate or blackstrap), honey, or sugar
* Sea salt and freshly ground black pepper to taste

Directions 

1. Prepare the beans for cooking. Sort the beans, removing any small stones, dark or oddly-shaped beans, then rinse with cool water. Place the beans in a large pot or bowl, cover with water by 2 inches, and soak for 8-12 hours or overnight. At the end of that time, discard the soaking water and rinse the beans. This last step improves cooking time and may reduce gas-causing compounds.

If you don't have all day, you can also use the "quick" prep method for the beans: sort and rinse the beans, then place them in a pot and add water to cover the beans by 3 inches. Bring to a boil,  remove from heat and allow the beans to sit for one hour, covered. Drain, rinse and cook.

2. Put the prepared beans, pork belly, carrots, onion, celery, garlic, thyme, hot sauce, molasses or honey in a large dutch oven and add the chicken broth. If the liquid does not cover the ingredients, add more stock or water to bring it up a bit more. Please note that you should not add salt until much later in the process when the beans are finished cooking as salt will prevent the beans from getting tender.

3. Cook, partially covered, on medium to low heat (you want this barely simmering) for 4-8 hours until the beans are creamy and tender and the meat from the pork belly is falling to pieces. Remove the pork belly and separate the meat from the fat, returning the meat to the pot. Season with salt and pepper to taste and make any other adjustments needed -- you may find that you want to add a splash of lime juice, hot sauce or molasses to bring the flavors in line with what you're looking for.  Cook for another 10-20 minutes to meld the flavors.

4. Serve with skillet corn bread. Enjoy!

Skillet Corn Bread
Serves 6-8

Ingredients

* 11/4 cups buttermilk, milk, or yogurt (use organic)
* 2 tablespoons bacon drippings, butter or extra virgin olive oil
* 11/2 cups medium-grind cornmeal
* 1/2 cup all-purpose flour
* 11/2 teaspoons baking powder
* 1 teaspoon salt
* 1-2 tablespoons molasses or honey (you can use more if you like sweet corn bread)
* 1 egg (use organic, pasture-raised)

Directions 

1. Preheat the oven to 375°F.

2. Place the skillet in the oven while you mix the ingredients to allow time for the bacon drippings (or butter or oil) to heat up.

3. Combine the dry ingredients in a bowl. Mix the egg into the buttermilk. Stir the liquid into the dry ingredients (just enough to combine); if it seems too dry, add another tablespoon or two of buttermilk. Pour the batter into the prepared skillet or pan, smooth out the top if necessary, and put in the oven.

4. Bake about 30 minutes, until the top is lightly browned and the sides have pulled away from the pan; a toothpick inserted into the center will come out clean. Serve hot or warm.

You might also like:
Or check out these delicious-looking bean recipes from some of my favorite blogs:
For more delicious recipes, gardening ideas, foraging tips, and food-related inspiration "like" the Garden of Eating on Facebook, or follow me on Twitter and Pinterest.

Tuesday, May 17, 2011

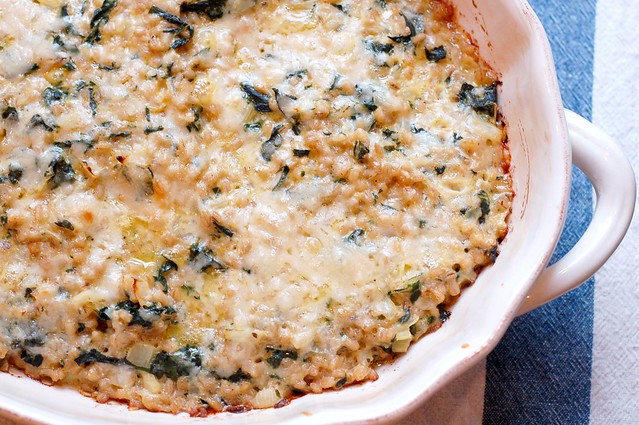
Swiss Chard & Barley Gratin

Swiss Chard & Barley Gratin by Eve Fox, Garden of Eating blog, copyright 2011

After a few, all-too-brief days of glorious blue skies, sunshine and warm breezes, it has been raining for the past five days straight. And, if we are to believe the weather forecast (even though that's often a foolish thing to do), we're in for more of the same for the foreseeable future. Blech.

Unfortunately, I am not blessed with the "sunniest" of dispositions and when it is gray out for days on end (or, to be honest, even just a few hours), I begin to feel tired, cranky and a tad despairing. One way I've found to beat the rainy day week blues is to cook something really delicious and cozy. So when Sunday dawned just as gray, wet and depressing as the previous few days had been, I decided to try out a variation on this delicious, hearty barley and greens gratin that I'd spotted in the New York Times' Recipes for Health column earlier in the week.

Eggs Hiding In The Cream by Eve Fox, Garden of Eating blog, copyright 2011

As usual, I took Martha Rose Schulman's excellent, health-conscious recipe and made it a little less healthy by substituting cream for her 2% milk (though I think my version is still pretty good for you.)

I was primarily drawn to this recipe by the barley - it sounds so filling and unpretentious. I can imagine a big, bustling family of French peasants devouring this dish with gusto after hours in the fields, n'est-ce pas?

Rinsing the Barley by Eve Fox, Garden of Eating blog, copyright 2011

I was also glad to have a chance to use some of our fresh thyme. I finally moved our plant outside last week after a long winter indoors and it seems to like this endless rain. At least one of us is happy...

Our Thyme Plant by Eve Fox, Garden of Eating blog, copyright 2011

I substituted Swiss Chard for the beet greens since I did not feel like dealing with beets and also found the thought of chard's brilliant greenery appealing.

Swiss Chard by Eve Fox, Garden of Eating blog, copyright 2011

I served this for lunch along with a green salad topped with roasted beets, a nice crumbly sheep's milk feta cheese, and sliced cucumbers. It did the trick. I am REALLY hoping that the sun comes out soon, though!

Swiss Chard & Barley Gratin by Eve Fox, Garden of Eating blog, copyright 2011

-- print recipe --
Swiss Chard & Barley Gratin
Serves 4-6

Ingredients

* 1 generous bunch Swiss chard (or beet greens or spinach or kale), washed and dried with the ribs removed (chop the ribs and set them aside)
* 2 tablespoons extra virgin olive oil
* 1 large onion, chopped
* 4 large cloves garlic, peeled and sliced or pressed
* Salt to taste
* 1 teaspoon fresh thyme leaves or 1/2 teaspoon dried thyme
* 3 eggs (use organic, free range)
* 1/2 cup half and half or whole milk (use organic, grass-fed, if you can get it)
* 2 Tbsp Worcestershire sauce
* 1 tsp Dijon mustard
* Freshly ground pepper
* 1 cup cooked barley (regular pearled or purple), brown rice or arborio rice
* 1/2 cup grated Gruyère cheese (2 ounces)
* 2 tablespoons freshly grated Parmesan

Directions

1. Preheat the oven to 375 degrees. Grease a 2-quart gratin dish with butter or olive oil. Steam the chard leaves or other greens over 1 inch of boiling water for two to five minutes until wilted and tender. Rinse with cold water, squeeze out water and chop medium-fine. Set aside.

2. Heat the oil over medium heat in a large, heavy skillet. Add the onion and cook, stirring, until tender, about five minutes. Add the garlic, the chopped chard ribs and a generous pinch of salt. Continue to cook for another minute or two until the garlic is fragrant. Stir in the cooked greens and the thyme, and toss together. Season to taste with salt and pepper. Remove from the heat.

3. In a large bowl, beat together the eggs and milk. Add the mustard, Worcestershire sauce, 1/2 teaspoon salt and freshly ground pepper to taste. Stir in the greens mixture, the barley or rice, and the cheeses. Mix together well. Scrape into the oiled baking dish.

4. Bake 35 to 40 minutes until sizzling and lightly browned on the top and sides. Remove from the heat, and allow to sit for at least 10 minutes before serving.

You might also like:
For more delicious recipes, gardening ideas, foraging tips, and food-related inspiration "like" the Garden of Eating on Facebook, or follow me on Twitter and Pinterest.

Sunday, May 15, 2011

Lemon Aioli, Roasted Beets, Asparagus & Oven Fries - An Homage To Spring

The first time I tried to make aioli (a.k.a. garlic mayonnaise), a couple of years ago, the mixture never thickened. I was left with a big, messy bowl of soupy, garlic-flavored egg yolk and oil and a heavy feeling of failure. But that earlier defeat only heightened my sense of triumph at creating a truly delicious, perfectly balanced, lemon aioli last weekend!

Roasted beets & asparagus with lemon aioli by Eve Fox, Garden of Eating blog, copyright 2011

I had always suspected that my first attempt failed because I had not drizzled the oil in slowly enough to allow for the emulsion to form properly so this time I made sure to pour the oil into the food processor in a tiny, steady stream. Et voilà, a mere three minutes later -- a lovely bowl of golden deliciousness.

I had planned to roast some beets and potatoes to dip in this dangerously addictive sauce and decided at the last minute to steam some asparagus, too, since the local offerings have been so tasty these last few weeks - my little way of tipping my hat to spring.

Perfect oven fries by Eve Fox, Garden of Eating blog, copyright 2011

The combination of the sweet, earthy beets, crispy, salty potatoes and the fresh umami (which is Japanese for "pleasant savory taste") of the asparagus with the lemon aioli is, well, awesome.

Roasted beets & asparagus with lemon aioli by Eve Fox, Garden of Eating blog, copyright 2011

While none of these components is particularly time-consuming or challenging to assemble, there is a fair amount of slicing and dicing involved, as well as some roasting time. But you could easily just do one or two of the veggies with the aioli if you're in a rush.

Happy spring!

-- print recipe --
Lemon Aioli With Roasted Beets, Perfect Oven Fries & Steamed Asparagus
Serves 4-6

Ingredients
  • 2-3 large beets, scrubbed, tops and tails removed
  • 3 large or 4 medium potatoes, preferably russets, scrubbed
  • 1 bunch asparagus, washed and with woody ends snapped off
For the aioli:
  • 1 lemon (preferably, organic, since you'll be using the zest- also, if you have a Meyer lemon on hand, use that, it will be delicious!)
  • 1 tsp Dijon mustard
  • 1 cup good quality olive oil (use organic)
  • 2 large egg yolks (use organic, free range eggs)
  • 2 large garlic cloves, peeled and cut into rough chunks
  • Sea salt to taste (you'll probably want to use around 1/2 tsp)
  • Freshly ground white or black pepper to taste
Directions

1.  Begin by roasting the beets. Preheat the oven to 450°F. Place the scrubbed, trimmed beets in a generous pouch of tinfoil, drizzle them with olive oil and fold the foil over them to form a neat, enclosed little package. Place the package on a baking sheet (preferably one you do not care overmuch about as it may end up getting some charred beet juice baked on to it -- another reason not to skimp with the tinfoil - I actually used two layers this time around), place it on the rack and bake for 40-60 minutes, until the beets are tender when poked with a fork. When they're done, remove them from the oven and allow them to cool, then slip the skins off with your fingers or a knife and slice them into rounds (or whatever shape appeals to you.)

Scrubbing the beets before roasting by Eve Fox, Garden of Eating blog, copyright 2011

2. Once the beets are in the oven, it's time to turn your attention to the oven fries. Follow this recipe - it's from Cook's Illustrated and it never fails to produce the most perfect oven fries you could imagine.

Oven fries roasting by Eve Fox, Garden of Eating blog, copyright 2011

3. Now it's time to make the aioli. Zest the lemon and then juice it, placing both the zest and juice in the bowl of a food processor.

Lemon Zest By Eve Fox, Garden of Eating blog, copyright 2011

Toss the garlic cloves, mustard and egg yolks into the bowl of the food processor and process until smooth. With the motor running, begin to pour in the oil in a steady, thin stream -- resist the temptation to pour it in quickly -- the slow, steady addition is essential to allowing the emulsion to form. Continue to pour until all the oil has been added. You should see the mixture "gel" and become mayo-like during the process. Add white pepper and salt to taste and pulse a few times to incorporate the seasonings. Remove the aioli from the bowl, place it in a glass container with an airtight lid and put it in the fridge while you get the rest of the meal ready.

Roasted beets & asparagus with lemon aioli by Eve Fox, Garden of Eating blog, copyright 2011

* Please note that since aioli contains raw egg so you should not feed it to infants, the elderly or anyone with a compromised immune system due to the risk of salmonella. Also, you should keep it refrigerated and plan to use it up quickly.

4. Place an inch or two of water in the bottom of a steamer pot and bring to a boil. Add the asparagus (heads up) to the pot and steam for 2-3 minutes, just until bright green and slightly tender. While they're steaming, prepare a bowl of ice water that is large enough to hold all the asparagus. Once the asparagus are done, remove them from the steamer and plunge them into the bowl of ice water to stop the cooking. Then drain and gently pat dry with a kitchen towel.

Asparagus Spears Drying by Eve Fox, Garden of Eating blog, copyright 2011

5. Arrange the oven fries, beet slices and asparagus spears on a platter and serve with the lemon aioli.

You might also like:
For more delicious recipes, gardening ideas, foraging tips, and food-related inspiration "like" the Garden of Eating on Facebook, or follow me on Twitter and Pinterest.

Wednesday, May 4, 2011

Good News - More Farms Are "Hoofin' It"

Just saw this short piece in the New York Times about a growing trend among small farms - more and more of them are using animal power in place of tractors and other oil-powered machines.
Rich Ciotola with the team of young oxen he works with in Sheffield, Mass. Photo by Jennifer May, courtesy of The New York Times web site.
It looks like Kristin Kimball, author of The Dirty Life (a great new read - my review is here) and her husband, Mark of Essex Farm are in good company. They use draft horses to work their 100-acre organic farm in New York's northcountry.

Animal power has some distinct advantages to oil-powered machines for small-scale farming:
  • They don't require costly, environment-polluting fossil fuels;
  • They never need spare parts;
  • They are literally lighter on the land than machines are - instead of leaving deep ruts of dense-packed soil behind them, the hooves of horses and oxen actually aerate the soil and do not damage the all-important layers of fertile microbes in the dirt;
  • They also provide free fertilizer!; and
  • They're better company than a tractor.
Demand for instruction on how to train and work with draft animals is soaring as young farmers look to a 7,000-year-old practice to help make their farms as modern as possible.

Draft power is spreading! Read more on the NYTimes.com site.